HP LaserJet M9059 HP LaserJet M9059 MFP - User Guide - Page 199
Clear jams from the duplexer, WARNING
 |
View all HP LaserJet M9059 manuals
Add to My Manuals
Save this manual to your list of manuals |
Page 199 highlights
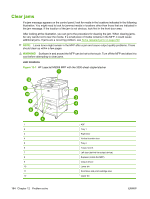
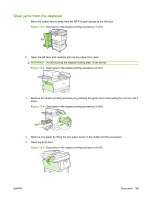
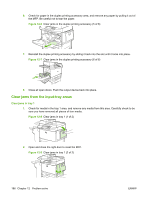
Clear jams from the duplexer 1. Move the output device away from the MFP to gain access to the left door. Figure 12-2 Clear jams in the duplex printing accessory (1 of 6) 2. Open the left door and carefully pull out any paper from area. WARNING! Avoid touching the adjacent fusing area. It can be hot. Figure 12-3 Clear jams in the duplex printing accessory (2 of 6) 3. Remove the duplex printing accessory by pressing the green lever and pulling the unit out until it stops. Figure 12-4 Clear jams in the duplex printing accessory (3 of 6) 4. Remove any paper by lifting the two green levers in the duplex printing accessory. 5. Open the front door. Figure 12-5 Clear jams in the duplex printing accessory (4 of 6) ENWW Clear jams 185
-
 1
1 -
2
-
3
-
4
-
5
-
6
-
7
-
8
-
9
-
10
-
11
-
12
-
13
-
14
-
15
-
16
-
17
-
18
-
19
-
20
-
21
-
22
-
23
-
24
-
25
-
26
-
27
-
28
-
29
-
30
-
31
-
32
-
33
-
34
-
35
-
36
-
37
-
38
-
39
-
40
-
41
-
42
-
43
-
44
-
45
-
46
-
47
-
48
-
49
-
50
-
51
-
52
-
53
-
54
-
55
-
56
-
57
-
58
-
59
-
60
-
61
-
62
-
63
-
64
-
65
-
66
-
67
-
68
-
69
-
70
-
71
-
72
-
73
-
74
-
75
-
76
-
77
-
78
-
79
-
80
-
81
-
82
-
83
-
84
-
85
-
86
-
87
-
88
-
89
-
90
-
91
-
92
-
93
-
94
-
95
-
96
-
97
-
98
-
99
-
100
-
101
-
102
-
103
-
104
-
105
-
106
-
107
-
108
-
109
-
110
-
111
-
112
-
113
-
114
-
115
-
116
-
117
-
118
-
119
-
120
-
121
-
122
-
123
-
124
-
125
-
126
-
127
-
128
-
129
-
130
-
131
-
132
-
133
-
134
-
135
-
136
-
137
-
138
-
139
-
140
-
141
-
142
-
143
-
144
-
145
-
146
-
147
-
148
-
149
-
150
-
151
-
152
-
153
-
154
-
155
-
156
-
157
-
158
-
159
-
160
-
161
-
162
-
163
-
164
-
165
-
166
-
167
-
168
-
169
-
170
-
171
-
172
-
173
-
174
-
175
-
176
-
177
-
178
-
179
-
180
-
181
-
182
-
183
-
184
-
185
-
186
-
187
-
188
-
189
-
190
-
191
-
192
-
193
-
 194
194 -
 195
195 -
 196
196 -
 197
197 -
 198
198 -
 199
199 -
 200
200 -
 201
201 -
 202
202 -
 203
203 -
 204
204 -
205
-
206
-
207
-
208
-
209
-
210
-
211
-
212
-
213
-
214
-
215
-
216
-
217
-
218
-
219
-
220
-
221
-
222
-
223
-
224
-
225
-
226
-
227
-
228
-
229
-
230
-
231
-
232
-
233
-
234
-
235
-
236
-
237
-
238
-
239
-
240
-
241
-
242
-
243
-
244
-
245
-
246
-
247
-
248
-
249
-
250
-
251
-
252
-
253
-
254
-
255
-
256
-
257
-
258
-
259
-
260
-
261
-
262
-
263
-
264
-
265
-
266
-
267
-
268
-
269
-
270
-
271
-
272
 |
 |
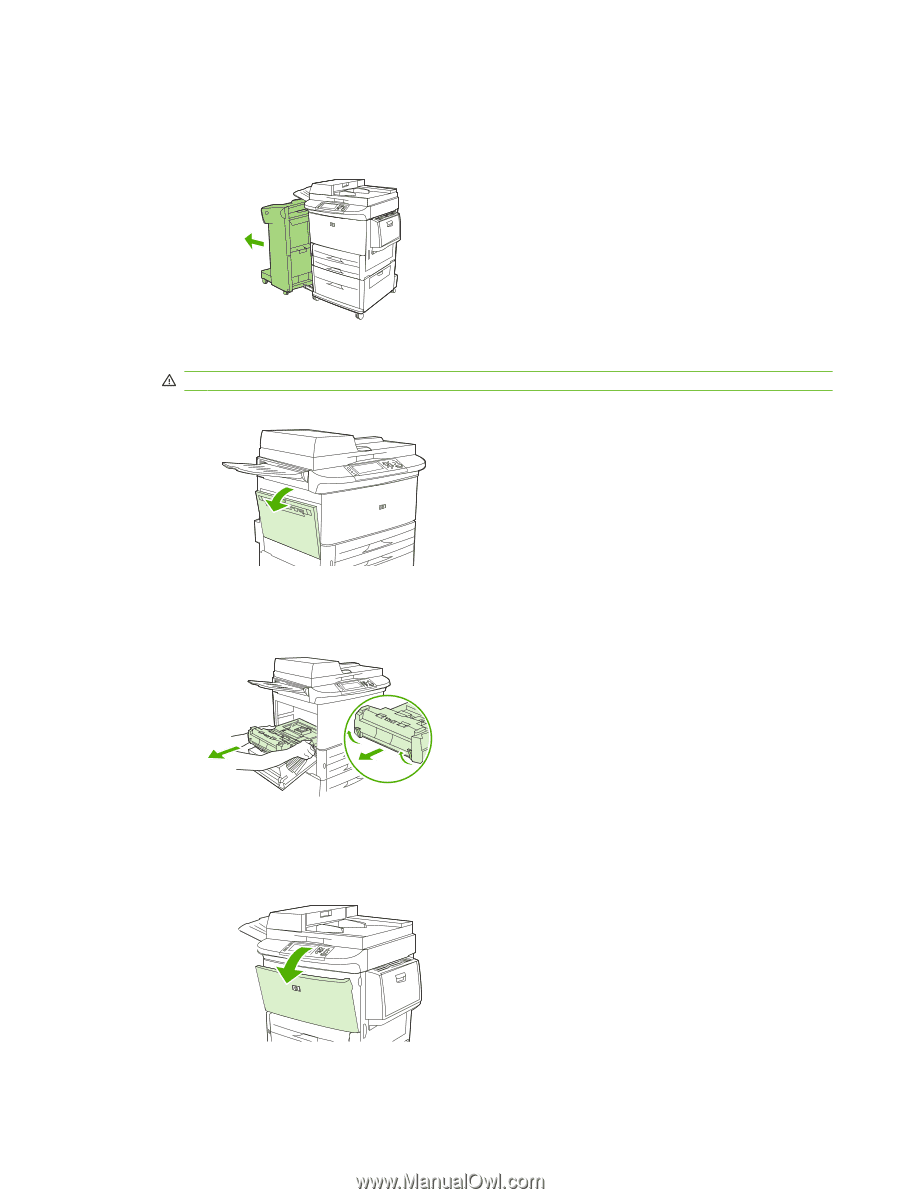
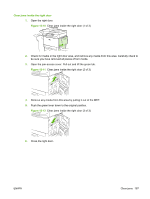
Clear jams from the duplexer
1.
Move the output device away from the MFP to gain access to the left door.
Figure 12-2
Clear jams in the duplex printing accessory (1 of 6)
2.
Open the left door and carefully pull out any paper from area.
WARNING!
Avoid touching the adjacent fusing area. It can be hot.
Figure 12-3
Clear jams in the duplex printing accessory (2 of 6)
3.
Remove the duplex printing accessory by pressing the green lever and pulling the unit out until it
stops.
Figure 12-4
Clear jams in the duplex printing accessory (3 of 6)
4.
Remove any paper by lifting the two green levers in the duplex printing accessory.
5.
Open the front door.
Figure 12-5
Clear jams in the duplex printing accessory (4 of 6)
ENWW
Clear jams
185