HP LaserJet Pro 100 HP LaserJet Pro 100 Color MFP M175 - Software Technical Re - Page 210
Upload Fonts, Upload, File Upload, Choose, Display response from the device, Information And Support
 |
View all HP LaserJet Pro 100 manuals
Add to My Manuals
Save this manual to your list of manuals |
Page 210 highlights
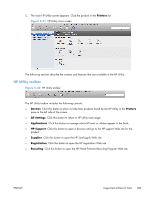
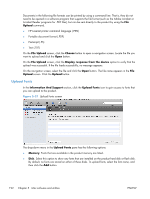
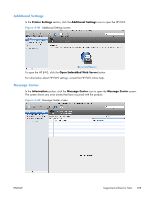
Documents in the following file formats can be printed by using a command line. That is, they do not need to be opened in a software program that supports the file format (such as the Adobe Acrobat or Acrobat Reader programs for .PDF files), but can be sent directly to the product by using the File Upload command. ● HP LaserJet printer command language (.PRN) ● Portable document format (.PDF) ● Postscript (.PS) ● Text (.TXT) On the File Upload screen, click the Choose button to open a navigation screen. Locate the file you want to upload and click the Open button. On the File Upload screen, click the Display response from the device option to verify that the upload was successful. If the file loads successfully, no message appears. On the navigation screen, select the file and click the Open button. The file name appears in the File Upload screen. Click the Upload button. Upload Fonts In the Information And Support section, click the Upload Fonts icon to gain access to fonts that you can upload to the product. Figure 5-37 Upload Fonts screen The drop-down menu in the Upload Fonts pane has the following options: ● Memory. Fonts that are available in the product memory are listed. ● Disk. Select this option to show any fonts that are installed on the product hard disk or flash disk. By default, no fonts are stored on either of these disks. To upload fonts, select the font name, and then click the Add button. 192 Chapter 5 Mac software and utilities ENWW
-
 1
1 -
2
-
3
-
4
-
5
-
6
-
7
-
8
-
9
-
10
-
11
-
12
-
13
-
14
-
15
-
16
-
17
-
18
-
19
-
20
-
21
-
22
-
23
-
24
-
25
-
26
-
27
-
28
-
29
-
30
-
31
-
32
-
33
-
34
-
35
-
36
-
37
-
38
-
39
-
40
-
41
-
42
-
43
-
44
-
45
-
46
-
47
-
48
-
49
-
50
-
51
-
52
-
53
-
54
-
55
-
56
-
57
-
58
-
59
-
60
-
61
-
62
-
63
-
64
-
65
-
66
-
67
-
68
-
69
-
70
-
71
-
72
-
73
-
74
-
75
-
76
-
77
-
78
-
79
-
80
-
81
-
82
-
83
-
84
-
85
-
86
-
87
-
88
-
89
-
90
-
91
-
92
-
93
-
94
-
95
-
96
-
97
-
98
-
99
-
100
-
101
-
102
-
103
-
104
-
105
-
106
-
107
-
108
-
109
-
110
-
111
-
112
-
113
-
114
-
115
-
116
-
117
-
118
-
119
-
120
-
121
-
122
-
123
-
124
-
125
-
126
-
127
-
128
-
129
-
130
-
131
-
132
-
133
-
134
-
135
-
136
-
137
-
138
-
139
-
140
-
141
-
142
-
143
-
144
-
145
-
146
-
147
-
148
-
149
-
150
-
151
-
152
-
153
-
154
-
155
-
156
-
157
-
158
-
159
-
160
-
161
-
162
-
163
-
164
-
165
-
166
-
167
-
168
-
169
-
170
-
171
-
172
-
173
-
174
-
175
-
176
-
177
-
178
-
179
-
180
-
181
-
182
-
183
-
184
-
185
-
186
-
187
-
188
-
189
-
190
-
191
-
192
-
193
-
194
-
195
-
196
-
197
-
198
-
199
-
200
-
201
-
202
-
203
-
204
-
 205
205 -
 206
206 -
 207
207 -
 208
208 -
 209
209 -
 210
210 -
 211
211 -
 212
212 -
 213
213 -
 214
214 -
 215
215 -
216
-
217
-
218
-
219
-
220
-
221
-
222
-
223
-
224
-
225
-
226
-
227
-
228
-
229
-
230
-
231
-
232
-
233
-
234
-
235
-
236
 |
 |
