HP LaserJet Pro 100 HP LaserJet Pro 100 Color MFP M175 - Software Technical Re - Page 223
Engine Error. Press [OK]., Jam in Area. Open Door and Clear Jam., Jam in Tray 1. Clear Jam and then
 |
View all HP LaserJet Pro 100 manuals
Add to My Manuals
Save this manual to your list of manuals |
Page 223 highlights
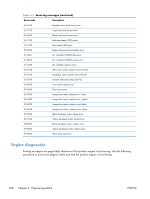
Engine Error. Press [OK]. Recommended action If the error persists, replace the DC controller. Jam in Area. Open Door and Clear Jam. Recommended action 1. Verify the pickup roller, and separation roller are working correctly and not damaged. If necessary, replace the rollers. 2. Verify that connector J116 on the DC controller is firmly seated. Jam in Tray 1. Clear Jam and then Press [OK]. Recommended action 1. Clear the jam, and then follow the control panel instructions. 2. If the error persists, try the following solutions: a. Verify the pickup roller and separation roller are working correctly. If necessary, replace the rollers. b. If the error persists during print jobs, verify that the connectors on DC controller are firmly seated. c. If the error persists during copy jobs, verify that the connectors on DC controller are firmly seated. d. Replace the product. Load Paper Recommended action 1. Replace the cassette (paper tray). 2. Verify that all eighteen DC controller connectors are firmly seated. Print Failure. Press [OK]. Recommended action 1. Perform an NVRAM initialization. 2. Update the firmware. 3. Replace the formatter PCA. ENWW Tools for troubleshooting 205
-
 1
1 -
2
-
3
-
4
-
5
-
6
-
7
-
8
-
9
-
10
-
11
-
12
-
13
-
14
-
15
-
16
-
17
-
18
-
19
-
20
-
21
-
22
-
23
-
24
-
25
-
26
-
27
-
28
-
29
-
30
-
31
-
32
-
33
-
34
-
35
-
36
-
37
-
38
-
39
-
40
-
41
-
42
-
43
-
44
-
45
-
46
-
47
-
48
-
49
-
50
-
51
-
52
-
53
-
54
-
55
-
56
-
57
-
58
-
59
-
60
-
61
-
62
-
63
-
64
-
65
-
66
-
67
-
68
-
69
-
70
-
71
-
72
-
73
-
74
-
75
-
76
-
77
-
78
-
79
-
80
-
81
-
82
-
83
-
84
-
85
-
86
-
87
-
88
-
89
-
90
-
91
-
92
-
93
-
94
-
95
-
96
-
97
-
98
-
99
-
100
-
101
-
102
-
103
-
104
-
105
-
106
-
107
-
108
-
109
-
110
-
111
-
112
-
113
-
114
-
115
-
116
-
117
-
118
-
119
-
120
-
121
-
122
-
123
-
124
-
125
-
126
-
127
-
128
-
129
-
130
-
131
-
132
-
133
-
134
-
135
-
136
-
137
-
138
-
139
-
140
-
141
-
142
-
143
-
144
-
145
-
146
-
147
-
148
-
149
-
150
-
151
-
152
-
153
-
154
-
155
-
156
-
157
-
158
-
159
-
160
-
161
-
162
-
163
-
164
-
165
-
166
-
167
-
168
-
169
-
170
-
171
-
172
-
173
-
174
-
175
-
176
-
177
-
178
-
179
-
180
-
181
-
182
-
183
-
184
-
185
-
186
-
187
-
188
-
189
-
190
-
191
-
192
-
193
-
194
-
195
-
196
-
197
-
198
-
199
-
200
-
201
-
202
-
203
-
204
-
205
-
206
-
207
-
208
-
209
-
210
-
211
-
212
-
213
-
214
-
215
-
216
-
217
-
 218
218 -
 219
219 -
 220
220 -
 221
221 -
 222
222 -
 223
223 -
 224
224 -
 225
225 -
 226
226 -
 227
227 -
 228
228 -
229
-
230
-
231
-
232
-
233
-
234
-
235
-
236
 |
 |