HP Model 735 hp DDS-DC tape drive user's guide (a1658-90696) - Page 34
Verifying the DDS-DC Tape Drive Operation
 |
View all HP Model 735 manuals
Add to My Manuals
Save this manual to your list of manuals |
Page 34 highlights
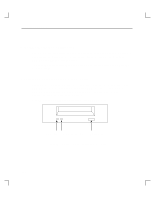
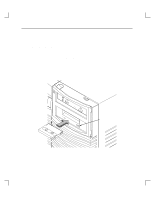
Using Your DDS Drive 2. Push the data cassette about three quarters of an inch into the drive. The drive automatically pulls the data cassette the rest of the way in. When the Tape LED on the left front of the drive stops flashing, the drive has loaded the data cassette. 3. To remove the data cassette, press and release the eject button on the front of the drive, as shown in Figure 2-3. The Tape LED on the drive flashes on and off. Ten to twenty seconds later, the data cassette slides partway out of the drive. Remove the cassette from the drive. Verifying the DDS-DC Tape Drive Operation To verify that your workstation can communicate with the DDS-DC tape drive, type the following, if you are using HP-UX 9.05: /etc/ioscan -d scsitape Return After a few moments the ioscan utility returns a message similar to the following: H/W Path Description Status 2.0.1.3.0 tape_drive ok(nnnnnnnnn) Type the following, if you are using HP-UX 10.0: /usr/sbin/ioscan -d stape Return After a few moments the ioscan utility returns a message similar to the following: H/W Path Class Description bc 8 bc I/O Adapter 8/12 ba Core I/O Adapter 8/12/5 ext_bus Built-in SCSI 8/12/5.3 target 8/12/5.3.0 tape HP HP35480A If your DDS-DC drive is not listed, go to Chapter 3, "Troubleshooting and Removal/ Replacement Procedures." 2-7
-
 1
1 -
2
-
3
-
4
-
5
-
6
-
7
-
8
-
9
-
10
-
11
-
12
-
13
-
14
-
15
-
16
-
17
-
18
-
19
-
20
-
21
-
22
-
23
-
24
-
25
-
26
-
27
-
28
-
 29
29 -
 30
30 -
 31
31 -
 32
32 -
 33
33 -
 34
34 -
 35
35 -
 36
36 -
 37
37 -
 38
38 -
 39
39 -
40
-
41
-
42
-
43
-
44
-
45
-
46
-
47
-
48
-
49
-
50
-
51
-
52
 |
 |
