HP Officejet 600 HP OfficeJet 600 Series All-in-One - (English) User Guide - Page 83
What is OCR?
 |
View all HP Officejet 600 manuals
Add to My Manuals
Save this manual to your list of manuals |
Page 83 highlights
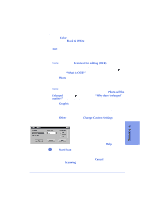
Make any changes you'd like to any of the settings. The sample page in the middle of the dialog box shows how the change in settings will affect the scanned document. q Select Color if you have a color original and want to scan in color. Select Black & White if you want a black and white scan of your original. q Text is used to make the words and simple line drawings in your document appear to be the clearest elements after scanning. You can scan up to 20 pages, or a single scan/copy sleeve with this selection. Note: Do not click Scan text for editing (OCR). Refer to "Scanning Your Document to Edit the Words (OCR)" on page 5-8 later in this chapter for OCR scanning instructions. Or click the button labeled, "What is OCR?" for help on the subject. q Click Photo to make photographs in your document appear to be the sharpest elements after scanning. You can only scan one page at a time with this selection. Note: If you plan to make your image larger than the original, you will get better results when you check the box Photo will be Enlarged. Click the button labeled, "Why does 'enlarged' matter?" for more information. q Click Graphic to make more complex illustrations or graphic images in your document appear to be the sharpest elements after scanning. You can only scan one page at a time with this selection. q Click Other and then click Change Custom Settings to choose your own custom scanning settings. This information (for example, 100 x 100 dots per inch, Color, Low compression for Color Photo) is displayed on the Scan Settings dialog box. For more information about the Custom Settings dialog box, click the Help button. 3 Click Start Scan to begin scanning. Your scanned image will display in the Image Viewer window. To cancel a scan in progress, click the Cancel button in the HP OfficeJet's Scanning window, which is displayed during scanning. 5-3 5. Scanning
-
 1
1 -
2
-
3
-
4
-
5
-
6
-
7
-
8
-
9
-
10
-
11
-
12
-
13
-
14
-
15
-
16
-
17
-
18
-
19
-
20
-
21
-
22
-
23
-
24
-
25
-
26
-
27
-
28
-
29
-
30
-
31
-
32
-
33
-
34
-
35
-
36
-
37
-
38
-
39
-
40
-
41
-
42
-
43
-
44
-
45
-
46
-
47
-
48
-
49
-
50
-
51
-
52
-
53
-
54
-
55
-
56
-
57
-
58
-
59
-
60
-
61
-
62
-
63
-
64
-
65
-
66
-
67
-
68
-
69
-
70
-
71
-
72
-
73
-
74
-
75
-
76
-
77
-
 78
78 -
 79
79 -
 80
80 -
 81
81 -
 82
82 -
 83
83 -
 84
84 -
 85
85 -
 86
86 -
 87
87 -
 88
88 -
89
-
90
-
91
-
92
-
93
-
94
-
95
-
96
-
97
-
98
-
99
-
100
-
101
-
102
-
103
-
104
-
105
-
106
-
107
-
108
-
109
-
110
-
111
-
112
-
113
-
114
-
115
-
116
-
117
-
118
-
119
-
120
-
121
-
122
-
123
-
124
-
125
-
126
-
127
-
128
-
129
-
130
-
131
-
132
-
133
-
134
-
135
-
136
-
137
-
138
-
139
-
140
 |
 |
