HP Officejet 7200 Setup Poster - Page 4
Open access door, Insert the tri-color print cartridge, Remove tape from both cartridges
 |
View all HP Officejet 7200 manuals
Add to My Manuals
Save this manual to your list of manuals |
Page 4 highlights
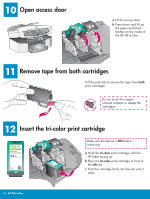
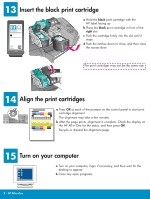
10 Open access door a Lift the access door. b Press down and lift up the green and black latches on the inside of the HP All-in-One. 11 Remove tape from both cartridges Pull the pink tab to remove the tape from both print cartridges. Do not touch the coppercolored contacts or retape the cartridges. 12 Insert the tri-color print cartridge Make sure the device is ON before continuing. a Hold the tri-color print cartridge with the HP label facing up. b Place the tri-color print cartridge in front of the left slot. c Push the cartridge firmly into the slot until it stops. 4 • HP All-in-One
-
 1
1 -
 2
2 -
 3
3 -
 4
4 -
 5
5 -
 6
6 -
 7
7 -
 8
8 -
 9
9 -
 10
10 -
11
-
12
 |
 |
4 • HP All-in-One
10
11
12
Open access door
a
Hold the
tri-color
print cartridge with the
HP label facing up.
b
Place the
tri-color
print cartridge in front of
the
left
slot.
c
Push the cartridge firmly into the slot until it
stops.
Insert the tri-color print cartridge
Make sure the device is
ON
before
continuing.
a
Lift the access door.
b
Press down and lift up
the green and black
latches on the inside of
the HP All-in-One.
Remove tape from both cartridges
Pull the pink tab to remove the tape from
both
print cartridges.
Do not touch the copper-
colored contacts or retape the
cartridges.