HP Officejet v40 HP Officejet V Series - (English) User Guide - Page 23
To send the scan to a destination - image
 |
View all HP Officejet v40 manuals
Add to My Manuals
Save this manual to your list of manuals |
Page 23 highlights
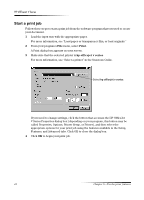
HP OfficeJet V Series )LQLVK WKH V.DQ When you initiate a scan from the software, your scanned image appears in the HP Image Viewer. After you have scanned an image and edited or adjusted it as needed, you can send the image to your destination or print it. You can also save the image in a file on your computer's hard drive. To send the scan to a destination 1 In the HP Image Viewer, go to the Send To list, and select the appropriate destination. 2 Click Send Now. To print the scan Your HP OfficeJet lets you print your scanned image from the HP Image Viewer. You can also use the Creative Photo Printing options to print special versions of your scan. For more information, see "Print images using Creative Photo Printing." 1 In the HP Image Viewer, go to the File menu, and choose Print. The Print dialog box appears. 2 From the Name list, choose hp officejet v series, and then select other relevant print settings. 3 If you need to change settings such as paper type or print quality, click Properties, select the appropriate options for your print job using the features available in the Setup, Features, and Advanced tabs, and then click OK to close the dialog box. 4 Click OK to begin your print job. To save the scan to a file 1 In the HP Image Viewer, go to the File menu, and select Save As. 2 In the Save As dialog box, select the format of your output image and the folder in which you want to store it, and then click Save. Chapter 6-Use the scan features 19
-
 1
1 -
2
-
3
-
4
-
5
-
6
-
7
-
8
-
9
-
10
-
11
-
12
-
13
-
14
-
15
-
16
-
17
-
 18
18 -
 19
19 -
 20
20 -
 21
21 -
 22
22 -
 23
23 -
 24
24 -
 25
25 -
 26
26 -
 27
27 -
 28
28 -
29
-
30
-
31
-
32
-
33
-
34
-
35
-
36
-
37
-
38
-
39
-
40
-
41
-
42
-
43
-
44
-
45
-
46
-
47
-
48
-
49
-
50
-
51
-
52
-
53
-
54
-
55
-
56
 |
 |
