HP PageWide 377 OfficeJet Pro X and PageWide 300 400 500 series - Shipping Ins
HP PageWide 377 Manual
 |
View all HP PageWide 377 manuals
Add to My Manuals
Save this manual to your list of manuals |
HP PageWide 377 manual content summary:
- HP PageWide 377 | OfficeJet Pro X and PageWide 300 400 500 series - Shipping Ins - Page 1
Paper Shipping Instructions OfficeJet Pro X series PageWide 300, 400, 500 series Introduction Computers and printers are equipment that need special consideration when moving. Organizations often have the need to configure and setup a printer at a central location, and then move the printer to its - HP PageWide 377 | OfficeJet Pro X and PageWide 300 400 500 series - Shipping Ins - Page 2
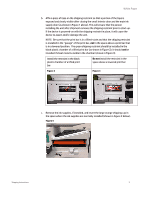
for your product model: • For OfficeJet Pro X series: Insert the orange shipping restraint (part no: CN59867068) shown in the install guide in figure 3.2. This shipping restraint must be pushed back into the product until it clicks into place. • For PageWide 300 and 400 series: Insert the green - HP PageWide 377 | OfficeJet Pro X and PageWide 300 400 500 series - Shipping Ins - Page 3
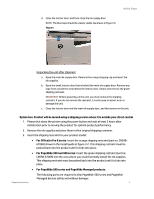
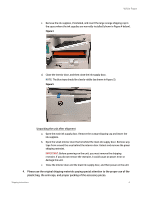
tape is exposed and clearly visible after closing the small interior door and the main ink supply door (as shown in Figure 1 above). This will ensure that the person installing bar Figure 2 Figure 3 c. Remove the ink supplies, if installed, and insert the large orange shipping cap in the space where the - HP PageWide 377 | OfficeJet Pro X and PageWide 300 400 500 series - Shipping Ins - Page 4
(part no: CN598-67068) into the area where you would normally install the ink supplies. This shipping restraint must be pushed back into the product until it clicks into place. • For PageWide 500 series and PageWide Managed products: Shipping Instructions The following parts are required to ship - HP PageWide 377 | OfficeJet Pro X and PageWide 300 400 500 series - Shipping Ins - Page 5
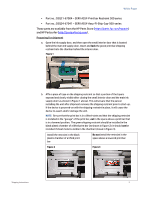
500-series These parts are available from the HP Parts Store (https://parts.hp.com/hpparts) and HP Partsurfer (http://partsurfer.hp.com). Preparing for shipment a. Open the ink supply door, and then open the small in the space above a lowered print bar Figure 2 Figure 3 Shipping Instructions 5 - HP PageWide 377 | OfficeJet Pro X and PageWide 300 400 500 series - Shipping Ins - Page 6
ink supplies are normally installed (shown in Figure 4 below). Figure 4 d. Close the interior door, and then close the ink ink supply door. Remove the orange shipping cap and insert the ink supplies. b. Open the small interior door that is behind the main ink door and the main ink supply door, and - HP PageWide 377 | OfficeJet Pro X and PageWide 300 400 500 series - Shipping Ins - Page 7
HP products and services are set forth in the express warranty statements accompanying such products and services. Nothing herein should be construed as constituting an additional warranty. HP shall not be liable for technical or editorial errors or omissions contained herein. Shipping Instructions
-
 1
1 -
 2
2 -
 3
3 -
 4
4 -
 5
5 -
 6
6 -
 7
7
 |
 |

White Paper
Shipping Instructions
1
Shipping Instructions
OfficeJet Pro X series
PageWide 300, 400, 500 series
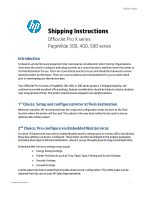
Introduction
Computers and printers are equipment that need special consideration when moving. Organizations
often have the need to configure and setup a printer at a central location, and then move the printer to
its final destination for use. There are several best practices to use and should be followed to ensure
optimal product performance. There are several options and considerations for you to understand
prior to developing your distribution plan.
Your OfficeJet Pro X series or PageWide 300, 400, or 500 series product, if shipped properly, will
continue to provide excellent office printing. Special consideration should be taken to reduce vibration
over long periods of time. The printer should also be shipped in an upright position.
1
st
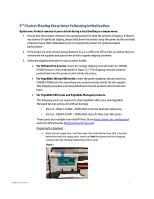
Choice: Setup and configure printer at final destination
Whenever possible, HP recommends that the setup and configuration steps be done at the final
location where the printer will be used. This option is the very best method to be used to ensure
optimum life of the product.
2
nd
Choice: Pre-configure via Embedded Web Services
A central IT Department may wish to enable/disable specific settings prior to remote office installation.
Many key settings can be pre-configured. The product can then be shipped in the original packaging
(including blue tape) to the final destination, where it can go through physical setup and initialization.
Embedded Web Services settings may include:
o
Energy Saving Settings
o
Printer Preferences such as Tray, Paper Type, Printing and Screen Settings
o
Security Settings
o
Firewall Settings
A white paper has been created that provides detail on pre-configuration. This white paper can be
obtained from hp.com or your HP Sales Representative.