HP PageWide XL 4700 Assembly Instructions - Page 7
Assemble the diverter
 |
View all HP PageWide XL 4700 manuals
Add to My Manuals
Save this manual to your list of manuals |
Page 7 highlights
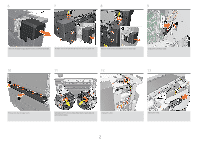
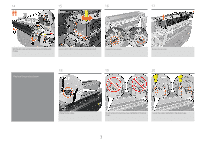
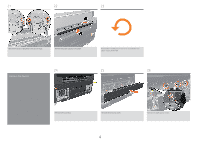
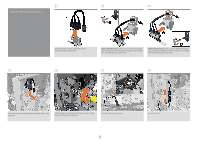
39 40 41 Assemble the diverter Attach the other assembly into the left side of the printer structure., then repeat steps 36, 37 and 38 to connect it. Push the cable clamp into place, and connect the cable. 42 43 44 Insert the diverter valve. Important: Ensure that the brackets highlighted in orange are completely inserted into place in the printzone. Connect the three cables. Tighten the eight diverter valve cover screws. Attach the top E-box cover and fix in place with two screws. 7
-
 1
1 -
 2
2 -
 3
3 -
 4
4 -
 5
5 -
 6
6 -
 7
7 -
 8
8 -
 9
9 -
 10
10
 |
 |

7
Assemble the diverter
Connect the three cables.
Tighten the eight diverter valve cover screws.
Attach the other assembly into the left side of the printer
structure., then repeat steps 36, 37 and 38 to connect it.
Push the cable clamp into place, and connect the cable.
Insert the diverter valve.
Important:
Ensure that the brackets highlighted in orange are
completely inserted into place in the printzone.
Attach the top E-box cover and fix in place with two screws.
40
39
41
44
43
42