HP Pavilion 500 HP Pavilion Desktop PCs - (English) Quick Start Guide 5990-527 - Page 110
First Boot Device selection. Press the + plus - bios
 |
View all HP Pavilion 500 manuals
Add to My Manuals
Save this manual to your list of manuals |
Page 110 highlights
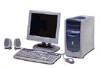
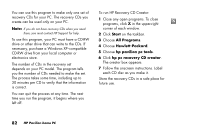
5 Enter the BIOS setup program during the startup: When the blue screen with the HP Invent logo appears, press the F1 key on the keyboard until Entering SETUP is displayed. (You only have a few seconds to press the F1 key before the normal startup process continues.) Wait until the BIOS setup program opens. 6 Press the right arrow key to select Boot. 7 Press the down arrow key to select Boot Device Priority, and then press Enter. 8 Change the first boot device to CD-ROM using one of these methods: Press the down arrow key to select the CD-ROM item. Press the + (plus) key to move the CD-ROM item up until it is the first item in the list. Or Press the down arrow key to highlight the First Boot Device selection. Press the + (plus) key until CD-ROM is the selection. When installation is complete, you'll return the BIOS to the original setting. 9 Press the Eject button on the top CD-ROM drive, and wait for the tray to open. Insert Recovery CD #1 and close the tray. 10 Press the F10 key to save the changes and exit BIOS. 11 With Yes selected, press Enter. 12 The PC starts the recovery; wait for the onscreen instructions to display, and then follow those instructions: For standard recovery, press R, and then press R again. Click Next to proceed with the non-destructive system recovery. Click Yes to start the recovery. Insert the remaining CDs when directed. Or 84 HP Pavilion home PC
-
 1
1 -
2
-
3
-
4
-
5
-
6
-
7
-
8
-
9
-
10
-
11
-
12
-
13
-
14
-
15
-
16
-
17
-
18
-
19
-
20
-
21
-
22
-
23
-
24
-
25
-
26
-
27
-
28
-
29
-
30
-
31
-
32
-
33
-
34
-
35
-
36
-
37
-
38
-
39
-
40
-
41
-
42
-
43
-
44
-
45
-
46
-
47
-
48
-
49
-
50
-
51
-
52
-
53
-
54
-
55
-
56
-
57
-
58
-
59
-
60
-
61
-
62
-
63
-
64
-
65
-
66
-
67
-
68
-
69
-
70
-
71
-
72
-
73
-
74
-
75
-
76
-
77
-
78
-
79
-
80
-
81
-
82
-
83
-
84
-
85
-
86
-
87
-
88
-
89
-
90
-
91
-
92
-
93
-
94
-
95
-
96
-
97
-
98
-
99
-
100
-
101
-
102
-
103
-
104
-
 105
105 -
 106
106 -
 107
107 -
 108
108 -
 109
109 -
 110
110 -
 111
111 -
 112
112 -
 113
113 -
 114
114 -
 115
115 -
116
-
117
-
118
-
119
-
120
-
121
-
122
 |
 |
