HP Pavilion Slimline s5-1400 Upgrading and Servicing Guide - Page 11
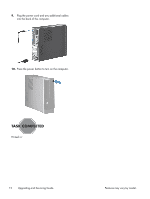
Removing and Replacing a CD/DVD Drive, is released.
 |
View all HP Pavilion Slimline s5-1400 manuals
Add to My Manuals
Save this manual to your list of manuals |
Page 11 highlights
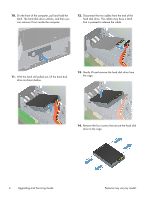
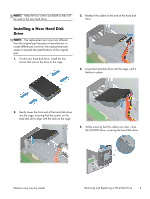
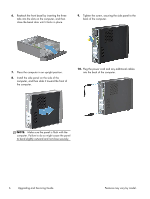
5. Slide the side panel toward the back of the computer, and then pull the side panel away from the computer. 8. Open the front bezel, and then remove it from the computer. The inside of the computer is exposed. 9. Lift the CD/DVD drive 90°, exposing the hard disk drive. As the CD/DVD drive is lifted, a latch is released. 6. Lay the computer on a flat surface. 7. Lift the three tabs to release the front bezel. 10. Remove the three cables from the back of the CD/DVD drive. The cables may have a latch that is pressed to release the cable. Features may vary by model. Removing and Replacing a CD/DVD Drive 9
-
 1
1 -
2
-
3
-
4
-
5
-
 6
6 -
 7
7 -
 8
8 -
 9
9 -
 10
10 -
 11
11 -
 12
12 -
 13
13 -
 14
14 -
 15
15 -
 16
16 -
17
-
18
-
19
-
20
-
21
-
22
-
23
-
24
-
25
-
26
-
27
-
28
-
29
-
30
 |
 |

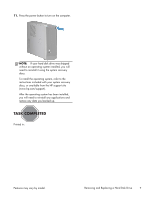
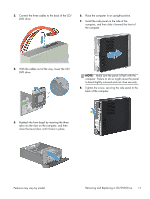
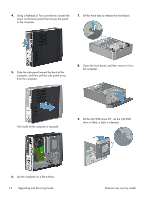
5.
Slide the side panel toward the back of the
computer, and then pull the side panel away
from the computer.
The inside of the computer is exposed.
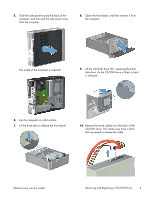
6.
Lay the computer on a flat surface.
7.
Lift the three tabs to release the front bezel.
8.
Open the front bezel, and then remove it from
the computer.
9.
Lift the CD/DVD drive 90°, exposing the hard
disk drive. As the CD/DVD drive is lifted, a latch
is released.
10.
Remove the three cables from the back of the
CD/DVD drive. The cables may have a latch
that is pressed to release the cable.
Features may vary by model.
Removing and Replacing a CD/DVD Drive
9