HP Pavilion Slimline s5-1400 Upgrading and Servicing Guide - Page 27
Replacing a power supply, Make sure the replacement power supply is
 |
View all HP Pavilion Slimline s5-1400 manuals
Add to My Manuals
Save this manual to your list of manuals |
Page 27 highlights
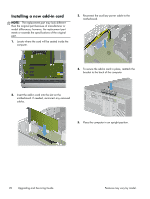
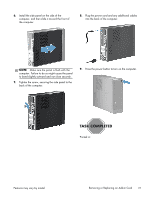
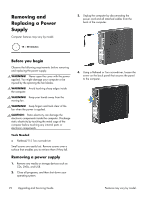
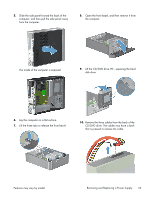
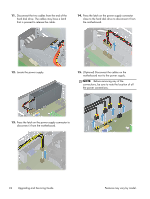
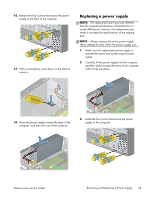
16. Remove the four screws that secure the power supply to the back of the computer. 17. With a screwdriver, push down on the latch to unlock it. Replacing a power supply NOTE: The replacement part may look different than the original part because of manufacturer or model differences; however, the replacement part meets or exceeds the specifications of the original part. NOTE: Always replace the entire power supply. Never attempt to work within the power supply unit. 1. Make sure the replacement power supply is oriented the same way as the original power supply. 2. Carefully tilt the power supply into the computer and then slide it toward the front of the computer until it locks into place. 18. Move the power supply toward the back of the computer, and then tilt it out of the computer. 3. Install the four screws that secure the power supply to the computer. Features may vary by model. Removing and Replacing a Power Supply 25
-
 1
1 -
2
-
3
-
4
-
5
-
6
-
7
-
8
-
9
-
10
-
11
-
12
-
13
-
14
-
15
-
16
-
17
-
18
-
19
-
20
-
21
-
 22
22 -
 23
23 -
 24
24 -
 25
25 -
 26
26 -
 27
27 -
 28
28 -
 29
29 -
 30
30
 |
 |
