HP Photosmart A610 User Guide - Page 11
Control panel, Layout, Printer screen, Delete, Photo Fix, Print, Cancel, way arrow button - photo printer
 |
View all HP Photosmart A610 manuals
Add to My Manuals
Save this manual to your list of manuals |
Page 11 highlights
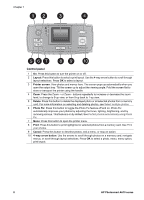
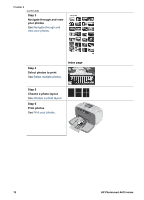
Chapter 1 Control panel 1 On: Press this button to turn the printer on or off. 2 Layout: Press this button to select a print layout. Use the 4-way arrow button to scroll through layout selections. Press OK to select a layout. 3 Printer screen: View photos and menus here. The screen pops up automatically when you open the output tray. Tilt the screen up to adjust the viewing angle. Fold the screen flat to store or transport the printer using the handle. 4 Zoom: Press the Zoom + or Zoom - buttons repeatedly to increase or decrease the zoom level, to change to 9-up view, or from 9-up back to 1-up view. 5 Delete: Press this button to delete the displayed photo or all selected photos from a memory card. For more information on selecting and deleting photos, see Select multiple photos. 6 Photo Fix: Press this button to toggle the Photo Fix feature off and on. Photo Fix automatically improves your photos by adjusting the focus, lighting, brightening, and by removing red-eye. This feature is on by default. See Perfect photos automatically using Photo Fix. 7 Menu: Press this button to open the printer menu. 8 Print: Press this button to print highlighted or selected photos from a memory card. See Print your photos. 9 Cancel: Press this button to deselect photos, exit a menu, or stop an action. 10 4-way arrow button: Use the arrows to scroll through photos on a memory card, navigate menus, or scroll through layout selections. Press OK to select a photo, menu, menu option, print layout. 8 HP Photosmart A610 series
-
 1
1 -
2
-
3
-
4
-
5
-
 6
6 -
 7
7 -
 8
8 -
 9
9 -
 10
10 -
 11
11 -
 12
12 -
 13
13 -
 14
14 -
 15
15 -
 16
16 -
17
-
18
-
19
-
20
-
21
-
22
-
23
-
24
-
25
-
26
-
27
-
28
-
29
-
30
-
31
-
32
-
33
-
34
-
35
-
36
-
37
-
38
-
39
-
40
-
41
-
42
-
43
-
44
-
45
-
46
-
47
-
48
-
49
-
50
-
51
-
52
-
53
-
54
-
55
-
56
-
57
-
58
-
59
-
60
-
61
-
62
-
63
-
64
-
65
-
66
-
67
-
68
-
69
-
70
 |
 |
