HP Photosmart C4100 Basics Guide - Page 12
cassette storage area on the left side of the HP All-in-One. - printer
 |
View all HP Photosmart C4100 manuals
Add to My Manuals
Save this manual to your list of manuals |
Page 12 highlights
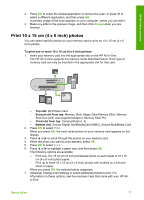
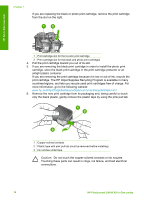
HP All-in-One overview 3. Pull the photo paper cassette towards you. 4. Load up to 20 sheets of paper print side down in the photo paper cassette. 5. Adjust the paper-length and paper-width guides to fit the loaded paper. 6. Line up the photo paper cassette with the right side of the input tray, and then slide it into the printer until it stops. 7. Pull the tray extender out to hold your printed photos. 8. When you finish printing, remove the photo paper cassette and store it in the cassette storage area on the left side of the HP All-in-One. Tip You can store your photo paper in the stowed photo paper cassette when not printing. This protects the photo paper from rips, wrinkles, and curled or bent edges. Basics Guide 9
-
 1
1 -
2
-
3
-
4
-
5
-
6
-
 7
7 -
 8
8 -
 9
9 -
 10
10 -
 11
11 -
 12
12 -
 13
13 -
 14
14 -
 15
15 -
 16
16 -
 17
17 -
18
-
19
-
20
-
21
-
22
-
23
-
24
-
25
-
26
-
27
-
28
-
29
-
30
-
31
-
32
-
33
-
34
 |
 |

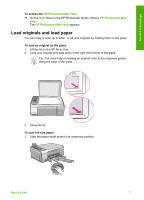
3.
Pull the photo paper cassette towards you.
4.
Load up to 20 sheets of paper print side down in the photo paper cassette.
5.
Adjust the paper-length and paper-width guides to fit the loaded paper.
6.
Line up the photo paper cassette with the right side of the input tray, and then
slide it into the printer until it stops.
7.
Pull the tray extender out to hold your printed photos.
8.
When you finish printing, remove the photo paper cassette and store it in the
cassette storage area on the left side of the HP All-in-One.
Tip
You can store your photo paper in the stowed photo paper cassette
when not printing. This protects the photo paper from rips, wrinkles, and
curled or bent edges.
Basics Guide
9
HP All-in-One overview