HP Photosmart eStation Printer - C510 User Guide
HP Photosmart eStation Printer - C510 Manual
 |
View all HP Photosmart eStation Printer - C510 manuals
Add to My Manuals
Save this manual to your list of manuals |
HP Photosmart eStation Printer - C510 manual content summary:
- HP Photosmart eStation Printer - C510 | User Guide - Page 1
- HP Photosmart eStation Printer - C510 | User Guide - Page 2
- HP Photosmart eStation Printer - C510 | User Guide - Page 3
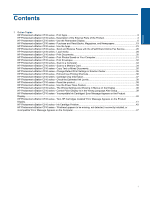
Fax Service 26 HP Photosmart eStation C510 series - Load media...28 HP Photosmart eStation C510 series - Print Documents 30 HP Photosmart eStation C510 series - Print Photos Saved on Your Computer 31 HP Photosmart eStation C510 series - Print Envelopes...32 HP Photosmart eStation C510 series - HP Photosmart eStation Printer - C510 | User Guide - Page 4
2 Contents - HP Photosmart eStation Printer - C510 | User Guide - Page 5
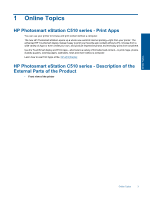
1 Online Topics HP Photosmart eStation C510 series - Print Apps You can use your printer to browse and print content without a computer. The new HP Photosmart eStation opens up a whole new world of internet printing-right from your printer. The enhanced HP Touchsmart display makes it easy to print - HP Photosmart eStation Printer - C510 | User Guide - Page 6
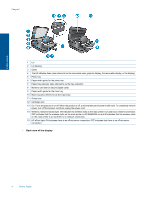
The HP eStation Zeen (also referred to as the removable color graphics display, the removable display, or the display). 5 Photo tray 6 Paper-width guide for the radio on the main printer is on and has a network connection; OFF indicates that the wireless radio on the main printer is off; BLINKING on - HP Photosmart eStation Printer - C510 | User Guide - Page 7
behind the removable display 26 Cancel 27 Copy Black 28 Copy Color 29 Paper Feed 30 Attention light 31 Docking connector for the removable display HP Photosmart eStation C510 series - Description of the External Parts of the Product 5 - HP Photosmart eStation Printer - C510 | User Guide - Page 8
rear views of the printer 32 Printhead assembly 33 Cartridge access area 34 Model number and ink selectability label location 35 Rear USB port 36 Power connection (Use only with the power adapter supplied by HP.) 37 Two-sided printing accessory HP Photosmart eStation C510 series - Use the Removable - HP Photosmart eStation Printer - C510 | User Guide - Page 9
in either landscape or portrait orientation. Online Topics View more Home screen pages To move between the pages, swipe left or right with your finger. HP Photosmart eStation C510 series - Use the Removable Display 7 - HP Photosmart eStation Printer - C510 | User Guide - Page 10
screen to shrink the image, and stretch your fingers apart to zoom in closer to the image. Power button options When the HP eStation Zeen is removed from the main printer, you can reduce screen battery power usage (without turning it off) by pressing the Power button on the back. Press the Power - HP Photosmart eStation Printer - C510 | User Guide - Page 11
five more for a total of eight Home screen pages. You can move and remove items, and add widgets, apps, and bookmarks to a home screen page. HP Photosmart eStation C510 series - Use the Removable Display 9 - HP Photosmart eStation Printer - C510 | User Guide - Page 12
to add a different type of item (an app or a bookmark instead of a widget), display that type of item in the Widget Library by using the instructions in the previous section, "View the Widget Library". 2. Swipe left or right with your finger to display the Home screen page where you want to - HP Photosmart eStation Printer - C510 | User Guide - Page 13
and hold a widget from the Widget Library, then drag it to the empty page to start populating the widget area of a new Home screen page. HP Photosmart eStation C510 series - Use the Removable Display 11 - HP Photosmart eStation Printer - C510 | User Guide - Page 14
Chapter 1 Online Topics 4. When you are finished making changes, touch Done to save the changes and return to the Home screen. NOTE: You can also access the area for adding a new Home screen page using the Widget App, or by touching the Menu button and selecting Manage Home screen. Remove a Home - HP Photosmart eStation Printer - C510 | User Guide - Page 15
To add a new app, open the App Drawer and touch Add More at the bottom of the screen. Choose from any of the available apps. HP Photosmart eStation C510 series - Use the Removable Display 13 - HP Photosmart eStation Printer - C510 | User Guide - Page 16
and touch Delete. The apps that cannot be deleted are now gray, and the ones that can be deleted appear with an "X". 2. Touch the app you want to all the settings for the main printer and the HP eStation Zeen. You must dock the HP eStation Zeen in the main printer to use some of the settings. - HP Photosmart eStation Printer - C510 | User Guide - Page 17
Online Topics Date and time settings Touch Date & Time Settings on the upper right of the System Dashboard screen. You can set the date, time, time zone, time format, and date format. HP Photosmart eStation C510 series - Use the Removable Display 15 - HP Photosmart eStation Printer - C510 | User Guide - Page 18
HP eStation Zeen and the main printer to a wireless network, and to check the connection status. If the HP eStation Zeen is removed from the main printer, they may be connected to different wireless networks. Use the instructions soon as you are in range of one, touch the checkbox in the Network - HP Photosmart eStation Printer - C510 | User Guide - Page 19
in the Printer Maintenance screen. Web Services settings Enable Web Services to use ePrint and some of your Print Apps 1. Touch Web Services to enable and printer volumes Volume controls are located under the Quick Settings area of the System Dashboard screen. HP Photosmart eStation C510 series - - HP Photosmart eStation Printer - C510 | User Guide - Page 20
HP eStation Zeen, touch the plus (+) or minus (-) controls next to Media Volume. To adjust the volume of the printer sounds, touch the plus (+) or minus (-) controls next to Printer Pattern in the Security Settings screen. 2. Read the instructions on how to set your own personal unlock pattern, then - HP Photosmart eStation Printer - C510 | User Guide - Page 21
Online Topics HP Photosmart eStation C510 series - Purchase and Read Books, Magazines, and Newspapers You can use the HP eStation Zeen to SD card into the HP eStation Zeen. The eReader supports documents in .epub and .pdf formats. To read documents in file formats not supported by the eReader, see - HP Photosmart eStation Printer - C510 | User Guide - Page 22
in the menu bar. 4. Touch Create an Account. 5. Follow the onscreen instructions to create an account. Purchase and download books, magazines, and newspapers NOTE: Make sure you have an internet connection to the HP eStation Zeen before attempting to purchase. You also need a Barnes & Noble account - HP Photosmart eStation Printer - C510 | User Guide - Page 23
Issue or Subscribe. 5. Follow the onscreen instructions to purchase. 6. When the download is complete holding a downloaded item in your shelf for one second will give you a dialog with additional information HP Photosmart eStation C510 series - Purchase and Read Books, Magazines, and Newspapers 21 - HP Photosmart eStation Printer - C510 | User Guide - Page 24
in one of the following formats, use these instructions to read it using the Quick Office app (instead of the eReader): .doc, .docx, .docm, .ppt, .pptx, .pps, .xls, .xlsx, .txt, .html, and .pdf. 1. Load the document file onto an SD card, and insert the SD card into the HP eStation - HP Photosmart eStation Printer - C510 | User Guide - Page 25
Zeen, touch the Files app. Touch the Digital Editions folder to find the book you just copied. Touch the book to open and read it. HP Photosmart eStation C510 series - Use the Apps When you purchase this product, a number of apps are provided in the App Favorites bar and the App Drawer. This section - HP Photosmart eStation Printer - C510 | User Guide - Page 26
this app to read email using your existing POP, IMAP, or Exchange email service. You can also print your email with this app. Facebook Touch this app you can create one by visiting www.google.com/accounts. After creating an account, you can log into it using the Calendar app. HP Gallery Touch this - HP Photosmart eStation Printer - C510 | User Guide - Page 27
the newspapers you have downloaded to your HP eStation Zeen, touch the Newspapers app. Touch the newspaper you want to read and it will open. Printer Touch this app to access the Copy search, view options, print, and more. HP Photosmart eStation C510 series - Use the Apps 25 Online Topics - HP Photosmart eStation Printer - C510 | User Guide - Page 28
account, or to sign up for a new Yahoo! account. HP Photosmart eStation C510 series - Send and Receive Faxes with the eFax® Brand Online Fax Service The HP Photosmart eStation C510 series printer faxes without a phone line. The printer sends and receives faxes using eFax®, a web-based faxing - HP Photosmart eStation Printer - C510 | User Guide - Page 29
you are sending the fax outside of your country, touch this option on the screen. This ensures that the appropriate international dialing codes are used. HP Photosmart eStation C510 series - Send and Receive Faxes with the eFax® Brand Online Fax Service 27 - HP Photosmart eStation Printer - C510 | User Guide - Page 30
brand service go to www.efax.com. • eFax® is a registered trademark of j2 Global Communications, Inc. in the U.S. and internationally. HP Photosmart eStation C510 series - Load media Do one of the following: 1. Load 10 x 15 cm (4 x 6 inch) paper a. Raise photo tray lid. • Slide the paper-width guide - HP Photosmart eStation Printer - C510 | User Guide - Page 31
stops at edge of paper. e. Lower photo tray lid. 2. Load A4 or 8.5 x 11 inch paper a. Open main tray. b. Slide paper-width guide. c. Remove all paper from the main input tray. d. Load paper. Slide paper-width guide until it stops at edge of paper. HP Photosmart eStation C510 series - Load media 29 - HP Photosmart eStation Printer - C510 | User Guide - Page 32
d. Insert one or more envelopes into far-right side of main input tray, with envelope flaps on left and facing up. e. Slide stack of envelopes forward until it stops. f. Slide paper-width guide against stack of envelopes until it stops. g. Close main tray. HP Photosmart eStation C510 series - Print - HP Photosmart eStation Printer - C510 | User Guide - Page 33
your print job by choosing one of the predefined print tasks or OK to begin printing. HP Photosmart eStation C510 series - Print Photos Saved on guide until it stops at the edge of the paper. 4. On the File menu in your software program, click Print. 5. Make sure the product is the selected printer - HP Photosmart eStation Printer - C510 | User Guide - Page 34
Maximum dpi setting with supported types of photo paper. HP Photosmart eStation C510 series - Print Envelopes With your HP Photosmart, you can print on a single envelope, a group of envelopes, or label sheets designed for inkjet printers guide against the stack of labels or envelopes until the guide - HP Photosmart eStation Printer - C510 | User Guide - Page 35
HP Photosmart eStation C510 series - Scan to a Computer Scan to a computer 1. Load the original. a. Lift the lid on the product. Lift the lid Online Topics b. Load the original print side down on the right front corner of the glass. Load the original c. Close the lid. 2. Touch the Printer App - HP Photosmart eStation Printer - C510 | User Guide - Page 36
Online Topics Chapter 1 HP Photosmart eStation C510 series - Scan to a Memory Card Save a scan to a memory card 1. Load the original. a. Lift the lid on the product. Lift the lid b. Load the original print - HP Photosmart eStation Printer - C510 | User Guide - Page 37
(SDHC), or TransFlash MicroSD Card (adapter required). 3. Touch the Printer App icon on the Home screen. Touch Scan. a. Touch the Memory view the scan progress in the Ongoing section of the Notification bar. HP Photosmart eStation C510 series - Copy Text or Mixed Documents Make a black and white or - HP Photosmart eStation Printer - C510 | User Guide - Page 38
Settings. 3. Make changes to the print settings, and click OK. HP Photosmart eStation C510 series - Edit and Use Printing Shortcuts Use printing shortcuts to print with print settings that you use often. The printer software has several specially designed printing shortcuts that are available in the - HP Photosmart eStation Printer - C510 | User Guide - Page 39
HP Photosmart manually. Create a printing shortcut 1. On the File menu in your software program, click Print. 2. Make sure the product is the selected printer . The original HP shortcuts cannot be deleted. HP Photosmart eStation C510 series - Cartridge Chip Information The HP cartridges used with - HP Photosmart eStation Printer - C510 | User Guide - Page 40
dialog box. In the Print Properties dialog box, click the Features tab, and then click the Printer Services button. HP Photosmart eStation C510 series - Reset the product Some error conditions can be cleared by resetting the printer, for example, if your product does not print. 38 Online Topics - HP Photosmart eStation Printer - C510 | User Guide - Page 41
When there is any activity on the secondary display (behind the removable display) • When the printer's power button is pressed • When a print job is sent to the printer HP Photosmart eStation C510 series - The Wrong Settings Are Showing in Menus on the Display Change the country/region setting. Set - HP Photosmart eStation Printer - C510 | User Guide - Page 42
Chapter 1 HP Photosmart eStation C510 series - 'Incompatible Ink for your product. See the labels inside the printer, near the print carriage, to determine the correct cartridges. For a solve the problem, contact HP support for service at www.hp.com/support. 40 Online Topics - HP Photosmart eStation Printer - C510 | User Guide - Page 43
/anticounterfeit. Solution one: Replace the cartridges 1. Check that power is on. 2. Remove cartridge. a. Open cartridge door. Wait for the print carriage to move towards the center of the product. Open cartridge door Online Topics HP Photosmart eStation C510 series - 'Non-HP Cartridges installed - HP Photosmart eStation Printer - C510 | User Guide - Page 44
Online Topics Chapter 1 b. Press tab on cartridge, then remove it from slot. Press the tab on the cartridge to remove it 3. Insert new cartridge. a. Remove cartridge from the packaging. Remove cartridge from the packaging. b. Twist orange cap to snap it off. A forceful twist may be required to - HP Photosmart eStation Printer - C510 | User Guide - Page 45
it clicks into place. Install the cartridges d. Close cartridge door. Close the cartridge door Online Topics HP Photosmart eStation C510 series - Ink Cartridge Problem Solution one: Insert the cartridges ▲ One or more of the cartridges is missing. Remove and reinsert the cartridges and verify that - HP Photosmart eStation Printer - C510 | User Guide - Page 46
Chapter 1 The print carriage moves to the center of the product. Open the cartridge door Online Topics c. Remove a cartridge by pressing on the tab and removing the cartridge from the slot. d. Reinsert the cartridge by sliding it forward into the slot until it clicks. Reinsert a cartridge in the - HP Photosmart eStation Printer - C510 | User Guide - Page 47
. Leaving the latch handle raised can result in incorrectly seated ink cartridges and problems printing. The latch must remain down in order to correctly install the ink towards the center of the product. Open the cartridge door HP Photosmart eStation C510 series - Ink Cartridge Problem 45 - HP Photosmart eStation Printer - C510 | User Guide - Page 48
Online Topics Chapter 1 c. Locate the ink cartridge that is indicated in the error message, and then press the tab on the ink cartridge to release it from the slot. Press the tab on the cartridge to remove it d. Hold the cartridge by its sides with the bottom pointing up and locate the electrical - HP Photosmart eStation Printer - C510 | User Guide - Page 49
. Replace the cartridges that are causing the problem. To find the compatible cartridge number, look at the stickers near the cartridges inside the printer cover or go online to www.hp.com/go/learnaboutsupplies. HP Photosmart eStation C510 series - 'Printhead appears to be missing, not detected - HP Photosmart eStation Printer - C510 | User Guide - Page 50
Chapter 1 Online Topics 4. Remove all of the ink cartridges and place them on a piece of paper with the ink opening pointing up. To remove the ink cartridges a. Push in the tab on the ink cartridge you want to replace to release it from the slot. b. Pull the ink cartridge up and then toward you - HP Photosmart eStation Printer - C510 | User Guide - Page 51
Lightly dampen a fresh lint-free cloth and wipe any accumulated ink and debris from the edge between the nozzles and the contacts. HP Photosmart eStation C510 series - 'Printhead appears to be missing, not detected, incorrectly installed, or incompatible' Error 49 Message Appears on the Computer - HP Photosmart eStation Printer - C510 | User Guide - Page 52
: Make sure you lower the latch handle before reinserting the ink cartridges. Leaving the latch handle raised can result in incorrectly seated ink cartridges and problems printing. The latch must remain down in order to correctly install the ink cartridges. 50 Online Topics - HP Photosmart eStation Printer - C510 | User Guide - Page 53
shaped icon and color as the one you are installing. 11. Close HP for information on calling for technical support. If this did not solve the issue, try the next solution. Solution 3: Cycle the Power on the printer need to continue troubleshooting. HP Photosmart eStation C510 series - 'Printhead - HP Photosmart eStation Printer - C510 | User Guide - Page 54
available from HP Support or authorized service providers. Contact HP for assistance to get a new printhead. If the issue persists, try the next solution. Solution 5: Service the printer ▲ If you have completed all the steps above and are still experiencing a problem, service the product. Online
-
 1
1 -
 2
2 -
 3
3 -
 4
4 -
 5
5 -
 6
6 -
 7
7 -
8
-
9
-
10
-
11
-
12
-
13
-
14
-
15
-
16
-
17
-
18
-
19
-
20
-
21
-
22
-
23
-
24
-
25
-
26
-
27
-
28
-
29
-
30
-
31
-
32
-
33
-
34
-
35
-
36
-
37
-
38
-
39
-
40
-
41
-
42
-
43
-
44
-
45
-
46
-
47
-
48
-
49
-
50
-
51
-
52
-
53
-
54
 |
 |
