HP Presario 6600 Installing the Optical Wireless Mouse Set - Page 11
English
 |
View all HP Presario 6600 manuals
Add to My Manuals
Save this manual to your list of manuals |
Page 11 highlights
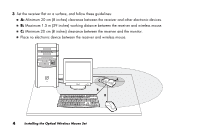
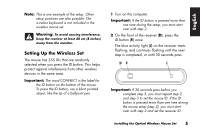
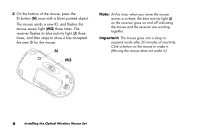
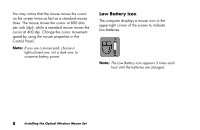
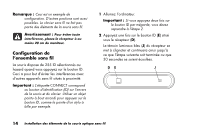
English Troubleshooting If the wireless mouse does not work, do the following: ■ Check that the receiver cable plugs into the USB connector on the front or the back of the computer. ■ Move or click a button on the mouse to see if the blue light on the receiver flashes. If it doesn't flash, press the receiver ID button once, and then press the mouse ID button once. ■ Make sure that the batteries are correctly installed in the mouse. ■ Position the receiver at least 20 centimeters (8 inches) from other electronic devices (computer, monitor, keyboard, etc.). Position the mouse within 1.5 meters (59 inches) of the receiver. Place no electronic devices between the wireless mouse and the receiver. ■ Check the surface where you are using the receiver and the mouse. Choose a nonmetallic surface for better reception. Use the optical mouse on an opaque surface; use a light-coloured surface for better mouse performance. ■ If you still experience reception problems, reset the ID buttons of the two units by following the steps in the section "Setting Up the Wireless Set." ■ If the mouse cursor moves too fast, you can change the cursor movement speed by using the mouse properties in the Control Panel. The wireless mouse moves the cursor on the screen twice as fast as a standard mouse does. The wireless mouse moves the cursor at 800 dots per inch (dpi), while a standard mouse moves the cursor at 400 dpi. Installing the Optical Wireless Mouse Set 9
-
 1
1 -
2
-
3
-
4
-
5
-
 6
6 -
 7
7 -
 8
8 -
 9
9 -
 10
10 -
 11
11 -
 12
12 -
 13
13 -
 14
14 -
 15
15 -
 16
16 -
17
-
18
-
19
-
20
-
21
-
22
-
23
-
24
-
25
-
26
-
27
-
28
-
29
-
30
-
31
-
32
-
33
-
34
-
35
-
36
-
37
-
38
-
39
-
40
-
41
-
42
-
43
-
44
-
45
-
46
-
47
-
48
-
49
-
50
-
51
-
52
-
53
-
54
-
55
-
56
-
57
-
58
-
59
-
60
-
61
-
62
-
63
-
64
-
65
-
66
-
67
-
68
-
69
-
70
-
71
-
72
-
73
-
74
-
75
-
76
 |
 |