HP ProLiant DL160 HP ProLiant DL160 Generation 5 Server Software Configuration
HP ProLiant DL160 - G5 Server Manual
 |
View all HP ProLiant DL160 manuals
Add to My Manuals
Save this manual to your list of manuals |
HP ProLiant DL160 manual content summary:
- HP ProLiant DL160 | HP ProLiant DL160 Generation 5 Server Software Configuration - Page 1
HP ProLiant DL160 Generation 5 Server Software Configuration Guide Part number 449872-001 First edition November 2007 - HP ProLiant DL160 | HP ProLiant DL160 Generation 5 Server Software Configuration - Page 2
products and services. Nothing herein should be construed as constituting an additional warranty. HP shall not be liable for technical or editorial errors or omissions contained herein. Microsoft, Windows, and Windows NT are U.S. registered trademarks of Microsoft Corporation. Windows Server 2003 is - HP ProLiant DL160 | HP ProLiant DL160 Generation 5 Server Software Configuration - Page 3
(POST)...35 POST error indicators ...35 POST-related troubleshooting ...35 Supported NOS...37 NOS pre-installation procedure ...37 Hardware setup ...38 BIOS update ...38 Installing Microsoft Windows NOS ...38 Pre-installation instructions ...38 Installation flow...39 Section 1. Creating the driver - HP ProLiant DL160 | HP ProLiant DL160 Generation 5 Server Software Configuration - Page 4
Contents 4 - HP ProLiant DL160 | HP ProLiant DL160 Generation 5 Server Software Configuration - Page 5
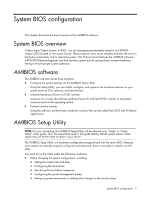
Setup Utility will be referred to as "Setup" or "Setup Utility" in this guide. Also, the screenshots used in this guide display default system values. These values may not be the same as those in your server. The AMIBIOS Setup Utility is a hardware configuration program built into the server BIOS - HP ProLiant DL160 | HP ProLiant DL160 Generation 5 Server Software Configuration - Page 6
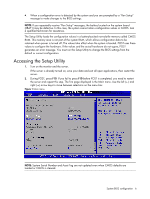
values and the actual hardware do not agree, POST generates an error message. You must run the Setup Utility to change the BIOS settings from the default or current configuration. Accessing the Setup Utility 1. Turn on the monitor and the server. If the server is already turned on, save your data - HP ProLiant DL160 | HP ProLiant DL160 Generation 5 Server Software Configuration - Page 7
is highlighted. The right side of each menu screen displays the Item Specific Help panel. This panel displays the help text for the selected field. Setup navigation keys that are not displayed on the legend bar. Saves all changes to settings and closes the Setup Utility. System BIOS configuration - HP ProLiant DL160 | HP ProLiant DL160 Generation 5 Server Software Configuration - Page 8
Figure 2 General Help Screen Setup Utility menus The Setup Utility menu bar displays the five primary menu selections. For detailed information and screenshots of these Setup menus and their related submenus, refer to the following sections. System BIOS configuration 8 - HP ProLiant DL160 | HP ProLiant DL160 Generation 5 Server Software Configuration - Page 9
Time System Date Boot Settings Configuration Description Displays the system ROM Version, the date when the Setup utility was created and identification number. Displays the CPU version, speed and count. Displays the amount of system memory detected during POST. Displays the server serial number - HP ProLiant DL160 | HP ProLiant DL160 Generation 5 Server Software Configuration - Page 10
computer system is boot up. This allows light on the keyboard Will be lit. Enabled POST F1 Prompt Set this value to allow wait up to 15 seconds for press F1. The setting default value is Delayed. Delayed Set this value to allow to wait indefinitely for press F1. Enabled System BIOS configuration - HP ProLiant DL160 | HP ProLiant DL160 Generation 5 Server Software Configuration - Page 11
value. Do not wait for F1. Continue booting. Advanced menu Figure 5 Advanced menu Options Disabled NOTE: The CPU Configuration setup screen varies depending on the installed processor. Table 4 Advanced menu fields Field Description CPU Configuration You can use this screen to select options - HP ProLiant DL160 | HP ProLiant DL160 Generation 5 Server Software Configuration - Page 12
Plus> and keys to change the value of the selected option. USB Configuration These items control various USB devices. From the USB configuration screen, press to access the submenu for the USB controller and USB 2.0 controller. Use the up and down keys to select an item. Use - HP ProLiant DL160 | HP ProLiant DL160 Generation 5 Server Software Configuration - Page 13
submenu Figure 6 CPU Configuration submenu Table 5 CPU Configuration submenu fields Field C1E Support Intel Virtualization Tec Core Multi-Processing Description Options This should be enabled in to disabled, one execution core of each CPU does not work. Disabled System BIOS configuration 13 - HP ProLiant DL160 | HP ProLiant DL160 Generation 5 Server Software Configuration - Page 14
SATA as IDE mode. The setting default IDE value is IDE. Set this value to configure SATA as RAID mode. RAID Legacy IDE Channels Set this value to support only SATA Device. SATA Only Set this value to support PATA as primary device and select SATA as PATA Pri. secondary Device. SATA Sec. Note - HP ProLiant DL160 | HP ProLiant DL160 Generation 5 Server Software Configuration - Page 15
erased. Enabled IDE Detect Time Out (Sec) This value is the best setting to use if the onboard IDE controllers are 0 set to a specific IDE disk drive in the BIOS. Set this value to stop the setup from searching the IDE bus for IDE 5 disk drives in 5 seconds. Set this value to stop the - HP ProLiant DL160 | HP ProLiant DL160 Generation 5 Server Software Configuration - Page 16
setting. The most common serial device connected to this port is a mouse. If the system will not use a serial device, it is best to set this port to Disabled. Set the interrupt address. If the system will not use a serial device, it is best to set this port to Disabled. System BIOS configuration 16 - HP ProLiant DL160 | HP ProLiant DL160 Generation 5 Server Software Configuration - Page 17
section. The Set LAN BIOS Setup screen is shown below (When you have a LO100 Device, this item will display). Watchdog Configuration Select Watchdog Configuration in the left frame of the screen and press to go to the submenu for that item. That will display POST Watchdog Timer Action, BMC - HP ProLiant DL160 | HP ProLiant DL160 Generation 5 Server Software Configuration - Page 18
Figure 10 SEL Configuration submenu Table 9 SEL Configuration submenu fields Field View BMC System Event Log Clear BMC System Event Log Description to clear out the BMC Event log. If this option is selected, a confirmation prompt will appear before the log is cleared. System BIOS configuration 18 - HP ProLiant DL160 | HP ProLiant DL160 Generation 5 Server Software Configuration - Page 19
Port Configuration submenu fields Field Description Options Serial Port Assignment This setting will assign the serial port connector to the system. The setting default value is System. System This setting will assign the serial port connector to the BMC (Baseboard BMC management controller - HP ProLiant DL160 | HP ProLiant DL160 Generation 5 Server Software Configuration - Page 20
Disabled. Setting this value will allow support share NIC mode (Disabled the KVM). Setting this value will allow manual IP assignment. Setting this value will allow dynamic IP assignment. The setting default value is Enabled. Options Disabled Enabled Disabled Enabled System BIOS configuration 20 - HP ProLiant DL160 | HP ProLiant DL160 Generation 5 Server Software Configuration - Page 21
Figure 13 Watchdog Configuration submenu Table 12 Watchdog Configuration submenu fields Field POST Watchdog Timer Action BMC Watch Dog Time Out Description Options Set this value to allow BMC to wait before assuming the system has crashed and needs to reset. 30 Min System BIOS configuration 21 - HP ProLiant DL160 | HP ProLiant DL160 Generation 5 Server Software Configuration - Page 22
Figure 14 Hardware health information submenu System BIOS configuration 22 - HP ProLiant DL160 | HP ProLiant DL160 Generation 5 Server Software Configuration - Page 23
15 Remote Access Configuration submenu Table 13 Remote Access Configuration submenu fields Field Remote Access Description Options Enable to select Remote Access type. Enabled Disable to select Remote Access type. The setting default value is Disabled Disabled. System BIOS configuration 23 - HP ProLiant DL160 | HP ProLiant DL160 Generation 5 Server Software Configuration - Page 24
: When you install USB storage, USB Mass Device Configuration items are displayed. From this item, you can get some information about the device, some information you can configure it if needed. Table 14 USB Configuration submenu fields Field Description USB Controller This setting allows the - HP ProLiant DL160 | HP ProLiant DL160 Generation 5 Server Software Configuration - Page 25
Then you can select it as the first boot device or disable it as the first drive. Embedded NIC Port 1 The option specifies the embedded NIC Port 1 PXE. The setting default value is PXE Enabled Embedded NIC Port 2 The option specifies the embedded NIC Port 2 PXE. PXE System BIOS configuration 25 - HP ProLiant DL160 | HP ProLiant DL160 Generation 5 Server Software Configuration - Page 26
the boot menu. For example, if the 1st boot device is set to Hard disk drives, then BIOS will try to boot to hard disk drives first. Figure 18 Boot Device Priority submenu NOTE: When you select a boot category from the boot menu, a list of devices in that category appears. System BIOS configuration - HP ProLiant DL160 | HP ProLiant DL160 Generation 5 Server Software Configuration - Page 27
Hard Disk Drives submenu Figure 19 Hard Disk Drives submenu Security menu The Security menu allows users to set an administrator password. When entered, this password allows the user to access and change all settings in the Setup Utility. Figure 20 Security menu System BIOS configuration 27 - HP ProLiant DL160 | HP ProLiant DL160 Generation 5 Server Software Configuration - Page 28
the Enter New Password box. The password may consist of up to six alphanumeric characters (A-Z, a-z, 0-9), then press Enter. The Confirm New Password window displays. System BIOS configuration 28 - HP ProLiant DL160 | HP ProLiant DL160 Generation 5 Server Software Configuration - Page 29
press Enter. The Password Installed OK is displayed. Press OK to finish. Figure 23 Password installed 5. Press F10 to save the password and close the Setup Utility. Setup automatically changes the administrator Password. System BIOS configuration 29 - HP ProLiant DL160 | HP ProLiant DL160 Generation 5 Server Software Configuration - Page 30
Security menu screen, in the Change Administrator Password field, press Enter. The Enter New Password displays. 2. Press Enter. Figure 24 Clear Administrator Password submenu System BIOS configuration 30 - HP ProLiant DL160 | HP ProLiant DL160 Generation 5 Server Software Configuration - Page 31
then press Enter. Figure 25 Password Check submenu Table 16 Password Check submenu fields Option Setup Always Description Set this value need to check password while invoking the set up utility. Set this value must check password while invoking setup on each boot. System BIOS configuration 31 - HP ProLiant DL160 | HP ProLiant DL160 Generation 5 Server Software Configuration - Page 32
Changes and Exit Save the changes made and exit the Setup Utility Discard Changes and Exit Discard the changes and exit the setup utility Discard Changes Discard the changes in the utility Load Optimal Defaults Loads the default settings for all BIOS setup fields. System BIOS configuration 32 - HP ProLiant DL160 | HP ProLiant DL160 Generation 5 Server Software Configuration - Page 33
Display screen The BIOS Summary Displays basic and important information about the current server configuration and is necessary for troubleshooting and may be required when asking for technical support. This information includes: • Size of the system • Serial port base I/O address • Available - HP ProLiant DL160 | HP ProLiant DL160 Generation 5 Server Software Configuration - Page 34
made in the Setup Utility have caused error messages to be unreadable. Clearing the CMOS data removes the administrator password. The clear CMOS setting is on clear CMOS button(SW6) on the system board. Refer to the HP ProLiant DL160 Generation 5 Server Maintenance and Service Guide for the location - HP ProLiant DL160 | HP ProLiant DL160 Generation 5 Server Software Configuration - Page 35
, even if the server appears to boot successfully. If your system displays one of the messages marked below with an asterisk (*), write down the code and message and contact your HP Customer Support provider. POST-related troubleshooting Perform the following procedures when POST fails to run - HP ProLiant DL160 | HP ProLiant DL160 Generation 5 Server Software Configuration - Page 36
. 6. If the server still does not work, repeat step 2. 7. Remove all accessories, except the primary boot hard disk drive. 8. Repeat steps 4 and 5. If the server now works, replace the boards and accessories one at a time to determine which one is causing the problem. System BIOS configuration 36 - HP ProLiant DL160 | HP ProLiant DL160 Generation 5 Server Software Configuration - Page 37
http://www.microsoft.com Editions Microsoft Product Support Services: • Microsoft Windows Server 2003 R2- http://www.support.microsoft.com/direct Enterprise, Standard, and NOS of your choice. 1. Configure the hardware aspect of the server. 2. Update the server BIOS. System BIOS configuration 37 - HP ProLiant DL160 | HP ProLiant DL160 Generation 5 Server Software Configuration - Page 38
SATA to PATA; otherwise, the operating system kernel will hang. Pre-installation instructions 1. Complete the NOS pre-installation procedures. 2. Have the following installation requirements on hand: ○ HP ProLiant DL160 Generation 5 Server Support CD ○ The applicable Microsoft Windows NOS CD-ROM - HP ProLiant DL160 | HP ProLiant DL160 Generation 5 Server Software Configuration - Page 39
the on-screen instructions to create the Windows NOS driver diskette. 4. Label, date, and save the driver diskette as HP disk [Windows NOS version]. Section 2. Installing Windows NOS 1. Boot the server from the Windows NOS CD-ROM. The Setup is inspecting your hardware configuration message displays - HP ProLiant DL160 | HP ProLiant DL160 Generation 5 Server Software Configuration - Page 40
-click the Startup.htm file located on the root directory of the Support CD. 2. Click the HP ProLiant DL160 Generation 5 server drivers for chipset, Network, and Video link. 3. Select the ServerEngines chipset driver option for Windows [NOS version] option. The File Download dialog box displays - HP ProLiant DL160 | HP ProLiant DL160 Generation 5 Server Software Configuration - Page 41
double-click the Startup.htm file located on the root directory of the Support CD. 2. Click the HP ProLiant DL160 Generation 5 server drivers for chipset, Network, and Video link. 3. Select the embedded VGA driver for the Windows [NOS version] option. The File Download dialog box displays. 4. Click - HP ProLiant DL160 | HP ProLiant DL160 Generation 5 Server Software Configuration - Page 42
NOS CD-ROM from the drive. 10. After the system reboots, log on to the system. 11. Click Start | Settings | Control Panel | Administrative Tools. 12. Check that the following services are now available: ○ Terminal Services Client Creator ○ Terminal Services Configuration System BIOS configuration 42 - HP ProLiant DL160 | HP ProLiant DL160 Generation 5 Server Software Configuration - Page 43
clients, open a command prompt and type: ping computername where computername is the server name you entered during the Windows NOS installation. You should get four replies from your new server. If there is a connection problem, you must fix it before going any further. System BIOS configuration 43 - HP ProLiant DL160 | HP ProLiant DL160 Generation 5 Server Software Configuration - Page 44
a client you installed Terminal Services on. 2. Select the target server from the Available Servers list displayed on the screen. 3. Click Connect. 4. Complete the User ID and Password login form. Phase 3 - Configuring the domain controller setup The Windows NOS manual calls this process "Promoting - HP ProLiant DL160 | HP ProLiant DL160 Generation 5 Server Software Configuration - Page 45
[version]. For the specific procedure for each RHEL NOS version, refer to the following sections. 2. Install additional HP accessories. The HP ProLiant DL160 Generation 5 Server Support CD includes the drivers for accessories compatible to your server. Refer to the product manual enclosed with the - HP ProLiant DL160 | HP ProLiant DL160 Generation 5 Server Software Configuration - Page 46
Partitioning dialog box, click Next. 6. Review the Disk Setup settings and modify if necessary, then click Next. Boot Loader Configuration HP recommends keeping the default option, then click Next to continue. Network Configuration Review the Network Configuration settings and verify that they fit - HP ProLiant DL160 | HP ProLiant DL160 Generation 5 Server Software Configuration - Page 47
the initial setup configuration. License Agreement Read the license agreement. If the terms of the agreement are acceptable, click Next. Date and Time Modify the Date and Time settings, then click Next to continue. Display Retain the default display setting, then click Next to continue. System BIOS - HP ProLiant DL160 | HP ProLiant DL160 Generation 5 Server Software Configuration - Page 48
in this section apply to all versions of the Red Hat Enterprise Linux 5 supported by your ProLiant server. Refer to Table 18 for a list of these NOS versions. NOTE: If the system has more than 4 GB of memory, the Red Hat Enterprise Linux installation requires the pci=nommconf parameter. Section - HP ProLiant DL160 | HP ProLiant DL160 Generation 5 Server Software Configuration - Page 49
, the DNS Name Server package may be required if you have set-up your new server to be the DNS controller. Section 3. Installing setup configuration. License Agreement Read the license agreement. If the terms of the agreement are acceptable, click Forward. Firewall Review the Firewall Configuration - HP ProLiant DL160 | HP ProLiant DL160 Generation 5 Server Software Configuration - Page 50
Setup The initial setup configuration specific procedure for each SLE NOS version, refer to the following sections. 2. Install additional HP accessories. The HP ProLiant DL160 Generation 5 Server Support CD includes the drivers for accessories compatible to your server. Refer to the product manual - HP ProLiant DL160 | HP ProLiant DL160 Generation 5 Server Software Configuration - Page 51
Linux Enterprise Server 9 1. Turn on the server and insert the SUSE Linux Enterprise Server 9 (SLES9 default settings. 2. Review the default installation Network Configuration Review the Network Configuration settings and the installation. Service Configuration Review the Services settings and - HP ProLiant DL160 | HP ProLiant DL160 Generation 5 Server Software Configuration - Page 52
Configuration Review the default hardware settings and modify them as necessary, then click Next to continue. Installation Completed Click Finish to proceed to the login window. SUSE Linux Enterprise Server . Section 3. Completing the installation Hostname and Domain Name System BIOS configuration 52 - HP ProLiant DL160 | HP ProLiant DL160 Generation 5 Server Software Configuration - Page 53
Note Review the release notes, then click Next to continue. Hardware Configuration Review the ProLiant server. Pre-installation instructions 1. Complete the NOS pre-installation procedures. 2. Have the following installation requirements on hand: ○ HP ProLiant DL160 Generation 5 Server Support - HP ProLiant DL160 | HP ProLiant DL160 Generation 5 Server Software Configuration - Page 54
10. Refer to the next section for detailed instructions. 2. Install additional HP accessories. The HP ProLiant DL160 Generation 5 Server Support CD includes the drivers for accessories compatible to your server. Refer to the product manual enclosed with the accessory for the detailed installation - HP ProLiant DL160 | HP ProLiant DL160 Generation 5 Server Software Configuration - Page 55
password in the second box, then click Next to continue. Confirm Information A configuration information summary is displayed. Verify this information, then click Confirm to proceed to the option, then select the appropriate localization(s). Click Next to continue. System BIOS configuration 55 - HP ProLiant DL160 | HP ProLiant DL160 Generation 5 Server Software Configuration - Page 56
Click Entire Group, then click Next to continue. Disk Selection Select a boot disk. If the system contains more than one hard disk, select partition size, then click Next to continue. Layout File System Review the default file system layout and modify if necessary, then System BIOS configuration 56 - HP ProLiant DL160 | HP ProLiant DL160 Generation 5 Server Software Configuration - Page 57
cool before touching them. CAUTION: Follow the ESD precautions listed in Chapter 2 of the HP ProLiant DL160 Generation 5 Server Maintenance and Service Guide when handling any hardware component. 1. Turn off the server and all the peripherals connected to it. 2. Disconnect the AC power cord from the - HP ProLiant DL160 | HP ProLiant DL160 Generation 5 Server Software Configuration - Page 58
server. The serial port can be controlled by the server or shared between the server and the BMC (the default setting). To configure the BMC through the Setup Utility: 1. In the Serial Port Configuration submenu under the IPMI Configuration to get the IP address. To manually set the IP address, type - HP ProLiant DL160 | HP ProLiant DL160 Generation 5 Server Software Configuration - Page 59
Browse the server settings using the user interface that displays. To enable console redirection via the Setup Utility: 1. In the Serial Port Configuration submenu under the IPMI Configuration submenu, set the Serial port Assignment field to System or BMC. See the "Serial Port Configuration submenu - HP ProLiant DL160 | HP ProLiant DL160 Generation 5 Server Software Configuration - Page 60
interface, 58 L LAN Configuration, 17 LAN Controller, 58 Load Option Default, 32 loading system defaults, 34 M Main menu, 6 Main Menu, 9 memory, 9 N New Password box, 28 NOS installation, 37 O operating systems supported. P password check, 31 Password Check, 31 POST, 35 POST Watchdog Timer Action - HP ProLiant DL160 | HP ProLiant DL160 Generation 5 Server Software Configuration - Page 61
Solaris 10, installing, 53 SUSE Linux Enterprise Server NOS, installing, 50 SW6, 34 system configuration changing, 5 System Date, 9 system defaults, 34 System Time, 9 system time and date setting, 5 U USB 2.0 Controller, 24 USB Configuration submenu, 24 USB Controller, 24 V View BMC System Event Log
-
 1
1 -
 2
2 -
 3
3 -
 4
4 -
 5
5 -
 6
6 -
 7
7 -
8
-
9
-
10
-
11
-
12
-
13
-
14
-
15
-
16
-
17
-
18
-
19
-
20
-
21
-
22
-
23
-
24
-
25
-
26
-
27
-
28
-
29
-
30
-
31
-
32
-
33
-
34
-
35
-
36
-
37
-
38
-
39
-
40
-
41
-
42
-
43
-
44
-
45
-
46
-
47
-
48
-
49
-
50
-
51
-
52
-
53
-
54
-
55
-
56
-
57
-
58
-
59
-
60
-
61
 |
 |

HP ProLiant DL160 Generation 5 Server
Software Configuration Guide
Part number 449872-001
First edition November 2007