HP StorageWorks 16-EL HP StorageWorks SAN Switch Rack Mount Kit Installation I - Page 16
Assemble the two inner rails one on each side to the switch using the, appropriate number from, of #
 |
View all HP StorageWorks 16-EL manuals
Add to My Manuals
Save this manual to your list of manuals |
Page 16 highlights
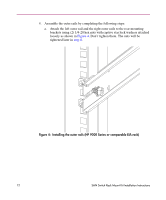
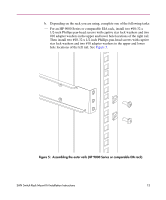
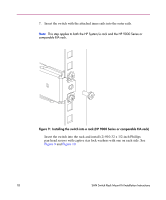
a. Assemble the two inner rails (one on each side) to the switch using the appropriate number (from step 5) of #8-32 x 3/16-inch Phillips pan-head screws as shown in Figure 7. Note: The rail kit provides fourteen #8-32 x 3/16-inch screws for assembling the inner rails. Each switch requires a different number of these screws. For example, Figure 7 shows the an inner rail being attached to the SAN Switch 2/16 with five screws. Attaching both inner rails requires ten screws. Figure 7: Assembling the inner rails Note: For factory integration only, tighten the #8-32 x 3/16-inch Phillips pan-head screw with thread lock and torque between 6 to 8 inch-pounds. 16 SAN Switch Rack Mount Kit Installation Instructions
-
 1
1 -
2
-
3
-
4
-
5
-
6
-
7
-
8
-
9
-
10
-
 11
11 -
 12
12 -
 13
13 -
 14
14 -
 15
15 -
 16
16 -
 17
17 -
 18
18 -
 19
19 -
 20
20
 |
 |

16
SAN Switch Rack Mount Kit Installation Instructions
a.
Assemble the two inner rails (one on each side) to the switch using the
appropriate number (from
step 5
) of #8-32 x 3/16-inch Phillips pan-head
screws as shown in
Figure 7
.
Note:
The rail kit provides fourteen #8-32 x 3/16-inch screws for assembling the inner
rails. Each switch requires a different number of these screws. For example,
Figure 7
shows the an inner rail being attached to the SAN Switch 2/16 with five screws.
Attaching both inner rails requires ten screws.
Figure 7:
Assembling the inner rails
Note:
For factory integration only, tighten the #8-32 x 3/16-inch Phillips pan-head
screw with thread lock and torque between 6 to 8 inch-pounds.