HP Surestore 15 Slot with DLT4000 HP SureStore DLT Tape Library Models 4115w/4 - Page 32
Library on Slides, Installation Handles
 |
View all HP Surestore 15 Slot with DLT4000 manuals
Add to My Manuals
Save this manual to your list of manuals |
Page 32 highlights
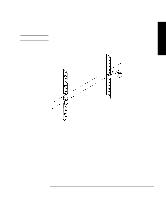
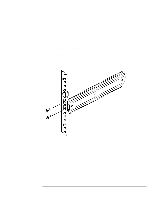
Figure 1-12 Installing the Tape Library Step 4: Mount the Library in a Rack (optional) 5. Attach the library to each slide using three 8-32 x 3/8 pan-slotted phillips screws. Library on Slides Figure 1-13 6. Remove the installation handles by removing two screws on each handle. Keep the screws and handles in case the library needs to be reshipped in the future. Installation Handles 1-18
-
 1
1 -
2
-
3
-
4
-
5
-
6
-
7
-
8
-
9
-
10
-
11
-
12
-
13
-
14
-
15
-
16
-
17
-
18
-
19
-
20
-
21
-
22
-
23
-
24
-
25
-
26
-
 27
27 -
 28
28 -
 29
29 -
 30
30 -
 31
31 -
 32
32 -
 33
33 -
 34
34 -
 35
35 -
 36
36 -
 37
37 -
38
-
39
-
40
-
41
-
42
-
43
-
44
-
45
-
46
-
47
-
48
-
49
-
50
-
51
-
52
-
53
-
54
-
55
-
56
-
57
-
58
-
59
-
60
-
61
-
62
-
63
-
64
-
65
-
66
-
67
-
68
-
69
-
70
-
71
-
72
-
73
-
74
-
75
-
76
-
77
-
78
-
79
-
80
-
81
-
82
-
83
-
84
-
85
-
86
-
87
-
88
-
89
-
90
-
91
-
92
-
93
-
94
-
95
-
96
-
97
-
98
-
99
-
100
-
101
-
102
-
103
-
104
-
105
-
106
-
107
-
108
-
109
-
110
-
111
-
112
-
113
-
114
-
115
-
116
-
117
-
118
-
119
-
120
-
121
-
122
-
123
-
124
-
125
-
126
-
127
-
128
-
129
-
130
-
131
-
132
-
133
-
134
-
135
-
136
 |
 |

1-18
Installing the Tape Library
Step 4: Mount the Library in a Rack (optional)
5.
Attach the library to each slide using three 8-32 x 3/8 pan-slotted phillips
screws.
Figure 1-12
Library on Slides
6.
Remove the installation handles by removing two screws on each handle. Keep
the screws and handles in case the library needs to be reshipped in the future.
Figure 1-13
Installation Handles