HP Surestore 64 Installation Guide - Page 8
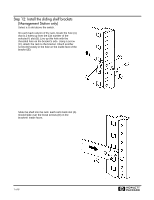
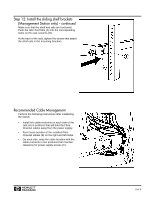
Step 12: Install the sliding shelf brackets, Management Station only - continued
 |
View all HP Surestore 64 manuals
Add to My Manuals
Save this manual to your list of manuals |
Page 8 highlights
Step 12: Install the sliding shelf brackets (Management Station only) - continued Make sure that the shelf and rails are horizontal. Push the rails' front tabs (A) into the corresponding holes on the rack columns (B). At the back of the rack, tighten the screws that attach the shelf rails to the mounting brackets. Recommended Cable Management Perform the following instructions after installating the switch: • Install two cable restraints on each side of the rack (A) in positions that will hold the Fibre Channel cables away from the power supply. • Form loose bundles of the installed Fibre Channel cables (B) on the right and left sides. • On each side, wrap the cable bundles with the cable restraints in two positions that maintain clearance for power supply access (C). H 8 of 8
-
 1
1 -
2
-
 3
3 -
 4
4 -
 5
5 -
 6
6 -
 7
7 -
 8
8 -
 9
9 -
 10
10
 |
 |
