HP Surestore Tape Library Model 4/48 HP DLT Tape Library 28/48-Slot - User& - Page 72
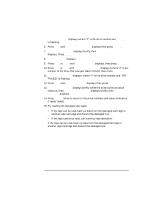
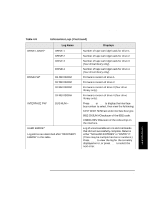
Drv # On Good, On Good, Drv # Off Failed, Change Confirmed, Online Repair, Drive Power, Drive Status
 |
View all HP Surestore Tape Library Model 4/48 manuals
Add to My Manuals
Save this manual to your list of manuals |
Page 72 highlights
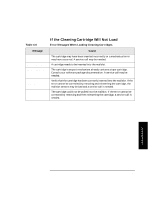
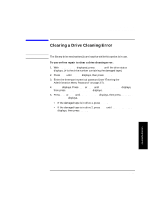
Library Operation Clearing a Drive Cleaning Error DRV # ON GOOD displays, where "#" is the drive number and ON GOOD is flashing. 6. Press NEXT until DRV # OFF FAILED displays then press ENTER. 7. CHANGE CONFIRMED displays briefly, then ONLINE REPAIR* displays. Press ENTER. 8. DRIVE POWER* displays. 9. Press NEXT or PREV until DRIVE STATUS displays, then press ENTER. 10. Press NEXT or PREV until DRV # OFF FAILED displays (where "#" is the number of the drive that was just taken off-line) then press ENTER. 11. DRV # OFF FAILED displays, where "#" is the drive number and "OFF FAILED" is flashing. 12. Press NEXT until DRV # ON GOOD displays, then press ENTER. 13. SETTING UP DRIVE displays briefly while the drive communication tests run, then CHANGE CONFIRMED displays briefly, then ONLINE REPAIR* displays. 14. Press CANCEL twice to return to the drive numbers and status indicators ("ready" state). 15. Try reading the damaged tape again. • If the tape can be read, back up data from the damaged cartridge to another tape cartridge and discard the damaged one. • If the tape cannot be read, call a service representative. If the tape can be read, back up data from the damaged cartridge to another tape cartridge and discard the damaged one. 4-28
-
 1
1 -
2
-
3
-
4
-
5
-
6
-
7
-
8
-
9
-
10
-
11
-
12
-
13
-
14
-
15
-
16
-
17
-
18
-
19
-
20
-
21
-
22
-
23
-
24
-
25
-
26
-
27
-
28
-
29
-
30
-
31
-
32
-
33
-
34
-
35
-
36
-
37
-
38
-
39
-
40
-
41
-
42
-
43
-
44
-
45
-
46
-
47
-
48
-
49
-
50
-
51
-
52
-
53
-
54
-
55
-
56
-
57
-
58
-
59
-
60
-
61
-
62
-
63
-
64
-
65
-
66
-
 67
67 -
 68
68 -
 69
69 -
 70
70 -
 71
71 -
 72
72 -
 73
73 -
 74
74 -
 75
75 -
 76
76 -
 77
77 -
78
-
79
-
80
-
81
-
82
-
83
-
84
-
85
-
86
-
87
-
88
-
89
-
90
-
91
-
92
-
93
-
94
-
95
-
96
-
97
-
98
-
99
-
100
-
101
-
102
-
103
-
104
-
105
-
106
-
107
-
108
-
109
-
110
 |
 |