HP TouchSmart 610-1150xt Wall-Mounting your HP TouchSmart User Guide - Page 10
replaced on the bottom of the computer stand in order to properly support the computer. Follow all
 |
View all HP TouchSmart 610-1150xt manuals
Add to My Manuals
Save this manual to your list of manuals |
Page 10 highlights
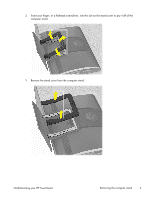
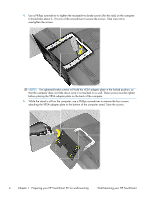
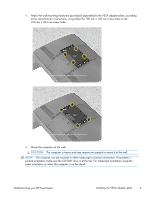
8. Lift the computer stand away from the computer. 9. Save the computer stand, stand cover, and four screws, so that you can convert your HP TouchSmart PC back to a desktop unit in the future. NOTE: If the computer stand is ever replaced on the computer, the VESA adapter plate must be replaced on the bottom of the computer stand in order to properly support the computer. Follow all the steps in Reinstalling the stand on your HP TouchSmart PC on page 10. 6 Chapter 1 Preparing your HP TouchSmart PC for wall-mounting Wall-Mounting your HP TouchSmart
-
 1
1 -
2
-
3
-
4
-
 5
5 -
 6
6 -
 7
7 -
 8
8 -
 9
9 -
 10
10 -
 11
11 -
 12
12 -
 13
13 -
 14
14 -
 15
15 -
16
-
17
-
18
-
19
-
20
 |
 |
8.
Lift the computer stand away from the computer.
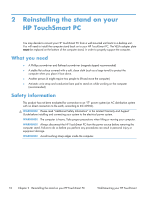
9.
Save the computer stand, stand cover, and four screws, so that you can convert your
HP TouchSmart PC back to a desktop unit in the future.
NOTE:
If the computer stand is ever replaced on the computer, the VESA adapter plate
must
be
replaced on the bottom of the computer stand in order to properly support the computer. Follow all
the steps in
Reinstalling the stand on your HP TouchSmart PC
on page
10
.
6
Chapter 1
Preparing your HP TouchSmart PC for wall-mounting
Wall-Mounting your HP TouchSmart