HP TouchSmart 9100 Maintenance and Service Guide: HP TouchSmart 9100 Business
HP TouchSmart 9100 - Business PC Manual
 |
View all HP TouchSmart 9100 manuals
Add to My Manuals
Save this manual to your list of manuals |
HP TouchSmart 9100 manual content summary:
- HP TouchSmart 9100 | Maintenance and Service Guide: HP TouchSmart 9100 Business - Page 1
Maintenance and Service Guide HP TouchSmart 9100 Business PC - HP TouchSmart 9100 | Maintenance and Service Guide: HP TouchSmart 9100 Business - Page 2
information that is protected by copyright. No part of this document may be photocopied, reproduced, or translated to another language without the prior written consent of Hewlett-Packard Company. Maintenance and Service Guide First Edition (December 2009) Document Part Number: 602766-001 - HP TouchSmart 9100 | Maintenance and Service Guide: HP TouchSmart 9100 Business - Page 3
About This Book WARNING! Text set off in this manner indicates that failure to follow directions could result in bodily harm or loss of life. CAUTION: Text set off in this manner indicates that failure to follow directions could result in damage to equipment or loss of information. NOTE: Text set - HP TouchSmart 9100 | Maintenance and Service Guide: HP TouchSmart 9100 Business - Page 4
iv About This Book - HP TouchSmart 9100 | Maintenance and Service Guide: HP TouchSmart 9100 Business - Page 5
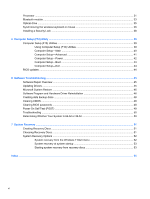
and system board ...8 Drives ...8 Memory ...8 Misc Boards ...9 Power Adapters ...9 Keyboards and Mice ...9 Misc Parts ...10 4 Removal and Replacement Procedures ...11 Preparing to disassemble the HP TouchSmart PC 11 Hard drive/memory cover ...12 I/O cover ...13 Feet ...14 Stand ...15 Adding Memory - HP TouchSmart 9100 | Maintenance and Service Guide: HP TouchSmart 9100 Business - Page 6
41 Computer Setup-Power 42 Computer Setup-Boot ...43 Computer Setup-Exit ...44 BIOS updates ...44 6 Software Troubleshooting ...45 Software Repair Overview ...45 Updating Drivers ...45 Microsoft System Restore ...46 Software Program and Hardware Driver Reinstallation 46 Creating data backup - HP TouchSmart 9100 | Maintenance and Service Guide: HP TouchSmart 9100 Business - Page 7
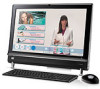
Description The HP TouchSmart 9100 Business PC transforms the PC experience with its All-in-One form factor and touch-enabled features. The PC can be used as an everyday desktop, but is better suited to reaching customers with interactive touch-enabled applications. The HP TouchSmart 9100 features - HP TouchSmart 9100 | Maintenance and Service Guide: HP TouchSmart 9100 Business - Page 8
art 58.4-cm (23-in) diagonal widescreen high-definition display with HP BrightView technology.* HP BrightView technology improves the contrast and clarity of your display. In addition may vary either higher or lower. Bluetooth (select models Use Bluetooth to connect to Bluetooth-enabled devices. The - HP TouchSmart 9100 | Maintenance and Service Guide: HP TouchSmart 9100 Business - Page 9
models only) wireless network. The diagram shows the internal location of the wireless LAN (top left and right, not visible externally). The wireless LAN supports video sharing sites. Use the HP TouchSmart button Turn your HP TouchSmart 9100 Business PC on and open your HP TouchSmart HP TouchSmart - HP TouchSmart 9100 | Maintenance and Service Guide: HP TouchSmart 9100 Business - Page 10
Lower left-side components Item 1 2 3 Item USB 2.0 Audio line in Headphones Component Connect USB devices (USB 2.0) such as printers, external hard disk drives, digital cameras, and MP3 players. Connect MP3 players or other audio players. This connector is not for headphones or a microphone. - HP TouchSmart 9100 | Maintenance and Service Guide: HP TouchSmart 9100 Business - Page 11
port (SPDIF Connect to your home theater system or your surround sound digital speakers. Out) Supports 3.1, 4.1, and 5.1 speakers. Audio line out Connect external 2.0 and 2.1 powered speakers. TV In (TV tuner models only) Connect your TV signal source to watch, record, and pause live TV. This - HP TouchSmart 9100 | Maintenance and Service Guide: HP TouchSmart 9100 Business - Page 12
while watching and recording TV programs. This is not required if you do not use a set-top box. A remote control is included with select models only. 11 USB 2.0 ports (2) Connect USB devices (USB 2.0) such as printers, external hard disk drives, digital cameras, and MP3 players. 12 Audio Line - HP TouchSmart 9100 | Maintenance and Service Guide: HP TouchSmart 9100 Business - Page 13
HP TouchSmart 9100 Business PC is shipped with the computer stand collapsed against the back of the computer. To assure that the computer is in a stable position on your desktop, pull the computer stand open until it snaps into place. Then, if you want to change the angle of the HP TouchSmart 9100 - HP TouchSmart 9100 | Maintenance and Service Guide: HP TouchSmart 9100 Business - Page 14
See the following available spare parts for the HP TouchSmart PC. Processors and system board Description Intel Core 2 Duo P7570 (2.26-GHz, 3-MB L2 cache) processor Intel Core 2 Duo T6570 (2.10-GHz, 2-MB L2 cache) processor System board Spare Part Number 593893-001 593892-001 602998-001 Drives - HP TouchSmart 9100 | Maintenance and Service Guide: HP TouchSmart 9100 Business - Page 15
Description Keyboard (blue, USB) For use in Brazil For use in French Canada For use in Latin America For use in the United States Keyboard (wireless GHz Spare Part Number 582726-001 593888-001 593897-001 593890-001 Spare Part Number 505911-001 593891-001 142766-005 Spare Part Number 596411-201 - HP TouchSmart 9100 | Maintenance and Service Guide: HP TouchSmart 9100 Business - Page 16
Misc Parts Description Wall mount assembly, VESA Bluetooth module Spare Part Number 593887-001 593889-001 10 Chapter 3 Spare Parts - HP TouchSmart 9100 | Maintenance and Service Guide: HP TouchSmart 9100 Business - Page 17
connected to the computer. 3. Shut down the computer. 4. After the system has completely shut down, disconnect the power adapter from the back of the HP TouchSmart PC. 5. Remove the connector cover by inserting your finger under the gap on the bottom-left side of the cover and then pulling gently - HP TouchSmart 9100 | Maintenance and Service Guide: HP TouchSmart 9100 Business - Page 18
hard disk drive, see Removing the hard drive on page 19. Hard drive/memory cover 1. Prepare the computer for disassembly (see Preparing to disassemble the HP TouchSmart PC on page 11). 2. Place the computer face down on a soft, flat surface. 3. Lift the stand and pull up on the stand flip cover. 12 - HP TouchSmart 9100 | Maintenance and Service Guide: HP TouchSmart 9100 Business - Page 19
4. Remove the screw that secures the hard drive/memory cover to the computer, and then pull the bottom edge of the cover away from the computer. To install the hard drive/memory cover, reverse the removal procedures. I/O cover ▲ Remove the connector cover on the back of the computer by inserting - HP TouchSmart 9100 | Maintenance and Service Guide: HP TouchSmart 9100 Business - Page 20
Feet 1. Prepare the computer for disassembly (see Preparing to disassemble the HP TouchSmart PC on page 11). 2. Place the computer face down on a soft, flat surface. 3. Remove the screw that secures the foot to the computer (1). 4. Slide the foot - HP TouchSmart 9100 | Maintenance and Service Guide: HP TouchSmart 9100 Business - Page 21
Stand 1. Prepare the computer for disassembly (see Preparing to disassemble the HP TouchSmart PC on page 11). 2. Place the computer face down on a soft, flat surface. 3. Remove the hard drive/memory cover (see Hard drive/memory cover on page - HP TouchSmart 9100 | Maintenance and Service Guide: HP TouchSmart 9100 Business - Page 22
The HP TouchSmart PC comes with random access memory (RAM), which temporarily stores data and instructions on your computer. The HP TouchSmart PC ships module your HP TouchSmart PC uses, and for specific memory module information and specifications, go to http://www.hp.com/support CAUTION: Using - HP TouchSmart 9100 | Maintenance and Service Guide: HP TouchSmart 9100 Business - Page 23
4. Lift the cover off the memory module slot. 5. Push the two latches of the retaining clips away from the memory module (1). The memory module pops up at an angle. Adding Memory 17 - HP TouchSmart 9100 | Maintenance and Service Guide: HP TouchSmart 9100 Business - Page 24
6. Lift the memory module from the memory socket by pulling the module away from the slot at an angle (2). NOTE: Memory modules are designed with a notch (3) to prevent incorrect insertion into the memory module slot. 7. Store the memory module in antistatic packaging. To reinstall memory, reverse - HP TouchSmart 9100 | Maintenance and Service Guide: HP TouchSmart 9100 Business - Page 25
Removing the hard drive 1. Prepare the computer for disassembly (see Preparing to disassemble the HP TouchSmart PC on page 11). 2. Place the computer face down on a soft, flat surface. 3. Remove the hard drive/memory cover (see Hard drive/memory cover on page - HP TouchSmart 9100 | Maintenance and Service Guide: HP TouchSmart 9100 Business - Page 26
Back cover 1. Prepare the computer for disassembly (see Preparing to disassemble the HP TouchSmart PC on page 11). 2. Place the computer face down on a soft, flat surface. 3. Remove the hard drive/memory cover (see Hard drive/memory cover on page - HP TouchSmart 9100 | Maintenance and Service Guide: HP TouchSmart 9100 Business - Page 27
8. Remove the side trims from each side by prying them at the bottom (1) and lifting up and off the computer (2). 9. Remove the optical drive cover. Back cover 21 - HP TouchSmart 9100 | Maintenance and Service Guide: HP TouchSmart 9100 Business - Page 28
that fit into slots in the top inside of the computer. Graphics card 1. Prepare the computer for disassembly (see Preparing to disassemble the HP TouchSmart PC on page 11). 2. Place the computer face down on a soft, flat surface. 3. Remove the hard drive/memory cover (see Hard drive/memory cover - HP TouchSmart 9100 | Maintenance and Service Guide: HP TouchSmart 9100 Business - Page 29
8. Remove the amp board shield by removing the two screws, rotating the top of the shield upward, and lifting the shield off the computer. 9. Remove the system board shield by removing the nine screws that secure it to the computer, and then lifting it off the computer. Graphics card 23 - HP TouchSmart 9100 | Maintenance and Service Guide: HP TouchSmart 9100 Business - Page 30
installing a new graphics card, be sure to apply thermal material. WLAN module 1. Prepare the computer for disassembly (see Preparing to disassemble the HP TouchSmart PC on page 11). 2. Place the computer face down on a soft, flat surface. 3. Remove the hard drive/memory cover (see Hard drive/memory - HP TouchSmart 9100 | Maintenance and Service Guide: HP TouchSmart 9100 Business - Page 31
8. Remove the amp board shield by removing the two screws, rotating the top of the shield upward, and lifting the shield off the computer. 9. Remove the system board shield by removing the nine screws that secure it to the computer, and then lifting it off the computer. 10. Disconnect the two - HP TouchSmart 9100 | Maintenance and Service Guide: HP TouchSmart 9100 Business - Page 32
. WLAN modules include a notch that prevents incorrect installation. TV tuner module 1. Prepare the computer for disassembly (see Preparing to disassemble the HP TouchSmart PC on page 11). 2. Place the computer face down on a soft, flat surface. 3. Remove the hard drive/memory cover (see Hard drive - HP TouchSmart 9100 | Maintenance and Service Guide: HP TouchSmart 9100 Business - Page 33
8. Remove the amp board shield by removing the two screws, rotating the top of the shield upward, and lifting the shield off the computer. 9. Remove the system board shield by removing the nine screws that secure it to the computer, and then lifting it off the computer. TV tuner module 27 - HP TouchSmart 9100 | Maintenance and Service Guide: HP TouchSmart 9100 Business - Page 34
10. Locate the TV tuner module on the system board. 11. Detach the side USB I/O module connectors from the system board, and then move them aside to gain access to the TV tuner module. 12. Disconnect the antenna cable from the top of the module. 13. Disconnect the AV input connector from the side of - HP TouchSmart 9100 | Maintenance and Service Guide: HP TouchSmart 9100 Business - Page 35
the computer for disassembly (see Preparing to disassemble the HP TouchSmart PC on page 11). 2. Place the computer face down on page 20). 9. Remove the frame support by removing the three screws that secure the frame support to the computer, and then lifting the support out of the computer. NOTE: The - HP TouchSmart 9100 | Maintenance and Service Guide: HP TouchSmart 9100 Business - Page 36
10. Remove the USB wireless mouse and keyboard receiver, as well as its housing, by pulling both devices straight out of and off the computer. 11. Remove the graphics card (see Graphics card on page 22). 12. Remove the processor thermal kit as follows: a. Disconnect the fan cable from the system - HP TouchSmart 9100 | Maintenance and Service Guide: HP TouchSmart 9100 Business - Page 37
system board. To install the system board, reverse the removal procedures. Processor 1. Prepare the computer for disassembly (see Preparing to disassemble the HP TouchSmart PC on page 11). 2. Place the computer face down on a soft, flat surface. 3. Remove the hard drive/memory cover (see Hard drive - HP TouchSmart 9100 | Maintenance and Service Guide: HP TouchSmart 9100 Business - Page 38
9. Remove the processor thermal kit as follows: a. Disconnect the fan cable from the system board (1). b. Remove the four screws that secure the fan to the system board (2). c. Loosen the four captive screws in the order indicated on the heat sink (3). d. Lift the thermal kit from the system board. - HP TouchSmart 9100 | Maintenance and Service Guide: HP TouchSmart 9100 Business - Page 39
of the heat sink and place it in position atop the processor. Bluetooth module 1. Prepare the computer for disassembly (see Preparing to disassemble the HP TouchSmart PC on page 11). 2. Place the computer face down on a soft, flat surface. 3. Remove the hard drive/memory cover (see Hard drive/memory - HP TouchSmart 9100 | Maintenance and Service Guide: HP TouchSmart 9100 Business - Page 40
5. Remove the I/O cover (see I/O cover on page 13). 6. Remove the feet (see Feet on page 14). 7. Remove the back cover (see Back cover on page 20). 8. Partially remove the left side cap by lifting it straight up and off the computer and resting it next to the computer with the cables attached. 9. - HP TouchSmart 9100 | Maintenance and Service Guide: HP TouchSmart 9100 Business - Page 41
drive manually, even if the system is not running. 1. Prepare the computer for disassembly (see Preparing to disassemble the HP TouchSmart PC on page 20). 8. Disengage the optical drive eject button connector from the cable guide at the side of the optical drive cage. 9. Loosen the captured screw - HP TouchSmart 9100 | Maintenance and Service Guide: HP TouchSmart 9100 Business - Page 42
batteries, and turning the mouse switch on (2). You may need to manually synchronize the wireless keyboard or mouse if they are not functioning. To synchronize them: ● Make sure the keyboard and mouse are next to the HP TouchSmart PC, within 30 cm (1 foot) and away from interference from other - HP TouchSmart 9100 | Maintenance and Service Guide: HP TouchSmart 9100 Business - Page 43
If this does not work, remove and then reinsert the wireless keyboard and mouse receiver from the back of the computer and then synchronize the keyboard and mouse again. Synchronizing the wireless keyboard or mouse 37 - HP TouchSmart 9100 | Maintenance and Service Guide: HP TouchSmart 9100 Business - Page 44
Installing a Security Lock A security lock (sold separately) enables you to secure your computer from theft and unwanted changes. A security lock is a key lock device that has a wire cable attached. You attach one end of the cable to your desk (or other stationary object) and the other to this - HP TouchSmart 9100 | Maintenance and Service Guide: HP TouchSmart 9100 Business - Page 45
5 Computer Setup (F10) Utility Computer Setup (F10) Utilities Access the BIOS Setup Utility by pressing the F10 button during startup. Use Computer Setup (F10) Utility to do the following: ● Change factory default settings. ● Set the system date and time. ● Set, view, change, or verify the system - HP TouchSmart 9100 | Maintenance and Service Guide: HP TouchSmart 9100 Business - Page 46
Setup-Boot on page 43 Power Computer Setup-Power on page 42 Exit Computer Setup-Exit on page 44 Computer Setup-Main NOTE: Support for specific Computer Setup options may vary depending on the hardware configuration. Table 5-2 Computer Setup-Main Option Description System Time Allows you - HP TouchSmart 9100 | Maintenance and Service Guide: HP TouchSmart 9100 Business - Page 47
Memory ● Memory Bank 1 ● Memory Bank 2 ● BIOS Revision ● Core Version ● Product Number ● Model Number ● Serial Number (press Enter to change) ● Asset Tag (press Enter to change) Computer Setup-Advanced NOTE: Support for specific Computer Setup options may vary depending on the hardware - HP TouchSmart 9100 | Maintenance and Service Guide: HP TouchSmart 9100 Business - Page 48
on-board audio to: ● Enabled ● Disabled Change Supervisor Password Allows you to change the supervisor password. Computer Setup-Power NOTE: Support for specific Computer Setup options may vary depending on the hardware configuration. Table 5-4 Computer Setup-Power Option Description After AC - HP TouchSmart 9100 | Maintenance and Service Guide: HP TouchSmart 9100 Business - Page 49
Maximum Power Savings feature must be disabled in order to enable limited Wake on LAN from S5. Computer Setup-Boot NOTE: Support for specific Computer Setup options may vary depending on the hardware configuration. Table 5-5 Computer Setup-Boot Option Description Boot-time Diagnostic Disables - HP TouchSmart 9100 | Maintenance and Service Guide: HP TouchSmart 9100 Business - Page 50
Computer Setup-Exit NOTE: Support for specific Computer Setup options may vary depending on the hardware available from the HP website. These updates often contain fixes for known issues in the BIOS. To find out whether a PC needs a BIOS update, compare the current BIOS version number against the - HP TouchSmart 9100 | Maintenance and Service Guide: HP TouchSmart 9100 Business - Page 51
Troubleshooting version of the driver if the new one does not solve your problem: 1. Click the Start button. 2. Type Device Manager into the HP DVD Writer 640b). 5. Click the Driver tab. 6. To update a driver, click Update Driver, and follow the on-screen instructions. - or - Software Repair Overview - HP TouchSmart 9100 | Maintenance and Service Guide: HP TouchSmart 9100 Business - Page 52
, right-click Computer, and then click Properties. 3. Choose System protection, System Restore, and then click Next. 4. Follow the on-screen instructions. To manually add restore points: 1. Close all open programs. 2. Click the Start button, right-click Computer, and then click Properties. 3. Click - HP TouchSmart 9100 | Maintenance and Service Guide: HP TouchSmart 9100 Business - Page 53
Program Reinstallation. 3. Click Next at the Welcome screen. 4. Choose the program you want to install, click Next, and follow the on-screen instructions. 5. When you have finished reinstalling, restart the computer. NOTE: Do not skip this last step. You must restart the computer when you are - HP TouchSmart 9100 | Maintenance and Service Guide: HP TouchSmart 9100 Business - Page 54
personal files, e-mail messages, and Web site bookmarks. You can also move data to your disc recording software, you may need to manually enable this feature (refer to the software CAUTION: Before attempting to remove or touch any parts from the motherboard, check that the power Troubleshooting - HP TouchSmart 9100 | Maintenance and Service Guide: HP TouchSmart 9100 Business - Page 55
: Before attempting to remove or touch any parts from the motherboard, check that the power cord Flash ROM If an error occurs during POST, the HP TouchSmart 9100 Business PC does one or both of the following: ● Displays an error message describing the problem ● Sounds a beep code Power-On Self Test - HP TouchSmart 9100 | Maintenance and Service Guide: HP TouchSmart 9100 Business - Page 56
in the center of the slot, instead of inserting towards the top or bottom of the slot. The HP TouchSmart 9100 includes the following specific tests: ● Screen Health test to support the touch-enabled display a. Verifies the touch signal strength and available touch regions. b. Screen Coverage test - HP TouchSmart 9100 | Maintenance and Service Guide: HP TouchSmart 9100 Business - Page 57
7 System Recovery System recovery completely erases and reformats the hard disk drive, deleting all data files you have created. System recovery reinstalls the operating system, programs, and drivers. However, you must reinstall any software that was not installed on the computer at the factory. - HP TouchSmart 9100 | Maintenance and Service Guide: HP TouchSmart 9100 Business - Page 58
model (typically 1-3 DVD discs). The Recovery Disc Creator program tells you the specific number . 3. Follow the on-screen instructions. Label each disc as you HP Support. To purchase recovery discs, go to http://www.hp.com/support and visit the Software & Driver downloads page for your computer model - HP TouchSmart 9100 | Maintenance and Service Guide: HP TouchSmart 9100 Business - Page 59
7. Under I need help immediately, tap System Recovery. 8. If you are prompted to back up your files, and you have not done so, select Back up your files first (recommended) button, and then tap Next. Otherwise, select Recover without backing up your files button, and then tap Next. System recovery - HP TouchSmart 9100 | Maintenance and Service Guide: HP TouchSmart 9100 Business - Page 60
3. Insert recovery disc #1 into the DVD drive tray, and close the tray. 4. If the computer works, click the Start button, click the Arrow button next to Shut Down, and then click Shut Down. - or - If the computer is not responding, press and hold the On button for approximately 5 seconds, or until - HP TouchSmart 9100 | Maintenance and Service Guide: HP TouchSmart 9100 Business - Page 61
Index A activity lights 6 adapter 9 adding memory 16 Audio Line In 6 audio line-in 4 audio line-out 5 B back cover, removing 20 Bluetooth 2 Bluetooth module, removing 33 C CD/DVD drive 3 choosing recovery discs 51 components front 2 left-side 4 rear 5 creating recovery discs 51 D drivers - HP TouchSmart 9100 | Maintenance and Service Guide: HP TouchSmart 9100 Business - Page 62
preparing to disassemble the TouchSmart PC 11 stand 15 system board 29 TV tuner module 26 WLAN module 24 removing hard drive 12 removing memory 16 repairing software problems 45 restoring the system 46 right-side components 2 S S-Video In 5 SODIMM 8 software problems 45 software reinstallation 46
-
 1
1 -
 2
2 -
 3
3 -
 4
4 -
 5
5 -
 6
6 -
 7
7 -
8
-
9
-
10
-
11
-
12
-
13
-
14
-
15
-
16
-
17
-
18
-
19
-
20
-
21
-
22
-
23
-
24
-
25
-
26
-
27
-
28
-
29
-
30
-
31
-
32
-
33
-
34
-
35
-
36
-
37
-
38
-
39
-
40
-
41
-
42
-
43
-
44
-
45
-
46
-
47
-
48
-
49
-
50
-
51
-
52
-
53
-
54
-
55
-
56
-
57
-
58
-
59
-
60
-
61
-
62
 |
 |

Maintenance and Service Guide
HP TouchSmart 9100 Business PC