HP TouchSmart 9100 Maintenance and Service Guide: HP TouchSmart 9100 Business - Page 38
Lift the thermal kit from the system board.
 |
View all HP TouchSmart 9100 manuals
Add to My Manuals
Save this manual to your list of manuals |
Page 38 highlights
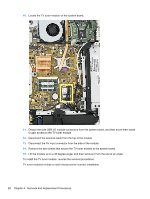
9. Remove the processor thermal kit as follows: a. Disconnect the fan cable from the system board (1). b. Remove the four screws that secure the fan to the system board (2). c. Loosen the four captive screws in the order indicated on the heat sink (3). d. Lift the thermal kit from the system board. 10. Rotate the locking lever to its full open position (1). 11. Raise and rotate the microprocessor retainer to its full open position (2) 32 Chapter 4 Removal and Replacement Procedures
-
 1
1 -
2
-
3
-
4
-
5
-
6
-
7
-
8
-
9
-
10
-
11
-
12
-
13
-
14
-
15
-
16
-
17
-
18
-
19
-
20
-
21
-
22
-
23
-
24
-
25
-
26
-
27
-
28
-
29
-
30
-
31
-
32
-
 33
33 -
 34
34 -
 35
35 -
 36
36 -
 37
37 -
 38
38 -
 39
39 -
 40
40 -
 41
41 -
 42
42 -
 43
43 -
44
-
45
-
46
-
47
-
48
-
49
-
50
-
51
-
52
-
53
-
54
-
55
-
56
-
57
-
58
-
59
-
60
-
61
-
62
 |
 |

9.
Remove the processor thermal kit as follows:
a.
Disconnect the fan cable from the system board
(1)
.
b.
Remove the four screws that secure the fan to the system board
(2)
.
c.
Loosen the four captive screws in the order indicated on the heat sink
(3)
.
d.
Lift the thermal kit from the system board.
10.
Rotate the locking lever to its full open position
(1)
.
11.
Raise and rotate the microprocessor retainer to its full open position
(2)
32
Chapter 4
Removal and Replacement Procedures