HP TouchSmart 9100 Maintenance and Service Guide: HP TouchSmart 9100 Business - Page 41
Optical drive - manual
 |
View all HP TouchSmart 9100 manuals
Add to My Manuals
Save this manual to your list of manuals |
Page 41 highlights
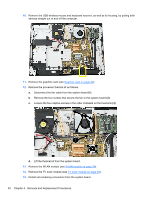
11. Unplug the Bluetooth cable from the Bluetooth module, and then remove the holder assembly from the computer. 12. Remove the Bluetooth module from the holder by pulling on the small arm at the mouth of the holder, and then sliding the module out of the holder. To install the Bluetooth module, reverse the removal procedures. Optical drive CD and DVD media can be removed from the optical drive manually, even if the system is not running. 1. Prepare the computer for disassembly (see Preparing to disassemble the HP TouchSmart PC on page 11). 2. Place the computer face down on a soft, flat surface. 3. Remove the hard drive/memory cover (see Hard drive/memory cover on page 12). 4. Remove the stand (see Stand on page 15). 5. Remove the I/O cover (see I/O cover on page 13). 6. Remove the feet (see Feet on page 14). 7. Remove the back cover (see Back cover on page 20). 8. Disengage the optical drive eject button connector from the cable guide at the side of the optical drive cage. 9. Loosen the captured screw that secures the optical drive cage to the computer (1). Optical drive 35
-
 1
1 -
2
-
3
-
4
-
5
-
6
-
7
-
8
-
9
-
10
-
11
-
12
-
13
-
14
-
15
-
16
-
17
-
18
-
19
-
20
-
21
-
22
-
23
-
24
-
25
-
26
-
27
-
28
-
29
-
30
-
31
-
32
-
33
-
34
-
35
-
 36
36 -
 37
37 -
 38
38 -
 39
39 -
 40
40 -
 41
41 -
 42
42 -
 43
43 -
 44
44 -
 45
45 -
 46
46 -
47
-
48
-
49
-
50
-
51
-
52
-
53
-
54
-
55
-
56
-
57
-
58
-
59
-
60
-
61
-
62
 |
 |
