Hitachi B13FI Instruction Manual - Page 16
Basic Operation Istructions, Your Protection, Fig. P, Fig. Q, Fig. R
 |
UPC - 717709012035
View all Hitachi B13FI manuals
Add to My Manuals
Save this manual to your list of manuals |
Page 16 highlights
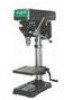
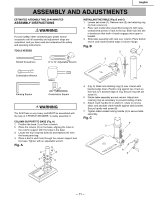
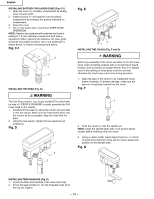
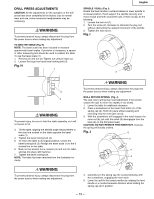
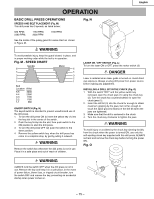
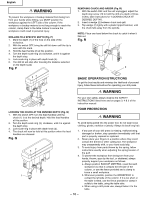
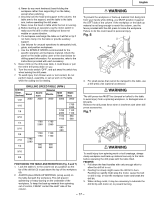
English WARNING To prevent the workpiece or backup material from being torn from your hands while drilling, you MUST position the workpiece against the LEFT side of the column. If the workpiece or backup material is not long enough to reach the column, clamp them to the table. Failure to secure the workpiece could result in personal injury. DRILLING TO A SPECIFIC DEPTH (Fig. P) 1. Mark the depth (1) of the hole on the side of the workpiece. 2. With the switch OFF, bring the drill bit down until the tip is even with the mark. 3. Hold the feed handle (2) at this position. 4. Turn the depth scale ring (3) clockwise, until it is against the depth stop. 5. Lock scale ring in place with depth knob (4). 6. The drill bit will stop after traveling the distance selected on the depth scale. Fig. P REMOVING CHUCK AND ARBOR (Fig. R) 1. With the switch OFF and the unit unplugged, adjust the depth stop screw (10 to hold the drill at a depth of three inches. (See instructions for "LOCKING CHUCK AT DESIRED DEPTH"). 2. Insert a wedge (2) between chuck and quill. 3. Tap wedge (2) lightly with a plastic tipped hammer, until the chuck falls away from the spindle. NOTE: Place one hand below the chuck to catch it when it falls out. Fig. R 1 2 34 2 BASIC OPERATION ISTRUCTIONS To get the best results and minimize the likelihood of personal injury, follow these instructions for operating your drill press. WARNING 1 For your own safety, always observe the SAFETY INSTRUCTIONS listed here and on pages 3, 4 & 5 of the instruction manual. LOCKING THE CHUCK AT THE DESIRED DEPTH (Fig. Q) 1. With the switch OFF, turn the feed handles until the chuck (1) is at the desired depth. Hold the feed handles at this position. 2. Turn the depth scale ring (3), clockwise, until it is against the depth stop. 3. Lock scale ring in place with depth knob (2). 4. The chuck will now be held at this position when the feed handles are released. Fig. Q 2 3 1 YOUR PROTECTION WARNING To avoid being pulled into the power tool, do not wear loose clothing, gloves, neckties or jewelry. Always tie back long hair. 1. If any part of your drill press is missing, malfunctioning, damaged or broken, stop operation immediately until that part is properly repaired or replaced. 2. Never place your fingers in a position where they could contact the drill bit or other cutting tool. The workpiece may unexpectedly shift, or your hand could slip. 3. To avoid injury from parts thrown by the spring, follow instructions exactly when adjusting the spring tension of the quill. 4. To prevent the workpiece from being torn from your hands, thrown, spun by the tool, or shattered, always properly support your workpiece as follows: a. Always position BACKUP MATERIAL (used beneath workpiece) so that it contacts the left side of the column, or use the fence provided and a clamp to brace a small workpiece. b. Whenever possible, position the WORKPIECE to contact the left side of the column. If it is too short or the table is tilted, use the fence provided or clamp it solidly to the table, using the table slots. c. When using a drill press vise, always fasten it to the table. - 16 -
-
 1
1 -
2
-
3
-
4
-
5
-
6
-
7
-
8
-
9
-
10
-
 11
11 -
 12
12 -
 13
13 -
 14
14 -
 15
15 -
 16
16 -
 17
17 -
 18
18 -
 19
19 -
 20
20 -
 21
21 -
22
-
23
-
24
-
25
-
26
-
27
-
28
-
29
-
30
-
31
-
32
-
33
-
34
-
35
-
36
-
37
-
38
-
39
-
40
-
41
-
42
-
43
-
44
-
45
-
46
-
47
-
48
-
49
-
50
-
51
-
52
-
53
-
54
-
55
-
56
 |
 |