Hitachi CJ18DL Instruction Manual - Page 13
Prior To Operation
 |
UPC - 717709011670
View all Hitachi CJ18DL manuals
Add to My Manuals
Save this manual to your list of manuals |
Page 13 highlights
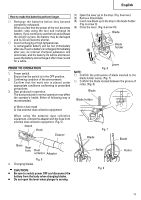
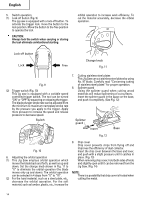
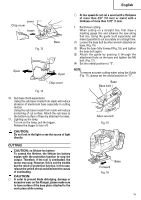
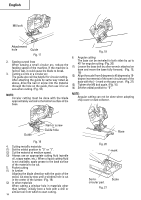
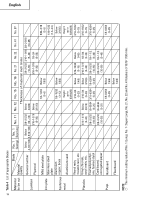
English How to make the batteries perform longer. ⅜ Recharge the batteries before they become completely exhausted. When you feel that the power of the tool becomes weaker, stop using the tool and recharge its battery. If you continue to use the tool and exhaust the electric current, the battery may be damaged and its life will become shorter. ⅜ Avoid recharging at high temperatures. A rechargeable battery will be hot immediately after use. If such a battery is recharged immediately after use, its internal chemical substance will deteriorate, and the battery life will be shortened. Leave the battery and recharge it after it has cooled for a while. PRIOR TO OPERATION 1. Power switch Ensure that the switch is in the OFF position. 2. Confirming condition of the environment: Confirm that the work site is placed under appropriate conditions conforming to prescribed precautions. 3. Dust produced in operation The dust produced in normal operation may affect the operator's health. Either of following way is recommended. (1) Open the lever up to the stop. (Fig. 6-arrow I) (2) Remove fitted blade. (3) Insert new blade up to the stop in the blade holder. (Fig. 6-arrow II) (4) Close the lever. (Fig. 6-arrow III) Blade Blade holder Lever Fig. 6 NOTE: ⅜ Confirm the protrusions of blade inserted to the blade holder surely. (Fig. 7) ⅜ Confirm the blade located between the groove of roller. (Fig. 8) Blade Blade holder a) Wear a dust mask b) Use external dust collection equipment When using the external dust collection equipment, connect the adapter with the hose from external dust collection equipment. (Fig. 5) Notch Hook Cleaner Blade Fig. 7 Blade Base Rear hole Dust collector Adapter Roller Roller Fig. 5 4. Changing blades CAUTION: ● Be sure to switch power OFF and disconnect the battery from the body when changing blades. ● Do not open the lever when plunger is moving. Fig. 8 13
-
 1
1 -
2
-
3
-
4
-
5
-
6
-
7
-
 8
8 -
 9
9 -
 10
10 -
 11
11 -
 12
12 -
 13
13 -
 14
14 -
 15
15 -
 16
16 -
 17
17 -
 18
18 -
19
-
20
-
21
-
22
-
23
-
24
-
25
-
26
-
27
-
28
-
29
-
30
-
31
-
32
-
33
-
34
-
35
-
36
-
37
-
38
-
39
-
40
-
41
-
42
-
43
-
44
-
45
-
46
-
47
-
48
-
49
-
50
-
51
-
52
-
53
-
54
-
55
-
56
-
57
-
58
-
59
-
60
-
61
-
62
-
63
-
64
 |
 |
