Hitachi CJ18DL Instruction Manual - Page 17
Concerning Cutting Of Stainless
 |
UPC - 717709011670
View all Hitachi CJ18DL manuals
Add to My Manuals
Save this manual to your list of manuals |
Page 17 highlights
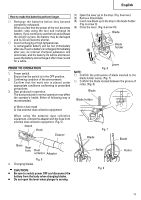
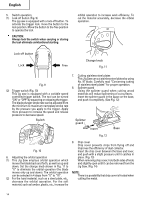
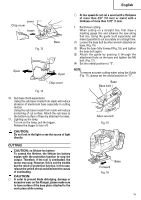
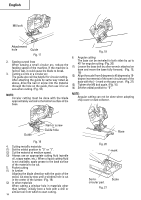
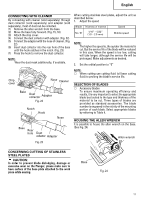
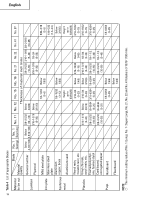
English CONNECTING WITH CLEANER By connecting with cleaner (sold separately) through dust collector (sold separately) and adapter (sold separately), most of dust can be collected. (1) Remove the allen wrench from the base. (2) Move the base fully forward. (Fig. 15, 16) (3) Attach the chip cover. (4) Connect the dust collector with adapter. (Fig. 22) (5) Connect the adapter with the nose of cleaner. (Fig. 22) (6) Insert dust collector into the rear hole of the base until the hook catches in the notch. (Fig. 23) (7) Press the hook to remove the dust collector. NOTE: Wear the dust mask additionally, if available. When cutting stainless steel plates, adjust the unit as described below: 1. Adjust the speed Blade Thickness of material No. 97 1/16" - 5/32" (1.5 - 2.5 mm) Speed Middle speed NOTE: The higher the speed is, the quicker the material is cut. But the service life of the blade will be reduced in this case. When the speed is too low, cutting will take longer, although the service life will be prolonged. Make adjustments as desired. 2. Set the orbital position to "0" Chip cover Nose Cleaner Base Dust collector Adapter Fig. 22 Notch Hook Nose Base Rear hole Dust collector Adapter Fig. 23 NOTE: ⅜ When cutting use cutting fluid (oil base cutting fluid) to prolong the blade's service life. SELECTION OF BLADES ⅜ Accessory blades To ensure maximum operating efficiency and results, it is very important to select the appropriate blade best suited to the type and thickness of the material to be cut. Three types of blades are provided as standard accessories. The blade number is engraved in the vicinity of the mounting portion of each blade. Select appropriate blades by referring to Table 4. HOUSING THE ALLEN WRENCH It is possible to house the allen wrench on the base. (See Fig. 24) Allen wrench CONCERNING CUTTING OF STAINLESS STEEL PLATES CAUTION: In order to prevent blade dislodging, damage or excessive wear on the Plunger, please make sure to have surface of the base plate attached to the work piece while sawing. Base Fig. 24 17
-
 1
1 -
2
-
3
-
4
-
5
-
6
-
7
-
8
-
9
-
10
-
11
-
 12
12 -
 13
13 -
 14
14 -
 15
15 -
 16
16 -
 17
17 -
 18
18 -
 19
19 -
 20
20 -
 21
21 -
 22
22 -
23
-
24
-
25
-
26
-
27
-
28
-
29
-
30
-
31
-
32
-
33
-
34
-
35
-
36
-
37
-
38
-
39
-
40
-
41
-
42
-
43
-
44
-
45
-
46
-
47
-
48
-
49
-
50
-
51
-
52
-
53
-
54
-
55
-
56
-
57
-
58
-
59
-
60
-
61
-
62
-
63
-
64
 |
 |
