Hitachi CJ18DL Instruction Manual - Page 14
Trigger switch Fig. 10
 |
UPC - 717709011670
View all Hitachi CJ18DL manuals
Add to My Manuals
Save this manual to your list of manuals |
Page 14 highlights
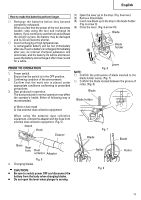
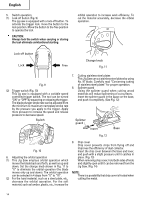
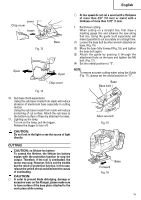
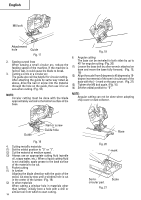
English 5. Switch operation (1) Lock-off button (Fig. 9) The jig saw is equipped with a lock-off button. To activate the trigger lock, move the button to the lock position. Move the button to the free position to operate the tool. CAUTION: Always lock the switch when carrying or storing the tool eliminate unintentional starting. orbital operation to increase work efficiency. To cut the material accurately, decrease the orbital operation. Lock off button Lock Change knob Free Fig. 11 Fig. 9 (2) Trigger switch (Fig. 10) This jig saw is equipped with a variable speed controlled trigger switch. The tool can be turned "ON" or "OFF" by squeezing or releasing the trigger. The blade plunger stroke rate can be adjusted from the minimum to maximum nameplate stroke rate by the pressure you apply to the trigger. Apply more pressure to increase the speed and release pressure to decrease speed. Switch 7. Cutting stainless steel plates This Jig Saw can cut stainless steel plates by using No. 97 blade. Carefully read "Concerning cutting of stainless steel plates" for proper operation. 8. Splinter guard Using the splinter guard when cutting wood materials will reduce splintering of cut surfaces. Insert the splinter guard in the space on the base, and push it completely. (See Fig. 12) Splinter guard Insert Base Fig. 12 Fig. 10 6. Adjusting the orbital operation (1) This Jig Saw employs orbital operation which moves the blade back and forth, as well as up and down. Set the change knob shown in Fig. 11 to "0" to eliminate the orbital operation (the blade moves only up and down). The orbital operation can be selected in 4 steps from "0" to "III". (2) For the hard material, such as a steel plate, etc., decrease the orbital operation. For the soft material, such as lumber, plastic, etc., increase the 9. Chip cover Chip cover prevents chips from flying off and improves the efficiency of dust collector. Insert the chip cover between the base and lever, and push with a slight pressure until it catches in place. (Fig. 13) When removing chip cover, hold both sides of knob and slightly open until it can be removed from the Jig Saw. (Fig. 14) NOTE: There is a possibility that chip cover is frosted when cutting the metal. 14
-
 1
1 -
2
-
3
-
4
-
5
-
6
-
7
-
8
-
 9
9 -
 10
10 -
 11
11 -
 12
12 -
 13
13 -
 14
14 -
 15
15 -
 16
16 -
 17
17 -
 18
18 -
 19
19 -
20
-
21
-
22
-
23
-
24
-
25
-
26
-
27
-
28
-
29
-
30
-
31
-
32
-
33
-
34
-
35
-
36
-
37
-
38
-
39
-
40
-
41
-
42
-
43
-
44
-
45
-
46
-
47
-
48
-
49
-
50
-
51
-
52
-
53
-
54
-
55
-
56
-
57
-
58
-
59
-
60
-
61
-
62
-
63
-
64
 |
 |
