Hitachi CP-A221N User Manual - Page 10
Computer In1, Computer In2, Usb Type B
 |
View all Hitachi CP-A221N manuals
Add to My Manuals
Save this manual to your list of manuals |
Page 10 highlights
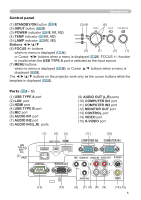
Setting up Connecting with your devices (continued) About Plug-and-Play capability • Plug-and-Play is a system composed of a computer, its operating system and peripheral equipment (i.e. display devices). This projector is VESA DDC 2B compatible. Plug-and-Play can be used by connecting this projector to a computer that is VESA DDC (display data channel) compatible. - Take advantage of this feature by connecting a computer cable to the COMPUTER IN1 port (DDC 2B compatible). Plug-and-Play may not work properly if any other type of connection is attempted. - Please use the standard drivers in your computer as this projector is a Plug-andPlay monitor. • When AUTO is selected for the COMPUTER IN1 or COMPUTER IN2 port in COMPUTER IN of the INPUT menu, that port will accept component video signals (40). • When the USB TYPE B port and the computer's type A USB port are connected, you can use the USB TYPE B port as a picture input port from the computer, or use the remote control as a simple mouse and keyboard of the computer. (17, 55). VCR/DVD/Blu-ray Disc player Computer USB LAN (A) COMPONENT Y Cb/Pb Cr/Pr HDMI AUDIO OUT RL DISPLAY USB TYPE A DC5V 0.5A LAN USB TYPE B HDMI COMPUTER IN2 COMPUTER IN1 CONTROL MONITOR OUT MIC AUDIO IN1 AUDIO IN3 AUDIO OUT S-VIDEO R R L AUDIO IN2 L VIDEO AUDIO OUT AUDIO OUT R L VIDEO RS-232C S-VIDEO L OUT AUDIO R (continued on next page) 10
-
 1
1 -
2
-
3
-
4
-
 5
5 -
 6
6 -
 7
7 -
 8
8 -
 9
9 -
 10
10 -
 11
11 -
 12
12 -
 13
13 -
 14
14 -
 15
15 -
16
-
17
-
18
-
19
-
20
-
21
-
22
-
23
-
24
-
25
-
26
-
27
-
28
-
29
-
30
-
31
-
32
-
33
-
34
-
35
-
36
-
37
-
38
-
39
-
40
-
41
-
42
-
43
-
44
-
45
-
46
-
47
-
48
-
49
-
50
-
51
-
52
-
53
-
54
-
55
-
56
-
57
-
58
-
59
-
60
-
61
-
62
-
63
-
64
-
65
-
66
-
67
-
68
-
69
-
70
-
71
-
72
-
73
-
74
-
75
-
76
-
77
-
78
-
79
-
80
-
81
-
82
-
83
-
84
-
85
-
86
-
87
-
88
-
89
-
90
-
91
-
92
-
93
-
94
-
95
-
96
-
97
-
98
-
99
-
100
-
101
-
102
-
103
-
104
-
105
-
106
-
107
 |
 |
