Hitachi PJ TX100 Owners Guide - Page 5
Remote control - reset lamp
 |
View all Hitachi PJ TX100 manuals
Add to My Manuals
Save this manual to your list of manuals |
Page 5 highlights
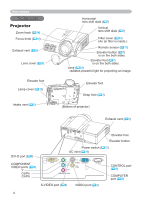
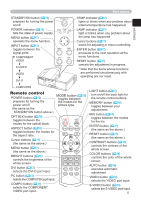
ENGLISH STANDBY/ON button ( 12) prepares for turning the power on/off. POWER indicator ( 12) tells the state of power supply. MENU button ( 17) operates the menu function. INPUT button ( 13) toggles between the signal ports. COMPONENT VIDEO STANDBY/ON POWER TEMP LAMP MENU ENTER INPUT RESET S-VIDEO VIDEO DVI-D Part names TEMP indicator ( 37) lights or blinks when any problem about internal temperature has happened. LAMP indicator ( 37) light or blinks when any problem about the lamp has happened. Cursor buttons ( 17) works for adjusting or menu controlling. ENTER button ( 17) proceeds to the next operation at the menu functions. RESET button ( 17) cancels the adjustment in progress. * Note that the items whose functions are performed simultaneously with operating are nor reset. COMPUTER Remote control POWER button ( 12) prepares for turning the power on/off. (the same as the STANDBY/ON button above.) MODE button ( 15) toggles between the modes for the picture type. OPT BLK button ( 15) toggles between the modes for the optical black. POWER LIGHT ASPECT button ( 16) toggles between the modes for the aspect ratio. OPT BLK MODE MEMORY ASPECT IRIS Cursor buttons ( 17) (the same as the above.) ENTER MENU button ( 17) (the same as the above.) MENU RESET BRIGHT buttons ( 16) controls the brightness of the whole screen. BRIGHT CONTRAST COLOR DVI button ( 13) selects the DVI-D port input. PC button ( 13) selects the COMPUTER port input. DVI PC AUTO COMPO S-VIDEO VIDEO COMPO button ( 13) selects the COMPONENT VIDEO port input. LIGHT button ( 11) turn on/off the back light for the remote control buttons. MEMORY button ( 16) toggles between your adjustments. IRIS button ( 14) toggles between the modes for the iris. ENTER button ( 17) (the same as the above.) RESET button ( 17) (the same as the above.) CONTRAST buttons ( 16) controls the contrast of the whole screen. COLOR buttons ( 16) controls the color of the whole screen. AUTO button ( 14) executes automatic adjustment. VIDEO button ( 13) selects the VIDEO port input. S-VIDEO button ( 13) selects the S-VIDEO port input. 5
-
 1
1 -
 2
2 -
 3
3 -
 4
4 -
 5
5 -
 6
6 -
 7
7 -
 8
8 -
 9
9 -
 10
10 -
 11
11 -
12
-
13
-
14
-
15
-
16
-
17
-
18
-
19
-
20
-
21
-
22
-
23
-
24
-
25
-
26
-
27
-
28
-
29
-
30
-
31
-
32
-
33
-
34
-
35
-
36
-
37
-
38
-
39
-
40
-
41
-
42
 |
 |
