Hitachi PJ TX100 Owners Guide - Page 7
Using the lens shift dials, Adjusting the projector's elevator - settings
 |
View all Hitachi PJ TX100 manuals
Add to My Manuals
Save this manual to your list of manuals |
Page 7 highlights
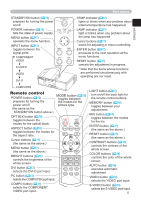
ENGLISH Setting up Using the lens shift dials CAUTION ►Do not put your fingers around the projection lens to prevent them from being caught by the lens and lens ring. The Lens of this projector can be shifted horizontally and vertically. When you want to adjust the picture position, use the lens shift dials. 1/4 (a) Using the horizontal picture shift dial shifts the picture to right or left. 1/4 (b) Using the vertical lens shift dial 3/4 shifts the picture upward or downward. 3/4 NOTE • Generally, better quality of a picture is available when the lens shift is set to the center known by each click point of the dials. Adjusting the projector's elevator WARNING ►Do not touch about the lens and ventilation openings during use or immediately after use to prevent a burn. CAUTION ►If you press the elevator button without holding the projector, the projector might crash down, overturn, smash your fingers and possibly result in malfunction. To prevent damaging the projector and injuring yourself, always hold the projector whenever using the elevator buttons to adjust the elevator feet. ►Except for inclining by the elevator feet adjustment, place the projector horizontally. You can use the elevator feet to make adjustments if the surface on which you need to set the projector is uneven or if you otherwise need to adjust the angle of projection. The adjustment range of the elevator feet is 0 to 9 degrees. 1. Press and hold in the elevator buttons. 2. Raise or lower the projector to the desired height and the release the elevator buttons. When you release the elevator buttons, the elevator feet will lock into position. 3. As necessary, you can also finely adjust the height of the projector by twisting the elevator feet by hand. Elevator Elevator feet button 7
-
 1
1 -
 2
2 -
 3
3 -
 4
4 -
 5
5 -
 6
6 -
 7
7 -
 8
8 -
 9
9 -
 10
10 -
 11
11 -
 12
12 -
13
-
14
-
15
-
16
-
17
-
18
-
19
-
20
-
21
-
22
-
23
-
24
-
25
-
26
-
27
-
28
-
29
-
30
-
31
-
32
-
33
-
34
-
35
-
36
-
37
-
38
-
39
-
40
-
41
-
42
 |
 |
