Honeywell CT54 Owner's Manual - Page 1
Honeywell CT54 Manual
 |
View all Honeywell CT54 manuals
Add to My Manuals
Save this manual to your list of manuals |
Page 1 highlights
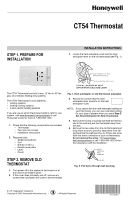
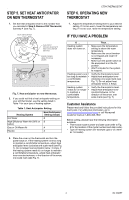
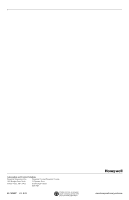
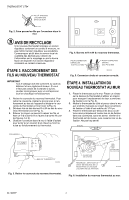
CT54 Thermostat STEP 1. PREPARE FOR INSTALLATION INSTALLATION INSTRUCTIONS 3. Locate the heat anticipator scale and the heat anticipator lever on the old thermostat (see Fig. 1). OLD THERMOSTAT HEAT ANTICIPATOR SCALE The CT54 Thermostat controls 2-wire, 15 Vac to 30 Vac, gas, oil or electric heating-only systems. The CT54 Thermostat is not suitable for: • cooling systems • heating-cooling systems • 3-wire electric heating systems If you are unsure which thermostat model is right for your system, visit www.honeywell.com/yourhome or call Honeywell Customer Care at 1-800-468-1502. 1. Check that the following components are included: • Thermostat • Two one-inch screws • Installation Instructions 2. Required tools: • Slotted screwdriver • Drill • Drill bit (1/16 in.) • Needle nose pliers • Level • Pencil STEP 2. REMOVE OLD THERMOSTAT 1. Turn power off to the system at the furnace or at the fuse/circuit breaker panel. 2. If the cover does not easily pull off, remove any screws that may fasten the cover to the thermostat. HEAT ANTICIPATOR LEVER TYPICAL LOCATION OF HEAT ANTICIPATOR SCALE AND LEVER M21192 Fig. 1. Heat anticipator on old thermostat (example). 4. Record the number that the heat anticipator lever points to on the heat anticipator scale. NOTE: If you cannot find the heat anticipator setting on your thermostat, you can use a standard setting for your type of system when you reach Step 5. Set Heat Anticipator On New Thermostat. 5. Remove the screw or screws that hold the thermostat to the wall and pull the thermostat away from the wall. 6. Remove the two wires from the old thermostat and wrap them around a pencil to keep them from falling back into the wall (see Fig. 2). If there are more than two wires connected to your old thermostat, do not remove the wires. Visit www.honeywell.com/yourhome or call 1-800-468-1502 for further assistance with the installation. WIRES THROUGH WALL OPENING M19645 Fig. 2. Pull wires through wall opening. ® U.S. Registered Trademark Copyright © 2003 Honeywell International Inc. • • All Rights Reserved 69-1696EF
-
 1
1 -
 2
2 -
 3
3 -
 4
4 -
 5
5 -
 6
6 -
 7
7 -
8
 |
 |