Honeywell RTH5100B Owner's Manual - Page 13
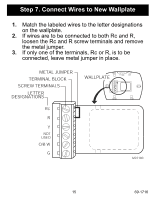
Position the wallplate on the wall with the arrow, pointing up. Level the wallplate for appearance,
 |
View all Honeywell RTH5100B manuals
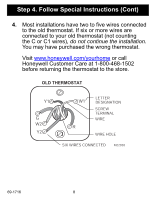
Add to My Manuals
Save this manual to your list of manuals |
Page 13 highlights
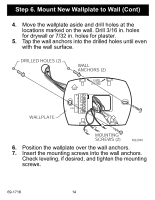
Step 6. Mount New Wallplate to Wall (Cont) 3. Position the wallplate on the wall with the arrow pointing up. Level the wallplate (for appearance only) and mark the two mounting holes with a pencil. LEVEL RC R Y NOT USED (O/B) W G WALLPLATE PLACE LEVEL ON TABS MARK MOUNTING HOLES (2) M22044 13 69-1716
-
 1
1 -
2
-
3
-
4
-
5
-
6
-
7
-
 8
8 -
 9
9 -
 10
10 -
 11
11 -
 12
12 -
 13
13 -
 14
14 -
 15
15 -
 16
16 -
 17
17 -
 18
18 -
19
-
20
-
21
-
22
-
23
-
24
-
25
-
26
-
27
-
28
-
29
-
30
-
31
-
32
 |
 |

13
69-1716
Step 6. Mount New Wallplate to Wall (Cont)
3.
Position the wallplate on the wall with the arrow
pointing up. Level the wallplate (for appearance
only) and mark the two mounting holes with
a pencil.
M22044
MARK MOUNTING
HOLES (2)
WALLPLATE
PLACE LEVEL ON TABS
G
W
NOT
USED
Y
R
R
C
(O/B)
LEVEL