Hotpoint HDA3500NWW Installation Instructions
Hotpoint HDA3500NWW - Dishwasher w/ 5 Wash Cycles Manual
 |
UPC - 084691156185
View all Hotpoint HDA3500NWW manuals
Add to My Manuals
Save this manual to your list of manuals |
Hotpoint HDA3500NWW manual content summary:
- Hotpoint HDA3500NWW | Installation Instructions - Page 1
instructions with your Owner's Manual for future reference. • Skill Level - Installation of this dishwasher requires basic mechanical, electrical and plumbing skills. Proper installation is the responsibility of the installer. Product failure due to improper installation is not covered under the GE - Hotpoint HDA3500NWW | Installation Instructions - Page 2
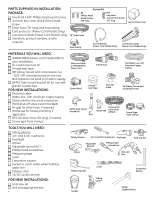
PARTS SUPPLIED IN INSTALLATION PACKAGE: ■ Two 8-18 x 5/8" Phillips head wood screws ■ Junction box cover and #10 hex head screw ■ Drain hose (78" long) and hose clamp ■ Cord protector (Power Cord Models Only) ■ Conversion leads (Power Cord Models Only) ■ Literature, product samples, and/or coupons - Hotpoint HDA3500NWW | Installation Instructions - Page 3
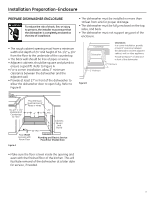
. • The dishwasher must be installed no more than 10 feet from sink for proper drainage. • The dishwasher must be fully enclosed on the top, sides, and back. • The dishwasher must not support any part of the enclosure. • The rough cabinet opening must have a minimum width and depth of 24" and - Hotpoint HDA3500NWW | Installation Instructions - Page 4
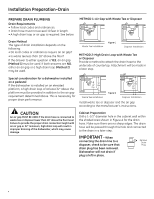
later step. Special consideration for a dishwasher installed on a pedestal lf the dishwasher is installed on an elevated platform, a high Waste Tee Installation Figure D Disposer Installation Install waste tee or disposer and the air gap according to the manufacturer's instructions. CAUTION An - Hotpoint HDA3500NWW | Installation Instructions - Page 5
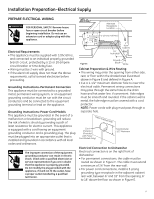
Instructions-Power Cord Models This or service representative as the drain hose and hot water line, if convenient. dishwasher. • For permanent connections, the cable must be routed as shown in Figure E. The cable must extend a minimum of 24" from the rear wall. • For power cord connections, install - Hotpoint HDA3500NWW | Installation Instructions - Page 6
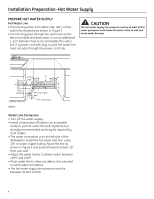
under the sink. (Optional, but strongly recommended and may be required by local codes.) • The water connection is on the left side of the dishwasher. Install the hot water inlet line, using 3/8" or larger copper tubing. Route the line as shown in Figure F and extend forward at least 19" from rear - Hotpoint HDA3500NWW | Installation Instructions - Page 7
Steps 5 or 16 • Drain hose and drain hose clamp-Step 7 • Owners' Manual-Steps 18 and 21 • Product Samples and/or coupons-Step 21 • Conversion leads (Factory-equipped Power Cord Models Only) -Appendix STEP 2: CHECK DOOR BALANCE • With the dishwasher on the wood base, check the door balance by opening - Hotpoint HDA3500NWW | Installation Instructions - Page 8
Kit WX09X70910, available for purchase from an authorized GE Appliance Dealer, meets these requirements. 90° Elbow Figure K Thread Seal Tape Water Valve Bracket Fill Hose Junction Box Bracket Ground White Black STEP 7: INSTALL DRAIN HOSE TO DISHWASHER DRAIN PORT Skip this step if drain hose - Hotpoint HDA3500NWW | Installation Instructions - Page 9
Dishwasher Installation is approximately 78" long. If a longer hose is needed, a 10 foot long hose may be purchased from an authorized GE appliance dealer. The 10 foot long hose is part number GPF10S. Hose Stop Do not use this port if present Hose Clamp STEP 9: INSERT DRAIN HOSE AND POWER CORD, - Hotpoint HDA3500NWW | Installation Instructions - Page 10
be approximately 3/4" behind the face of the adjacent cabinet. Refer to Figure R. Tip: Avoid unnecessary service charges for panel damage. Do not press on the center of panel with hands or knees when sliding dishwasher into position. 10 Figure R Check Level Side-to-Side • Adjust the level of the - Hotpoint HDA3500NWW | Installation Instructions - Page 11
Connect the water supply line to the 90° elbow installed in Step 6. • Slide the compression nut and then Hot Water Supply Line Countertop Bracket Side Mount Brackets (optional) 3/4" Figure T Tip: Avoid unnecessary service charges for leaks or control p0a6neFl -d1am8a4g7eD. Make sure the dishwasher - Hotpoint HDA3500NWW | Installation Instructions - Page 12
with Hanger 32" 18" Min. Min. 32" 18" Min. Min. Waste Tee Installation Figure Y Disposer Installation IliMnePtoO0a5RdDiTs-A1p2oNs9e4TrB, c-hWechketnocboensn0ue5rcDet-itn1hg2a9tth4teChedrdarianin plug has been removed. Dishwasher will not drain if plug is left in place. • Connect drain line to - Hotpoint HDA3500NWW | Installation Instructions - Page 13
• Install the junction box cover using the #10 hex head screw. Check to be sure that wires are not pinched under the cover. STEP 18: PRE-TEST CHECK LIST ■ Verify that power is turned off at the source. ■ Open the dishwasher door and remove all foam and cardboard packaging. ■ Read the Owner's Manual - Hotpoint HDA3500NWW | Installation Instructions - Page 14
has them, and then turn control dial just enough to start dishwasher. Be careful not to turn the dial past the first water fill. Dial should point to "Hot Start Option" or "Hot Prewash Option" depending on model. Cycles Pots Heavy Normal Hot Hi-Temp Heated Reset & Pans Wash Wash Start Wash Dry Cycle - Hotpoint HDA3500NWW | Installation Instructions - Page 15
both the access panel and toekick. STEP 21: LITERATURE ■ Leave the Owners' Manual, Installation Instructions, samples, and/or coupons with consumer. IMPORTANT - Screws are not interchangeable. To prevent damage to your dishwasher, use the proper screw in the proper location. Do not mix screw - Hotpoint HDA3500NWW | Installation Instructions - Page 16
dishwasher harness by connecting like-colored wires. Figure CC • Return to Step 16 in these instructions to complete the conversion. Figure BB Remove Strain Relief Disconnect Powercord Figure CC Conversion Harness 06H-1949_Conversion Harness SPECIFICATIONS SUBJECT TO CHANGE WITHOUT NOTICE GE
-
 1
1 -
 2
2 -
 3
3 -
 4
4 -
 5
5 -
 6
6 -
 7
7 -
8
-
9
-
10
-
11
-
12
-
13
-
14
-
15
-
16
 |
 |
GE Consumer & Industrial
Appliances
Installation Instructions
Built-In Dishwasher
If you have questions, call 800.GE.CARES (800.432.2737) or visit our website at: www.ge.com
IMPORTANT
– The dishwasher MUST be
installed to allow for future removal from the
enclosure if service is required.
If you received a damaged dishwasher, you should
immediately contact your dealer or builder.
Optional Accessories – See the Owner’s Manual for
available custom panel kits.
FOR YOUR SAFETY
Read and observe all CAUTIONS and WARNINGS
shown throughout these instructions. While
performing installations described in this booklet,
gloves and safety glasses should be worn.
READ CAREFULLY.
KEEP THESE INSTRUCTIONS.
IMPORTANT
– Observe all governing codes
and ordinances.
•
Note to Installer
– Be sure to leave these
instructions for the consumer and local inspector’s
use.
•
Note to Consumer
– Keep these instructions with
your Owner’s Manual for future reference.
•
Skill Level
– Installation of this dishwasher requires
basic mechanical, electrical and plumbing skills.
Proper installation is the responsibility of
the installer. Product failure due to improper
installation is not covered under the GE
Appliance Warranty. See warranty information.
•
Completion Time – 1 to 3 Hours
. New installations
require more time than replacement installations.
STOP
BEFORE YOU BEGIN
Read these instructions completely and
carefully.