Hotpoint HDA3500NWW Installation Instructions - Page 9
Dishwasher Installation
 |
UPC - 084691156185
View all Hotpoint HDA3500NWW manuals
Add to My Manuals
Save this manual to your list of manuals |
Page 9 highlights
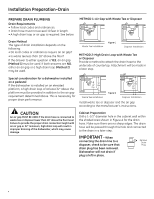
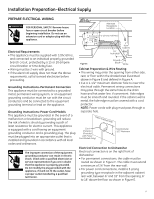
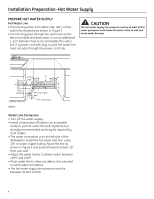
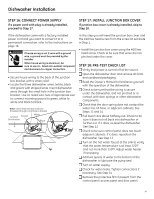
Dishwasher Installation is approximately 78" long. If a longer hose is needed, a 10 foot long hose may be purchased from an authorized GE appliance dealer. The 10 foot long hose is part number GPF10S. Hose Stop Do not use this port if present Hose Clamp STEP 9: INSERT DRAIN HOSE AND POWER CORD, IF USED, THROUGH CABINET • Upright the dishwasher and position it in front of the cabinet opening. • Insert the drain hose into the hole previously drilled in the cabinet wall. • If a power cord is used, guide the end of the cord through a separate hole cut for the power cord. The power cord should be routed directly to the rear of the junction box avoiding contact with the door spring and other dishwasher components. Drain Power Drain Hose Collection Chamber Figure M Drain Port Water Figure O Tip: Avoid unnecessary service charges for drain issues Make sure the drain hose connection is leak free and the hose is routed through the strain relief so it will not kink when the dishwasher is installed into the cabinet. 06H_1949_Drain Hose STEP 8: POSITION WATER LINE AND POWER SUPPLY • Position the water supply line and house wiring on the floor of the opening to avoid interference with the base of dishwasher and components under the dishwasher. Figure N Water Power Line Supply Tip: Avoid unnecessary service charges for no fill, drain, or noise concerns Position utility lines so they do not interfere with anything under or behind the dishwasher. STEP 10: INSTALL OPTIONAL GPF65 SIDE 3M0O7UDNTiaBR3A3CKETS Skip this step if the underside of countertop is wood or wood like material. • Purchase and install the GPF65 side mount bracket kit if the underside of counter is granite or a similar material that will not accept wood screws. The GPF65 kit is available from authorized GE appliance dealers. • Refer to Figure P and follow the instructions included in the kit. SideMounting Brackets Tub Frame Bracket Attachment Optional Screws Side-Mount Bracket Kit Figure P (2 Each Side) 9 06F-1847H
-
 1
1 -
2
-
3
-
 4
4 -
 5
5 -
 6
6 -
 7
7 -
 8
8 -
 9
9 -
 10
10 -
 11
11 -
 12
12 -
 13
13 -
 14
14 -
15
-
16
 |
 |
