Hotpoint HDA3500NWW Installation Instructions - Page 11
IMPORTANT, Dishwasher Installation, IMPORTANT
 |
UPC - 084691156185
View all Hotpoint HDA3500NWW manuals
Add to My Manuals
Save this manual to your list of manuals |
Page 11 highlights
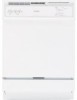
Dishwasher Installation STEP 13: FASTEN DISHWASHER TO UNDERSIDE OF COUNTERTOP OR SIDES OF CABINET In this step you will need the two 5/8" Phillips head wood screws set aside in Step 1. IMPORTANT - Dishwasher must be centered in cabinet opening. Interference with cabinets or countertop will cause leaks and damage to the door panel and/or control panel. • If countertop is wood or woodlike material, fasten the dishwasher to the countertop by driving the Phillips head screws through the countertop brackets and into the countertop. • If the countertop is granite or similar material, drive Phillips screws through side mount brackets and into the adjacent cabinets. • Make sure screws are driven straight and flush to prevent interference with door operation and damage to the control panel. See Figure T. STEP 14: CONNECT WATER SUPPLY Connect the water supply line to the 90° elbow installed in Step 6. • Slide the compression nut and then the ferrule over end of the water line. • Insert the water line into the 90° elbow. • Slide the ferrule against the elbow and secure with the compression nut. Compression Nut Ferrule 90° Hot Water Elbow Supply Line Water Valve Bracket Fill Hose 90° Elbow Hot Water Supply Line Countertop Bracket Side Mount Brackets (optional) 3/4" Figure T Tip: Avoid unnecessary service charges for leaks or control p0a6neFl -d1am8a4g7eD. Make sure the dishwasher is centered in the cabinet and the door opens and closes freely without hitting the adjacent cabinets. Drive mounting screws straight and flush. Figure U IMPORTANT - Check to be sure the door spring does not rub or contact the fill hose or water supply line. Test by opening and closing the 488Dia2 door. Re-route the water supply lines or slightly bend the water valve bracket if a rubbing noise or interference occurs. Tip: Avoid unnecessary service charges for noise or leaks Make sure the door spring does not rub against the fill hose or water supply line. 11
-
 1
1 -
2
-
3
-
4
-
5
-
 6
6 -
 7
7 -
 8
8 -
 9
9 -
 10
10 -
 11
11 -
 12
12 -
 13
13 -
 14
14 -
 15
15 -
 16
16
 |
 |