Hunter 24852 Owner's Manual - Page 11
After making the wire connections, the wires
 |
View all Hunter 24852 manuals
Add to My Manuals
Save this manual to your list of manuals |
Page 11 highlights
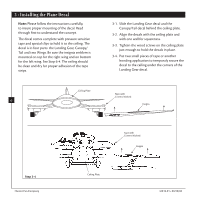
5 • Wiring the Fan 5-1. Be careful when wiring so that you do not hit the motor and let it turn, or it could fall out of the large hole. 5-2. Make sure the power is still off. 5-3. To connect the wires, hold the bare metal leads together and place a wire nut over them, then twist clockwise until tight. For all these connections use the wire nuts provided. 5-4. Connect electrical supply leads to the leads from the motor, using approved connectors. CAUTION: Be sure no bare wire or wire strands are visible after making connections. 5-5. Connect the black electrical supply lead to the black motor lead, the white supply lead to the white motor lead and the ground lead to the green lead. 5-6. After making the wire connections, the wires should be spread apart, with the white and green wires on one side of the outlet box, and the black wires on the other side of the box. The splices should be turned upward and pushed carefully into the outlet box. 5-7. Complete hanging of the motor by rotating it upwards and mounting with 3 shoulder screws supplied. Shoulder Screw 42813-01 • 09/20/06 Step 5-4 - 5-5 Motor Bracket 11 Shoulder Screw Step 5-6 - 5-7 Hunter Fan Company
-
 1
1 -
2
-
3
-
4
-
5
-
 6
6 -
 7
7 -
 8
8 -
 9
9 -
 10
10 -
 11
11 -
 12
12 -
 13
13 -
 14
14 -
 15
15 -
 16
16 -
17
 |
 |
