IBM 655743N Service Manual - Page 11
UsingtheOPTIONOn-screen, Display
 |
UPC - 087944378259
View all IBM 655743N manuals
Add to My Manuals
Save this manual to your list of manuals |
Page 11 highlights
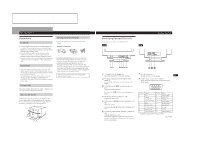
1-6 Customizing Your Monitor Using the OPTION On-screen Display The OPTION OSD allows you to manually degauss the screen and adjust settings such as the OSD position and power saving delay time. It also allows you to lock the controls. Degaussing the screen The monitor screen is automatically degaussed (demagnetized) when the power is turned on. You can also manually degauss the monitor. 1 Press the button. The MENU OSD appears. 2 Press the ¨./> and >?// buttons to select " OPTION," and press the button again. The OPTION OSD appears. OPTION ON ZZ... 1 MIN UNLOCK MANUAL DEGAUSS 3 Press the ¨./> buttons to select " DEGAUSS)." (MANUAL 4 Press the > / button. The screen is degaussed for about 3 seconds. Changing the on-screen display position You can change the OSD position (for example, when you want to adjust the picture behind the OSD). 1 Press the button. The MENU OSD appears. 2 Press the ¨./> and >?// buttons to select " OPTION," and press the button again. The OPTION OSD appears. OPTION ON ZZ... 1 MIN UNLOCK MANUAL DEGAUSS 3 Press the ¨./> buttons to select " (OSD H POSITION)" or " (OSD V POSITION)." Select " (OSD H POSITION)" to adjust the horizontal position. OPTION ZZ... 1 MIN UNLOCK OSD H POSITION Select " position. (OSD V POSITION)" to adjust the vertical OPTION 1 ZZ... UNLOCK OSD V POSITION 4 Press the >?// buttons to move the OSD to the desired position. If you need to degauss the screen a second time, wait for at least 20 minutes before repeating the steps above. The OPTION OSD automatically disappears after about 30 seconds. To close the OSD, press the button again. 12 The OPTION OSD automatically disappears after about 30 seconds. To close the OSD, press the button again. To reset, press the ? (reset) button while the OSD is on. Setting the power saving delay time You can set the delay time before the monitor enters the power saving mode. See page 15 for more information on this monitor's power saving capabilities. 1 Press the button. The MENU OSD appears. GCeuttsitnogmSiztianrgteYdour Monitor Locking the controls The control lock function disables all of the buttons on the front panel except the u (power) switch and button. 1 Press the button. The MENU OSD appears. 2 Press the ¨./> and >?// buttons to select " OPTION," and press the button again. The OPTION OSD appears. OPTION ON ZZ... 1 MIN UNLOCK MANUAL DEGAUSS 3 Press the ¨./> buttons to select " ZZ... (PWR SAVE DELAY)." OPTION 1 5 SEC 1 MIN ZZ... 60 MIN OFF PWR SAVE DELAY 4 Press the >?// buttons to select the desired time. 2 Press the ¨./> and >?// buttons to select " OPTION," and press the button again. The OPTION OSD appears. OPTION ON ZZ... 1 MIN UNLOCK MANUAL DEGAUSS 3 Press the ¨./> buttons to select " LOCK)." (CONTROL OPTION 1 ZZ... UNLOCK LOCK CONTROL LOCK 4 Press the >?// buttons to select "LOCK." EN F ES C When PWR SAVE DELAY is set to "OFF," the monitor does not go into power saving mode. The OPTION OSD automatically disappears after about 30 seconds. To close the OSD, press the button again. To reset, press the ? (reset) button while the OSD is on. The OPTION OSD automatically disappears after about 30 seconds. To close the OSD, press the button again. Once you select "LOCK," you cannot select any items except "EXIT" and " OPTION" in the MENU OSD. If you press any button other than the u (power) switch and button, the mark appears on the screen. To cancel the control lock Repeat steps 1 through 3 above and press the >?// buttons to select "UNLOCK." 13
-
 1
1 -
2
-
3
-
4
-
5
-
 6
6 -
 7
7 -
 8
8 -
 9
9 -
 10
10 -
 11
11 -
 12
12 -
 13
13 -
 14
14 -
 15
15 -
 16
16 -
17
-
18
-
19
-
20
-
21
-
22
-
23
-
24
-
25
-
26
-
27
-
28
-
29
-
30
-
31
-
32
-
33
-
34
-
35
-
36
-
37
-
38
-
39
-
40
-
41
-
42
-
43
-
44
-
45
-
46
 |
 |
