IBM 655743N Service Manual - Page 8
AdjustingthePictureBrightness, andContrast, UsingtheCENTEROn-screen, Display, IntroducingtheOn-
 |
UPC - 087944378259
View all IBM 655743N manuals
Add to My Manuals
Save this manual to your list of manuals |
Page 8 highlights
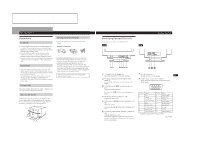
1-3 Getting Started 5 Press the >?// buttons to select "1" or "2." Customizing Your Monitor Before adjusting • Connect the monitor and the computer, and turn them on. • Select " LANG" in the MENU OSD, then select "ENGLISH" (see page 14). When "1" is selected The signal from the computer connected to the HD15 connector is input to the monitor. When "2" is selected The signal from the computer connected to the 13W3 connector is input to the monitor. The OPTION OSD automatically disappears after about 30 seconds. To close the OSD, press the button again. For more information on using the OSD, see "Introducing the On-screen Display System" on page 7. When you connect computers to both connectors If you restart the computer you want to view, or that computer is in power saving mode, the monitor may automatically select the other connector's signal. This is because the monitor switches from the interrupted signal to the constant signal. If this happens, manually select the desired signal. Adjusting the Picture Brightness and Contrast Once the setting is adjusted, it will be stored in memory for all input signals received. 1 Press the ¨ (brightness) ./> or > (contrast) ?// buttons. The BRIGHTNESS/CONTRAST OSD appears. BRIGHTNESS/CONTRAST 26 26 80.0kHz/ 75Hz Horizontal Vertical Frequency* Frequency* 2 For brightness adjustment Press the ¨./> buttons. > . . . for more brightness . . . . for less brightness For contrast adjustment Press the >?// buttons. / . . . for more contrast ? . . . for less contrast The OSD automatically disappears after about 3 seconds. To reset, press the ? (reset) button while the OSD is on. The brightness and contrast are both reset to the factory settings. * The horizontal and vertical frequencies for the received input signal appear in the BRIGHTNESS/CONTRAST OSD. 6 GCeuttsitnogmSiztianrgteYdour Monitor Introducing the On-screen Display System Most adjustments are made using the MENU OSD. MENU OSD Press the button to display the MENU OSD. This MENU OSD contains links to the other OSDs described below. Using the CENTER On-screen Display The CENTER settings allow you to adjust the centering of the picture. Once the setting is adjusted, it will be stored in memory for the current input signal. 1 Press the button. The MENU OSD appears. MENU OK MENU COLOR CENTER SCREEN GEOM EXIT ZOOM LANG SIZE OPTION 1 COLOR Displays the COLOR OSD for adjusting the color temperature. 2 CENTER Displays the CENTER OSD for adjusting the centering of the picture. 3 SCREEN Displays the SCREEN OSD for adjusting the vertical and horizontal convergence, etc. 4 ZOOM Displays the ZOOM OSD for enlarging and reducing the picture. 5 OPTION Displays the OPTION OSD for adjusting the OSD position and degaussing the screen, etc. 6 SIZE Displays the SIZE OSD for adjusting the picture size. 7 LANG Displays the LANGUAGE OSD for selecting the language. 8 GEOM Displays the GEOMETRY OSD for adjusting the picture rotation and pincushion, etc. 9 EXIT Closes the MENU OSD. 2 Press the ¨./> and >?// buttons to select " CENTER," and press the button again. The CENTER OSD appears. CENTER 73 26 EN F 3 For horizontal adjustment Press the >?// buttons. ES C / . . . to move the picture right ? . . . to move the picture left For vertical adjustment Press the ¨./> buttons. > . . . to move the picture up . . . . to move the picture down The OSD automatically disappears after about 30 seconds. To close the OSD, press the button again. To reset, press the ? (reset) button while the OSD is on. The horizontal and vertical centerings are both reset to the factory settings. 7
-
 1
1 -
2
-
 3
3 -
 4
4 -
 5
5 -
 6
6 -
 7
7 -
 8
8 -
 9
9 -
 10
10 -
 11
11 -
 12
12 -
 13
13 -
14
-
15
-
16
-
17
-
18
-
19
-
20
-
21
-
22
-
23
-
24
-
25
-
26
-
27
-
28
-
29
-
30
-
31
-
32
-
33
-
34
-
35
-
36
-
37
-
38
-
39
-
40
-
41
-
42
-
43
-
44
-
45
-
46
 |
 |
