Image Fitness 17.0 R Treadmill English Manual - Page 13
Tion Mode/demo Mode On - ratings
 |
View all Image Fitness 17.0 R Treadmill manuals
Add to My Manuals
Save this manual to your list of manuals |
Page 13 highlights
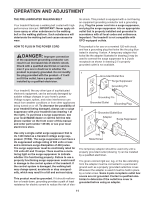
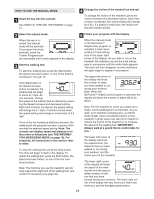
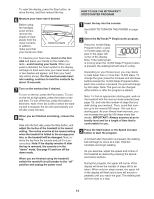
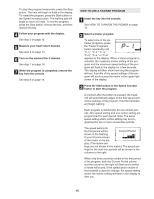
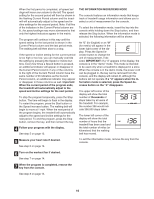
HOW TO USE THE MANUAL MODE 1 Insert the key into the console. See HOW TO TURN ON THE POWER on page 12. 4 Change the incline of the treadmill as desired. To change the incline of the treadmill, press the Incline increase and decrease buttons. Each time a button is pressed, the incline setting will change by 0.5%; if a button is held down, the incline setting will change quickly. 2 Select the manual mode. When the key is inserted, the manual mode will be selected. If a program has been selected, press the Trainer Programs button repeatedly until a track appears in the display. 3 Start the walking belt. To start the walking belt, press the Start button, the Speed increase button, or one of the buttons numbered 1 through 10. If the Start button or the Speed increase button is pressed, the walking belt will begin to move at 1 mph. As you exercise, change the speed of the walking belt as desired by pressing the Speed increase and decrease buttons. Each time a button is pressed, the speed setting will change by 0.1 mph; if a button is held down, the speed setting will change in increments of 0.5 mph. If one of the ten numbered buttons is pressed, the walking belt will gradually increase in speed until it reaches the selected speed setting. Note: The console can display speed and distance in either miles or kilometers (see THE INFORMATION MODE/DEMO MODE on page 16). For simplicity, all instructions in this section refer to miles. To stop the walking belt, press the Stop button. The time will begin to flash in the display. To restart the walking belt, press the Start button, the Speed increase button, or one of the ten numbered buttons. Note: The first time you use the treadmill, periodically inspect the alignment of the walking belt, and center it if necessary (see page 20). 5 Follow your progress with the display. When the manual mode or the MyTracks™ StepCounter program is selected, a track representing 1/4 mile will appear in the upper right corner of the display. As you walk or run on the treadmill, the indicators around the track will appear in succession until the entire track appears. The track will then disappear and the indicators will again begin to appear in succession. The upper left corner of the display will show the number of steps you have walked or run during your workout. Note: When the MyTracks™ StepCounter program is selected, the display will show the number of steps still to be taken. Note: For the treadmill to count your steps accurately, correct walking form is important. As you walk, try to maintain a steady pace, a uniform stride length, and a consistent position on the treadmill. Lighter users may also find it helpful to reduce the incline of the treadmill or to increase the speed of the walking belt. IMPORTANT: Always walk at a speed that is comfortable for you. The lower left corner of the display will show the elapsed time, the distance that you have walked or run during your workout, and the incline level of the treadmill. The lower right corner of the display will show the speed of the walking belt and the approximate number of calories that you have burned during your workout. The lower right corner of the display will also show your heart rate when you use the handgrip pulse sensor. 13
-
 1
1 -
2
-
3
-
4
-
5
-
6
-
7
-
 8
8 -
 9
9 -
 10
10 -
 11
11 -
 12
12 -
 13
13 -
 14
14 -
 15
15 -
 16
16 -
 17
17 -
 18
18 -
19
-
20
-
21
-
22
-
23
-
24
-
25
-
26
 |
 |
