Insignia NS-DXA1 User Manual - Page 9
Manually adding channels, Using the on-screen menu system, SETUP menu, OPTION menu
 |
View all Insignia NS-DXA1 manuals
Add to My Manuals
Save this manual to your list of manuals |
Page 9 highlights
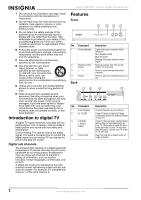
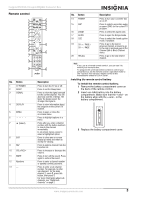
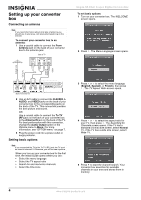
Insignia NS-DXA1 Coupon Eligible Converter Box Manually adding channels If you need to add a channel that was not found during the channel search, you can add the channel manually. To manually add channels: 1 Press MENU. The SETUP menu opens. SETUP menu 2 Press or to select Manual Tuning, then press or . The Channel Edit menu opens. 3 Select the channel you want to add, then press . 4 Repeat Step 3 to add more channels. Using the on-screen menu system The first time you turn on your converter box, the Install Guide opens, where you can set basic options. For more information, see "Setting basic options" on page 4. Your converter box has an on-screen menu system that you can use to adjust options such as picture and sound. To use the on-screen menu system: 1 Press MENU. The menu system opens. Menu option Description Auto Tuning EZ Add Channel Edit Manual Tuning Output Channel Automatically finds all digital channels available through the From Antenna jack. For more information, see "Searching for channels" on page 6. Automatically adds new channels available through the From Antenna jack. Select this option, then press . Your converter box searches for new channels and adds them to the memorized channel list. Manually adds or deletes channels from the channel list or the Favorites list. For more information, see "Editing the memorized channel list" on page 6 or "Creating a Favorites list" on page 6. Manually adds. For more information, see "Editing the memorized channel list" on page 6. Selects the channel (3 or 4) for the signal from the To TV (RF) jack. Your TV must be tuned to the same channel to display the TV image. For more information, see "Setting the output channel" on page 5. OPTION menu 2 Press or to select a menu, then press or to go to the options for the menu you selected. 3 Press or to select an option, then press to go to the next level of options. 4 Press or to adjust the option, then press to confirm your setting. 5 Press EXIT to close the menu system. Menu option Description Clock Sets the time. Normally, the clock is set using signals transmitted by digital TV (DTV) stations. When you select a time zone, the clock is set automatically. Note: If the DTV station does not send a time signal or sends the wrong time signal, the clock may be set to an incorrect time. For more information, see "Controlling closed captions" on page 10. TV Aspect Ratio Selects your TV type. Select 4:3 if your TV has a standard screen. Select 16:9 if your TV has a wide screen. For more information, see "Selecting the TV type" on page 8. www.insignia-products.com 7
-
 1
1 -
2
-
3
-
 4
4 -
 5
5 -
 6
6 -
 7
7 -
 8
8 -
 9
9 -
 10
10 -
 11
11 -
 12
12 -
 13
13 -
 14
14 -
15
-
16
-
17
-
18
-
19
-
20
-
21
-
22
-
23
-
24
-
25
-
26
-
27
-
28
-
29
-
30
-
31
-
32
-
33
-
34
-
35
-
36
-
37
-
38
-
39
-
40
-
41
-
42
 |
 |
