Intel BOXD510MO Product Guide - Page 30
Removing DIMMs, Connecting SATA Drives
 |
View all Intel BOXD510MO manuals
Add to My Manuals
Save this manual to your list of manuals |
Page 30 highlights
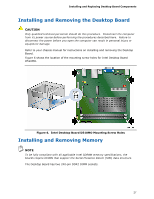
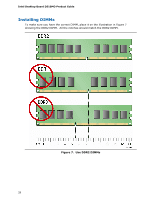
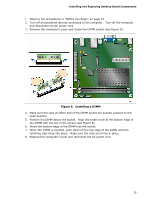
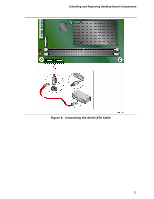
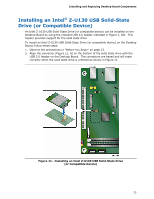
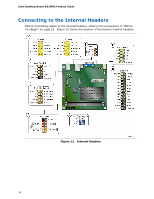
Intel Desktop Board D510MO Product Guide Removing DIMMs To remove a DIMM, follow these steps: 1. Observe the precautions in "Before You Begin" on page 23. 2. Turn off all peripheral devices connected to the computer. Turn off the computer. 3. Remove the AC power cord from the computer. 4. Remove the computer's cover. 5. Gently spread the retaining clips at each end of the DIMM socket. The DIMM pops out of the socket. 6. Hold the DIMM by the edges, lift it away from the socket, and store it in an anti-static package. 7. Reinstall and reconnect any parts you removed or disconnected to reach the DIMM sockets. 8. Replace the computer's cover and reconnect the AC power cord. Connecting SATA Drives The board has two SATA connectors each supporting one SATA drive. The included SATA cables support the Serial ATA protocol. For correct cable and drive function: 1. Observe the precautions in "Before You Begin" on page 23. 2. Attach the locking cable end to the connector on the board (Figure 9, A). 3. Attach the cable end without the lock to the drive (Figure 9, B). 30
-
 1
1 -
2
-
3
-
4
-
5
-
6
-
7
-
8
-
9
-
10
-
11
-
12
-
13
-
14
-
15
-
16
-
17
-
18
-
19
-
20
-
21
-
22
-
23
-
24
-
 25
25 -
 26
26 -
 27
27 -
 28
28 -
 29
29 -
 30
30 -
 31
31 -
 32
32 -
 33
33 -
 34
34 -
 35
35 -
36
-
37
-
38
-
39
-
40
-
41
-
42
-
43
-
44
-
45
-
46
-
47
-
48
-
49
-
50
-
51
-
52
-
53
-
54
-
55
-
56
-
57
-
58
-
59
-
60
-
61
-
62
-
63
-
64
-
65
-
66
 |
 |
