JVC GY-DV5000U Wireless Peer-to-Peer Connections from Streamcorder to Computer - Page 3
What You Need, Configuring the KA-DV300/350, KA-DV5000, or SA-DV6000 Network Pack
 |
View all JVC GY-DV5000U manuals
Add to My Manuals
Save this manual to your list of manuals |
Page 3 highlights
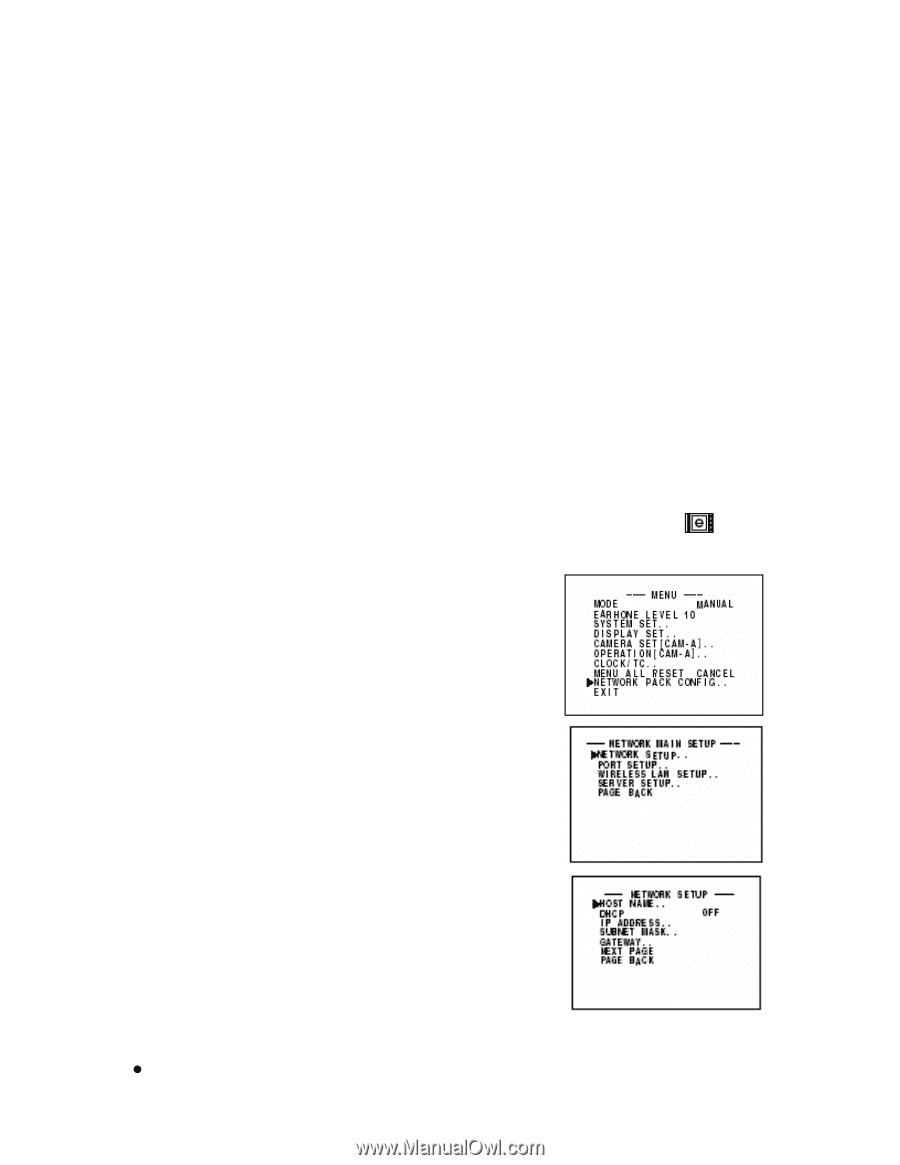
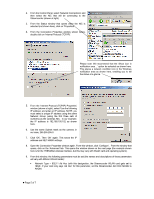
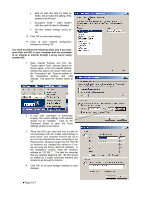
• AD HOC MODE - The ad-hoc mode must be used when connecting peer-to-peer with no intermediate infrastructure (wireless access point). • Encryption - If used, the encryption key must be the same on both Streamcorder and computer. We recommend disabling encryption until you feel comfortable with the other settings. What You Need • GY-DV300 camera with a KA-DV300/350 Network Pack, GY-DV5000 camera with a KA-DV5000 Network Pack, or a BR-DV6000 VTR with an SA-DV6000 Network Pack. • A wireless network card (with adapter, if applicable) for the Streamcorder. Only those shown on the list above are supported by the Streamcorder • A computer with a wireless LAN interface. Configuring the KA-DV300/350, KA-DV5000, or SA-DV6000 Network Pack Before you can use Streamcorder with a wireless LAN interface, you must configure it properly. You only need to configure the network pack when using it for the first time or when connecting to a different computer. The menus illustrated in the following discussion are from a KA-DV300 revision 2.00. Other revisions of the KADV300/350, the KA-DV5000 and the SA-DV6000 may have slightly different menu structures. Please consult your owners' manual for more information. To configure the network pack and LAN card: 1. Turn the camera or VTR power ON and wait for the Network Pack initialization sequence to finish. With the KA-DV5000, you must also turn the network pack power ON as well. You will know when the sequence finished when the icon, shown to the right, appears in the viewfinder. 2. From the camera, press and hold the MENU button until the main menu appears. With the BR-DV6000 VTR, you just have to press, but not hold, the MENU button. Please refer to your User's Guide for instructions on menu navigation if necessary. 3. From the top menu, shown here for the GY-DV300, select 'NETWORK PACK CONFIGURAION'. From the NETWORK PACK CONFIG window, not shown, select 'NETWORK MAIN SET'. 4. From the 'NETWORK MAIN SETUP' window, select 'NETWORK SETUP'. 5. From the first of the two NETWORK SET windows, shown below, the following parameters are set: • HOST NAME - This is an arbitrary name, up to 64 characters, that will be used by the host computer for saving files. • DHCP - When set to 'ON', this allows a host device or IP service provider to dynamically assign an IP address. For direct connections as outlined here, this must be set to 'OFF' z Page 3 of 7
-
 1
1 -
 2
2 -
 3
3 -
 4
4 -
 5
5 -
 6
6 -
 7
7
 |
 |