JVC JY-VS200U JY-VS200U User Manual -- Pages 2-35 (1231KB)
JVC JY-VS200U - Professional Dv 1-ccd Camcorder Manual
 |
View all JVC JY-VS200U manuals
Add to My Manuals
Save this manual to your list of manuals |
JVC JY-VS200U manual content summary:
- JVC JY-VS200U | JY-VS200U User Manual -- Pages 2-35 (1231KB) - Page 1
camera. Before use, please read the safety information and precautions contained in the following pages to ensure safe use of this product. Using This Instruction Manual Use the JVC BN-V408U/V416U/V428U battery packs and, to recharge them, the provided multi-voltage AC Power Adapter/Charger. (An - JVC JY-VS200U | JY-VS200U User Manual -- Pages 2-35 (1231KB) - Page 2
from battery power, or other sources, refer to the operating instructions. SERVICE EQUIPMENT ANTENNA DISCHARGE UNIT (NEC SECTION 810-20) GROUNDING CONDUCTORS (NEC SECTION 810-21) GROUND CLAMPS POWER SERVICE GROUNDING ELECTRODE SYSTEM (NEC ART 250. PART H) NEC - NATIONAL ELECTRICAL CODE JY-VS200U - JVC JY-VS200U | JY-VS200U User Manual -- Pages 2-35 (1231KB) - Page 3
mounting accessory recommended by the manufacturer and follow the manufacturer 's instructions for any mounting of the product. • Do not try service or repairs to this product, ask the service technician to perform safety checks to determine that the product is in safe operating condition. JY-VS200U - JVC JY-VS200U | JY-VS200U User Manual -- Pages 2-35 (1231KB) - Page 4
with this unit. Before recording an important scene . . . .... make sure you only use cassettes with the Mini DV mark . .... make sure you only use memory cards with the mark or . .... remember that this camcorder is not compatible with other digital video formats. .... remember that this - JVC JY-VS200U | JY-VS200U User Manual -- Pages 2-35 (1231KB) - Page 5
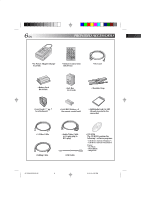
the camcorder) • S-Video Cable • Editing Cable •Audio/Video Cable (ø3.5 mini-plug to RCA plug) •USB Cable • CD-ROM The CD ROM contains the following 5 software programs: • USB Driver Soft (for Windows®) • USB Driver Soft (for Macintosh®) Presto! • Mr. Photo • PhotoAlbum • ImageFolio JY-VS200U EN - JVC JY-VS200U | JY-VS200U User Manual -- Pages 2-35 (1231KB) - Page 6
Available when the Power Switch is set to " " or " " and no cassette is in the camcorder. Ⅲ Performing any operation during the demonstration stops the demonstration temporarily. If no operation is performed for more . MENU Wheel DEMO MODE - OF F ON Sub Menu JY-VS200U EN 02-35 7 01.3.12, 6:55 PM - JVC JY-VS200U | JY-VS200U User Manual -- Pages 2-35 (1231KB) - Page 7
. Slide the battery and lift off. Remember to unplug the AC Adapter/Charger's power cord camcorder. As long as the battery pack itself is not cold, it should not affect performance. (If you're using a heating pad, make sure the battery pack does not come in direct contact with it.) JY-VS200U - JVC JY-VS200U | JY-VS200U User Manual -- Pages 2-35 (1231KB) - Page 8
pack & AA- V80U AC Power Adapter/Charger Read the kit's instruction manual before using. Neither BN-V840U nor BN-V856U can be charged by using the AC Power Adapter/Charger provided with this camcorder. Use only the AAV15U AC Power Adapter/Charger for BN-V840U battery pack and only AA-V80U AC Power - JVC JY-VS200U | JY-VS200U User Manual -- Pages 2-35 (1231KB) - Page 9
the viewfinder fully and adjust it manually for best viewability. 3 Turn 1 Align the screw and camera direction stud on the tripod with the camera's mounting socket and stud hole camcorder. To prevent damage to the unit caused by falling over, do not use a smallsized tripod. JY-VS200U EN 02- - JVC JY-VS200U | JY-VS200U User Manual -- Pages 2-35 (1231KB) - Page 10
Lamp Lock Button MENU Wheel Display FADER /WI PE PROGRAM AE W. BALANCE CAMERA MANUAL S Y S T EM D I SPLAY DSC F . WH I battery is integrated in the camcorder . While the camcorder is connected to an AC outlet using the AC Power Adapter/Charger, or while the battery pack attached to the camcorder - JVC JY-VS200U | JY-VS200U User Manual -- Pages 2-35 (1231KB) - Page 11
before closing the cassette holder cover. •When the battery's charge is low, you may not be able to close the cassette and try again. If the cassette holder still does not open, turn the camcorder off then on again. ● If the tape does not load properly, open . JY-VS200U EN 02-35 12 01.3.12, 6:55 PM - JVC JY-VS200U | JY-VS200U User Manual -- Pages 2-35 (1231KB) - Page 12
3 push the memory card, which then comes out of the camcorder automatically. Pull it out and close the card cover. NOTES: camcorder is turned on, as this may cause the memory card to be corrupted or cause the camcorder to become unable to recognize whether or not the card is installed. JY-VS200U - JVC JY-VS200U | JY-VS200U User Manual -- Pages 2-35 (1231KB) - Page 13
Auto): Allows you to record using NO special effects or manual adjustments. Suitable for standard recording. OFF: Allows you to switch off the camcorder . : Allows you to play back a recording on the with superior quality . • File size: 1600 x 1200 pixels JY-VS200U EN 02-35 14 01.3.12, 6:55 PM - JVC JY-VS200U | JY-VS200U User Manual -- Pages 2-35 (1231KB) - Page 14
switching point. ● It is recommended that tapes recorded in the LP mode on this camcorder be played back on this camcorder . ● During playback of a tape recorded on another camcorder, blocks of noise may appear or there may be momentary pauses in the sound. JY-VS200U EN 02-35 15 01.3.12, 6:55 PM - JVC JY-VS200U | JY-VS200U User Manual -- Pages 2-35 (1231KB) - Page 15
and open the LCD monitor fully or pull out the viewfinder fully . The power lamp lights and the camcorder turns on. 2 Press the MENU wheel. The Menu Screen appears. 3 Rotate the MENU wheel to select " RETURN", and press it twice. The Menu Screen closes. JY-VS200U EN 02-35 16 01.3.12, 6:55 PM - JVC JY-VS200U | JY-VS200U User Manual -- Pages 2-35 (1231KB) - Page 16
the subject is moving rapidly. - when there is excessive camera-shake. ● If "AUTO" is selected in the UXGA mode, and any of the shooting situations listed above are encountered, the camcorder will automatically process the image using the ENLARGE method. JY-VS200U EN 02-35 17 01.3.12, 6:55 PM - JVC JY-VS200U | JY-VS200U User Manual -- Pages 2-35 (1231KB) - Page 17
" while pressing down the Lock Button located on the switch. Make sure "CAMERA MODE" is set to "VIDEO" in the Menu Screen (੬ pg. 28 downward for best viewability. •The power lamp lights and the camcorder enters the Record-Standby mode. "PAUSE" is displayed. 2 JY-VS200U EN 02-35 18 01.3.12, 6:55 PM - JVC JY-VS200U | JY-VS200U User Manual -- Pages 2-35 (1231KB) - Page 18
is loaded. ● If the Record-Standby mode continues for 5 minutes, the camcorder 's power shuts off automatically. To turn the camcorder on again, push back and pull out the viewfinder again or close and the remaining time: (blinking) (blinking) (blinking) JY-VS200U EN 02-35 19 01.3.12, 6:55 PM - JVC JY-VS200U | JY-VS200U User Manual -- Pages 2-35 (1231KB) - Page 19
and press it twice. The Menu Screen closes. SNAPSHOT RECORDING 1 Set "CAMERA MODE" to "VIDEO" or "PS-VIDEO" in the Menu Screen (੬ image will be recorded for approx. 6 seconds, then the camcorder re-enters the Record-Standby mode. If you press during JY-VS200U EN 02-35 20 01.3.12, 6:55 PM - JVC JY-VS200U | JY-VS200U User Manual -- Pages 2-35 (1231KB) - Page 20
" or " " and power is supplied from the battery pack, the camcorder shuts off automatically to save power. To perform shooting again Still images taken are compliant to DCF (Design rules for Camera File systems). They do not have any compatibility with devices JY-VS200U EN 02-35 21 01.3.12, 6:55 PM - JVC JY-VS200U | JY-VS200U User Manual -- Pages 2-35 (1231KB) - Page 21
set the zoom while in Record-Standby , lock the focus by using the manual focus ( ੬ pg. 27), then zoom in or out in Record /VGA" ( ੬ pg. 14). •When "CAMERA MODE" is set to "DUAL" in the Menu Screen ( ੬ pg. 28, 29). •When "CAMERA MODE" is set to "PS-VIDEO" and JY-VS200U EN 02-35 22 01.3.12, 6:55 PM - JVC JY-VS200U | JY-VS200U User Manual -- Pages 2-35 (1231KB) - Page 22
When recording is resumed, the time code starts counting up again from "00:00:00". This means the camcorder may record the same time codes as those existing in a previously recorded scene. T o prevent this, point Shooting start point Shooting start point JY-VS200U EN 02-35 23 01.3.12, 6:55 PM - JVC JY-VS200U | JY-VS200U User Manual -- Pages 2-35 (1231KB) - Page 23
open the LCD monitor fully . Lock Button Recording Start/Stop Button 2 Set "CAMERA MODE" to "PS-VIDEO" in the Menu Screen (੬ pg. 28, . . .... press the Recording Start/Stop Button. The camcorder enters the Record-Standby mode. NOTES: ● When an image . 20). JY-VS200U EN 02-35 24 01.3.12, 6:55 PM - JVC JY-VS200U | JY-VS200U User Manual -- Pages 2-35 (1231KB) - Page 24
can look unnatural. Scan A Scan B Scan C Scan D Skip Skip Odd-number Field Even-number Field Odd-number Field Even-number Field 30 Frames per second JY-VS200U EN 02-35 25 01.3.12, 6:55 PM - JVC JY-VS200U | JY-VS200U User Manual -- Pages 2-35 (1231KB) - Page 25
image SNAPSHOT Button Released position 2 Set "CAMERA MODE" to "DUAL" in the Menu CAMERA MODE" is set to "DUAL", all Fade/ Wipe Effects and some Program AE with special effects cannot be used (੬ pg. 34 - 37). ● The optional flash (੬ pg. 5, 83) will not light during video recording. JY-VS200U - JVC JY-VS200U | JY-VS200U User Manual -- Pages 2-35 (1231KB) - Page 26
the Manual Focus mode. If you focus in on a subject in the wide-angle position, sharply focused images cannot be obtained when zoomed up because the depth-of-field is reduced at longer focal lengths. ● When the focus level cannot be adjusted any further or closer , " " or " " will blink. JY-VS200U - JVC JY-VS200U | JY-VS200U User Manual -- Pages 2-35 (1231KB) - Page 27
-use, on-screen menu system that simplifies many of the more detailed camcorder settings (੬ pg. 29 - 31) . 1 Set the Power Switch - STANDARD - VGA - AUTO RETURN FADER /WI PE PROGRAM AE W. BALANCE CAMERA MANUAL S Y S T EM D I SPLAY DSC END Normal Screen JY-VS200U EN 02-35 28 01.3.12, 6:55 PM - JVC JY-VS200U | JY-VS200U User Manual -- Pages 2-35 (1231KB) - Page 28
. ● Switch off this mode when recording with the camcorder on a tripod. ● The " " indicator blinks CAMERA" settings are effective when the Power Switch is set to both " " and " ". ● The " MANUAL" settings are effective only when the Power Switch is set to " ". CONTINUED ON NEXT PAGE JY-VS200U - JVC JY-VS200U | JY-VS200U User Manual -- Pages 2-35 (1231KB) - Page 29
of recording. : Factory-preset NOTES: ● The " MANUAL" settings are effective only when the Power Switch is set to " ". ● " SYSTEM" functions which are set when the Power Switch is set to " " are also applied when the Power Switch is set to " " (੬ pg. 41). JY-VS200U EN 02-35 30 01.3.12, 6:55 PM - JVC JY-VS200U | JY-VS200U User Manual -- Pages 2-35 (1231KB) - Page 30
. The date/time is always displayed. Time code is not displayed. Time code is displayed on the camcorder and on the connected TV . Frame numbers are not displayed during recording. Allows you to set the on the remote control (provided) (੬ pg. 55, 58, 66). JY-VS200U EN 02-35 31 01.3.12, 6:55 PM - JVC JY-VS200U | JY-VS200U User Manual -- Pages 2-35 (1231KB) - Page 31
Shooting Mode Switch Self-Timer Once the camcorder is set, the camcorder operator can become part of the scene MENU wheel. The Menu Screen appears. 3 Rotate the MENU wheel to select " MANUAL", and press it. 4 Rotate the MENU wheel to select "SELF-TIMER", and JY-VS200U EN 02-35 32 01.3.12, 6:55 PM - JVC JY-VS200U | JY-VS200U User Manual -- Pages 2-35 (1231KB) - Page 32
camcorder records a 5-second still (੬ pg. 20). When "5S" is set to "ANIM." (੬ pg. 30) this function is not available. NOTE: When "5S" is set to "ANIM." in the Menu Screen the 5-second recording mode is not available. Animation recording of a few frames only is taken instead ( ੬ pg. 30). JY-VS200U - JVC JY-VS200U | JY-VS200U User Manual -- Pages 2-35 (1231KB) - Page 33
fully. 2 Press the MENU wheel. The Menu Screen appears. Shooting Mode Switch 3 Set "CAMERA MODE" to "VIDEO" or "PS-VIDEO" in the Menu Screen (੬ pg. 28, 29 having turned the camcorder 's power off), the previous scene wipes out, revealing the new scene. JY-VS200U EN 02-35 34 01.3.12, 6:55 - JVC JY-VS200U | JY-VS200U User Manual -- Pages 2-35 (1231KB) - Page 34
the screen to the top. The new scene wipes in over the previous one from the center toward the top and bottom of the screen. JY-VS200U EN 02-35 35 01.3.12, 6:55 PM
-
 1
1 -
 2
2 -
 3
3 -
 4
4 -
 5
5 -
 6
6 -
 7
7 -
8
-
9
-
10
-
11
-
12
-
13
-
14
-
15
-
16
-
17
-
18
-
19
-
20
-
21
-
22
-
23
-
24
-
25
-
26
-
27
-
28
-
29
-
30
-
31
-
32
-
33
-
34
 |
 |

2
EN
This camcorder is designed to be used with NTSC-
type color television signals. It cannot be used for
playback with a television of a different standard.
However, live recording and LCD monitor/
viewfinder playback are possible anywhere. Use the
JVC BN-V408U/V416U/V428U battery packs and,
to recharge them, the provided multi-voltage AC
Power Adapter/Charger. (An appropriate conversion
adapter may be necessary to accommodate different
designs of AC outlets in different countries.)
Using This Instruction Manual
• All major sections and subsections are listed in the Table Of Contents on the cover page.
• Notes appear after most subsections. Be sure to read these as well.
• Basic and advanced features/operation are separated for easier reference.
It is recommended that you . . .
.....
refer to the Index (
±
pgs. 81 – 88) and familiarize yourself with button locations, etc. before use.
.....
read thoroughly the Safety Precautions and Safety Instructions that follow . They contain extremely important
information regarding the safe use of this product.
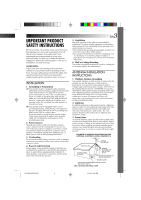
SAFETY PRECAUTIONS
CAUTION
RISK OF ELECTRIC SHOCK
DO NOT OPEN
CAUTION:
TO REDUCE THE RISK OF ELECTRIC SHOCK,
DO NOT REMOVE COVER (OR BACK).
NO USER-SERVICEABLE PARTS INSIDE.
REFER SERVICING TO QUALIFIED SERVICE PERSONNEL.
The lightning flash with arrowhead symbol, within an
equilateral triangle, is intended to alert the user to the
presence of uninsulated "dangerous voltage" within the
product's enclosure that may be of sufficient magnitude
to constitute a risk of electric shock to persons.
The exclamation point within an equilateral triangle is
intended to alert the user to the presence of important
operating and maintenance (servicing) instructions in
the literature accompanying the appliance.
You are recommended to carefully read the cautions on pages 89 through 91 before use.
NOTES:
●
The rating plate (serial number plate) and safety
caution are on the bottom and/or the back of the
main unit.
●
The rating plate (serial number plate) of the AC
Power Adapter/Charger is on its bottom.
WARNING:
TO PREVENT FIRE OR SHOCK
HAZARD, DO NOT EXPOSE THIS
UNIT TO RAIN OR MOISTURE.
The AA-V40U AC Power Adapter/Charger should be
used with:
AC 120 V
`
, 60 Hz in the USA and Canada,
AC 110 V – 240 V
`
, 50 Hz/60 Hz in other countries.
CAUTION (applies to the AA-V40U)
TO PREVENT ELECTRIC SHOCK MATCH WIDE
BLADE OF PLUG TO WIDE SLOT, FULLY INSERT.
ATTENTION (s’applique à l’AA-V40U)
POUR ÉVITER LES CHOCS ÉLECTRIQUES,
INTRODUIRE LA LAME LA PLUS LARGE DE LA
FICHE DANS LA BORNE CORRESPONDANTE DE
LA PRISE ET POUSSER JUSQU’AU FOND.
Dear Customer,
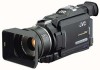
Thank you for purchasing this digital video camera. Before use, please read the safety information and precautions
contained in the following pages to ensure safe use of this product.
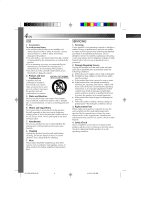
When the equipment is installed in a cabinet or on
a shelf, make sure that it has sufficient space on all
sides to allow for ventilation (10 cm (3-15/16") or
more on both sides, on top and at the rear).
Do not block the ventilation holes.
(If the ventilation holes are blocked by a newspaper ,
or cloth etc. the heat may not be able to get out.)
No naked flame sources, such as lighted candles,
should be placed on the apparatus.
When discarding batteries, environmental problems
must be considered and the local rules or laws
governing the disposal of these batteries must be
followed strictly.
The apparatus shall not be exposed to dripping or
splashing.
Do not use this equipment in a bathroom or places
with water.
Also do not place any containers filled with water or
liquids (such as cosmetics or medicines, flower
vases, potted plants, cups etc.) on top of this unit.
(If water or liquid is allowed to enter this equip-
ment, fire or electric shock may be caused.)
Caution: (applies to Jack Box)
To reduce the risk of fire, do not remove
cover. No user-serviceable parts inside.
Refer servicing to qualified service person.
JY-VS200U EN 02-35
01.3.12, 6:55 PM
2