JVC JY-VS200U JY-VS200U User Manual -- Pages 2-35 (1231KB) - Page 23
Advanced Features For Video And D.S.C.
 |
View all JVC JY-VS200U manuals
Add to My Manuals
Save this manual to your list of manuals |
Page 23 highlights
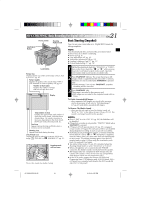
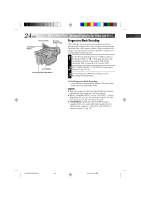
24 EN SNAPSHOT Button RECORDING Advanced Features For Video And D.S.C. Power Switch Shooting Mode Switch Progressive Mode Recording This mode lets you record moving images (successive jitter-free still images) onto a tape. Images can then played back jitter-free, with superior quality. High-resolution still images can also be processed on a personal computer or can be printed out (੬ pg. 57). 1 Set the Shooting Mode Switch to "VIDEO", then set the Power Switch to " " while pressing down the Lock Button located on the switch. Pull out the viewfinder fully or open the LCD monitor fully . Lock Button Recording Start/Stop Button 2 Set "CAMERA MODE" to "PS-VIDEO" in the Menu Screen (੬ pg. 28, 29). 3 To start Progressive Mode Recording, press the Recording Start/Stop Button. To End Progressive Mode Recording . . . .... press the Recording Start/Stop Button. The camcorder enters the Record-Standby mode. NOTES: ● When an image recorded using the Progressive Mode is played back, the image may not look natural. ● When "CAMERA MODE" is set to "PS-VIDEO", Picture Wipe/Dissolve (੬ pg. 34) and some Program AE with special effects (੬ pg. 36) cannot be used. ● If SNAPSHOT is pressed in the PS-VIDEO mode, a snapshot will be recorded with higher quality than in VIDEO mode. However, "MULTI-4" and "MULTI-9" cannot be used (੬ pg. 20). JY-VS200U EN 02-35 24 01.3.12, 6:55 PM
-
 1
1 -
2
-
3
-
4
-
5
-
6
-
7
-
8
-
9
-
10
-
11
-
12
-
13
-
14
-
15
-
16
-
17
-
 18
18 -
 19
19 -
 20
20 -
 21
21 -
 22
22 -
 23
23 -
 24
24 -
 25
25 -
 26
26 -
 27
27 -
 28
28 -
29
-
30
-
31
-
32
-
33
-
34
 |
 |
