JVC KW ADV790 Instructions
JVC KW ADV790 - DVD Player With LCD Monitor Manual
 |
UPC - 046838033131
View all JVC KW ADV790 manuals
Add to My Manuals
Save this manual to your list of manuals |
JVC KW ADV790 manual content summary:
- JVC KW ADV790 | Instructions - Page 1
RÉCEPTEUR DVD ET MONITEUR KW-ADV790 KW-AVX710 KW-ADV790 KW-AVX710 KW-ADV790 KW-AVX710 For canceling the display demonstration, see page 8. Para cancelar la demonstración en pantalla, consulte la página 8. Pour annuler la démonstration des affichages, référez-vous à la page 8. For installation and - JVC KW ADV790 | Instructions - Page 2
the receiver is connected. - Consult the dealer or an experienced radio/TV technician for help. Caution Changes or modifications not approved by JVC could void the user's authority to operate the equipment. WARNINGS: To prevent accidents and damage • DO NOT install any unit or wire any cable in - JVC KW ADV790 | Instructions - Page 3
unit. Cautions on the monitor: EXTERNAL DEVICES Bluetooth® operations- Cellular phone/audio player .......... 27 • The monitor built in Troubleshooting 64 • Stop the car before performing any complicated Specifications 68 operations. Temperature inside the car... If you have parked the car - JVC KW ADV790 | Instructions - Page 4
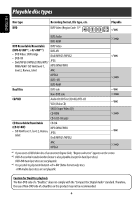
RW dual layer discs are not playable. *3 It is possible to play back finalized +R/+RW (Video format only) discs. +RW double layer discs are not playable. Caution for DualDisc playback The Non-DVD side of a "DualDisc" does not comply with the "Compact Disc Digital Audio" standard. Therefore, the use - JVC KW ADV790 | Instructions - Page 5
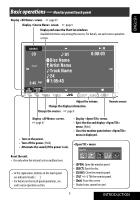
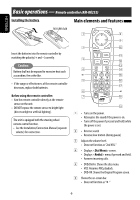
. ☞ page 9 Display and erase the Short Cut windows. Available functions vary among the sources. For details, see each source operation section. Adjust the volume. Change the display information. Change the sources. ☞ page 9 Remote sensor Display screen. ☞ page 47 • Turn on the power. - JVC KW ADV790 | Instructions - Page 6
the steering wheel remote control function. • See the Installation/Connection Manual (separate volume function as "2nd VOL." 4 • Displays screen. • Displays menu if pressed and held. • Answers incoming calls. 5 • DVD/DivX 6: Shows the disc menu. • VCD: Resumes PBC playback. • DVD - JVC KW ADV790 | Instructions - Page 7
/pauses. (for audio player operation). e Changes the aspect ratio of the playback pictures. r "TUNER"/"SAT"/"HD Radio": Selects the bands. "DISC": Stops playback. "Bluetooth PHONE": Ends the call. "Bluetooth AUDIO": Starts playback/pauses. t VCD: Returns to the PBC menu. y • DVD Video/DivX 6: Shows - JVC KW ADV790 | Instructions - Page 8
-available items will be shaded on the AV Menu screens. @ Set the clock settings. Moves to the preceding menu page Indication language: In this manual, English indications are used for purpose of explanation. You can select the indication language. (☞ page 49) ~ Turn on the power. Moves to the - JVC KW ADV790 | Instructions - Page 9
information. Ex. When the playback source is a DivX disc. Playback picture screen (only for video sources) Source information screen Exit Track list TUNER or HD Radio = SAT = DISC (DVD/VCD/CD) =CD-CH, iPod, or EXT-IN = Bluetooth PHONE = Bluetooth AUDIO = AV-IN = (back to the beginning) • You cannot - JVC KW ADV790 | Instructions - Page 10
on the touch panel. In the explanation, they are indicated inside [ ]. • Manual Search: Hold either [4]or [¢] until "Manual Search" appears on the screen, then press it repeatedly. • The ST indicator lights up when receiving an FM stereo broadcast with sufficient signal strength. When an FM - JVC KW ADV790 | Instructions - Page 11
(selected ), it always works when searching for FM stations. 1 Press [AV MENU]. FM station automatic presetting -SSM (Strong-station Sequential Memory) This function works only for FM bands. You can preset six stations for each band. 1 Press [AV MENU]. • You can also use AV MENU on the - JVC KW ADV790 | Instructions - Page 12
ENGLISH Manual presetting Ex.: Storing FM station of 92.5 MHz into preset number 4 of the FM1 band. 1 Display the Preset List. Selecting a preset station On the remote: 1 2 or Hold On the unit: • To select directly on the touch panel 2 Tune in to a station you want to preset. 3 Select a preset - JVC KW ADV790 | Instructions - Page 13
ENGLISH Disc operations The disc type is automatically detected, and playback starts automatically (for some discs: automatic start depends on its internal program). If a disc does not have any disc menu, all tracks on it will be played repeatedly until you change the source or eject the disc. If " - JVC KW ADV790 | Instructions - Page 14
page 9) Disc type *1 Audio format Sound mode (☞ page 45) Playback mode DVD Video: Title no./Chapter no./Playing time DVD-VR: Program no. (or Playlist no.)/Chapter no./Playing time Sampling frequency/Bit they are not shown on the touch panel (while watching the playback pictures on the screen). 14 - JVC KW ADV790 | Instructions - Page 15
ENGLISH While playing the following discs, press . • Each time you press the button, the display changes to show the different information (☞ page 9). For DivX/MPEG1/MPEG2: Folder no./Track no./Playing time For JPEG: Folder no./File no. Disc type Sound mode (☞ page 45) Total track no. included - JVC KW ADV790 | Instructions - Page 16
ENGLISH Track no./Playing time Sound mode (☞ page 45) ☞ page 19 Total playing time [3 / 8] Start and pause playback [7] Stop playback [4 ¢] Press: Select track Hold: Reverse/forward search*4 Only for CD Text *3 Total track no. included on the disc Folder no./Track no./Playing time Audio - JVC KW ADV790 | Instructions - Page 17
shown on the screen (while watching the playback picture). * While a disc menu is played back for DVD, [KEY] is automatically displayed. On the disc you can select a menu item directly by touching it on the screen. B For DVD/VCD/DivX menu operation playback [2 3 5 ∞] Select the menu items [ENT] - JVC KW ADV790 | Instructions - Page 18
ENGLISH Selecting playback modes You can use the following playback modes-Repeat or Random. Ex.: To select Track Repeat 1 3 • You can also use AV MENU on the monitor panel. 2 When one of the playback modes is selected, the corresponding indicator lights up on the source information screen. To - JVC KW ADV790 | Instructions - Page 19
same procedure to select . Using Short Cut Icons You can easily access the some frequently used functions by using [SHORT CUT] on the touch panel. 1 2 • For video software: Aspect ratio (☞ page 49) Sound mode (☞ page 45) • For audio software: Selected track starts playing. Turn on - JVC KW ADV790 | Instructions - Page 20
ENGLISH Operations using the remote controller-RM-RK252 Stop playback. Start playback/pause (if pressed playback or pause). Select aspect ratio. Select chapter. Select title (when not playing). Also functions as CLR (clear): Erases a misentry if pressed while holding SHIFT. twice Select title ( - JVC KW ADV790 | Instructions - Page 21
ENGLISH Stop playback. Start playback/pause (if pressed during playback). Reverse/forward search*4 (No sound can be heard.) Forward slow motion during pause*5 (No sound can be heard.) • Reverse slow motion does not work. Press: Select chapter (during playback or pause). Hold: Reverse/forward search - JVC KW ADV790 | Instructions - Page 22
Hold: Reverse/forward search*2 (No sound can be heard.) Select folder. Select aspect ratio. Select track (within the same folder). Also functions as CLR (clear): Erases a misentry if pressed while holding SHIFT. twice Select folder. While playing... Reverse/advance the scenes by five minutes - JVC KW ADV790 | Instructions - Page 23
ENGLISH Stop playback. Start playback/pause. (Slide show: each file is shown for a few seconds.) Shows the current file until you change it if pressed during Slide show. Select file. Select folder. Select aspect ratio. Select file (within the same folder). Select folder. twice Stop playback. Start - JVC KW ADV790 | Instructions - Page 24
Press: Select track. Hold: Reverse/forward search*2 Select track. *1 Search speed: x2 ] x5 ] x10 ] x20 ] x60 *2 Search speed: x2 ] x10 Also functions as CLR (clear): Erases a misentry if pressed while holding SHIFT. Stop playback. Start playback/pause (if pressed during playback). Reverse/forward - JVC KW ADV790 | Instructions - Page 25
These operations are possible on the screen using the remote controller, while playing the following discs-DVD/VCD/DivX/MPEG1/MPEG2/JPEG. 1 Display the or playlist may not be displayed depending on the recording equipment. Ex. For DVD-Video 2 Select an item. 3 Make a selection. If a pop-up menu - JVC KW ADV790 | Instructions - Page 26
Items shown on the bar vary due to the disc type. 1 Disc type 2 • DVD: Audio signal format • VCD: PBC 3 Playback mode *1 DVD Video: C. RPT: Chapter repeat T. RPT: Title repeat DVD-VR: C. RPT: Chapter repeat PG. RPT: Program repeat DivX/MPEG1/MPEG2: T. RPT: Track repeat F. RPT: Folder repeat F. RND - JVC KW ADV790 | Instructions - Page 27
• Refer also to the instructions supplied with the Bluetooth Adapter and the Bluetooth device. • Refer to the list (included in the box) to see the countries where you may use the Bluetooth® function. To use a Bluetooth device through the unit ("Bluetooth PHONE" and "Bluetooth AUDIO") for the first - JVC KW ADV790 | Instructions - Page 28
you want to connect. 5 Enter the specific PIN code of the device to the unit. • Refer to the instructions supplied with the device to check the PIN code. 6 Operate the Bluetooth device to connect while "Connecting..." is displayed on the screen. Now connection is established and you can use the - JVC KW ADV790 | Instructions - Page 29
ENGLISH Sound mode (☞ page 45) The Bluetooth icon lights up when the adapter is connected. ☞ page 31 *1 Status cellular phone with audio function is connected, appears. *2 This adjustment does not affect the volume level of the other sources. ~ Press [SOURCE], then press [Bluetooth PHONE]. (☞ page - JVC KW ADV790 | Instructions - Page 30
the message, press [Yes]. The source is changed to "Bluetooth PHONE." To read the message later, press [No]. • (☞ page 54) When is set to ... Access the message list to read messages. (☞ pages 54 have dialed. Received Calls Shows the list of the received calls. Phonebook - JVC KW ADV790 | Instructions - Page 31
) To redial previously dialed numbers Hold any button on the monitor panel (except /ATT 1 or +/-). Entering a phone number • You cannot use the remote controller to enter phone numbers. 2 You can enter [0] - [9 up to 32 numbers) • [BS]: Erases the character before the cursor. • [Del]: Erases the - JVC KW ADV790 | Instructions - Page 32
To call a preset number 1 2 Ex.: Selecting 2 Select a telephone number to store. 3 Select a preset number. [Hold] Now "Tom" is stored into preset no. 1. You can use the following buttons on the remote controller for the Bluetooth phone operations. : • Display screen - JVC KW ADV790 | Instructions - Page 33
on the remote controller for the Bluetooth audio operations. : Start and pause playback. : Reverse/forward skip : Adjust the volume. Bluetooth Information: If you wish to receive more information about Bluetooth, visit the following JVC web site: 33 - JVC KW ADV790 | Instructions - Page 34
]. [4 ¢] Press: Select track Hold: Reverse/forward search [5 ∞] Press: Select folders (only for MP3) Hold: Display Disc list It is recommended to use a JVC MP3-compatible CD changer with your unit. • You can play only CDs (CD-DA) and MP3 discs. Preparation: Make sure is selected for - JVC KW ADV790 | Instructions - Page 35
turn on or off Track Repeat by pressing [SHORT CUT] on the touch panel, then... ☞ page 45 You can use the following buttons on the remote controller to operate the CD changer. : Select disc. : Select folder (MP3 only). • Press: Select track. • Hold: Reverse/forward search 35 EXTERNAL DEVICES - JVC KW ADV790 | Instructions - Page 36
one of the following (separately purchased) to the CD changer jack on the rear of this unit. • JVC SIRIUS Satellite radio interface, KS-SRA 100, for listening to SIRIUS Satellite radio. • JVC Smart Digital Adaptor, XMDJVC 100, for listening to XM Satellite radio. For SIRIUS Radio Activate your - JVC KW ADV790 | Instructions - Page 37
ENGLISH Tuning in to a channel you want Preset No. Channel No. Band Sound mode (☞ page 45) Signal Reception indicator ☞ page 9 Only for SIRIUS ☞ page 38 : Buttons on the touch panel. In the explanation, they are indicated inside [ ]. For SIRIUS Radio ~ Press [SOURCE], then press [SAT]. (☞ - JVC KW ADV790 | Instructions - Page 38
the selected category. 3 Select a preset number. The station selected in step 2 is now stored in preset number 4. Selecting preset channels On the remote only: 1 * Press to move to the previous/next pages of the list 1 Current category list number/total category list number 2 Current channel list - JVC KW ADV790 | Instructions - Page 39
artist names and song titles. • When the HD Radio tuner box is connected, it can also receive conventional analog broadcasts. • Many HD Radio stations also offer more than one channel of programming. This service is called multicasting. • To find HD Radio stations in your area, visit www.hdradio.com - JVC KW ADV790 | Instructions - Page 40
, they are indicated inside [ ]. [4 ¢] Press: Select track Hold: Reverse/forward search [5] Enter player's menu [∞] Start playback/pause • To resume, press again. It is required to connect the Interface adapter for iPod (KS-PD100) to the CD changer jack on the rear. Preparation: Make sure - JVC KW ADV790 | Instructions - Page 41
ENGLISH Selecting a track from the player's menu 1 Press [5] to enter the player's menu. "SEARCH" flashes on the screen during Repeat One: Functions the same as "Repeat One." All: Functions the same as "Repeat All." Random Album: Functions the same as "Shuffle Albums." Song: Functions the same as - JVC KW ADV790 | Instructions - Page 42
-INPUT You can connect an external component to the LINE IN/VIDEO IN terminals. Assigned title (☞ page 46) Sound mode (☞ page These buttons also work when they are not shown on the touch panel (while watching the playback picture). ~ Press [SOURCE], then press [AV-IN]. (☞ page 9) • You can also use - JVC KW ADV790 | Instructions - Page 43
fixed to regardless of the setting. (☞ page 49) * If your Navigation System is equipped with the voice guidance function. To display the operation buttons (☞ page 17) while viewing the navigation screen • The operation buttons displayed on the screen vary among the playback sources - JVC KW ADV790 | Instructions - Page 44
ENGLISH EXT-INPUT You can connect an external component to the CD changer jack on the rear using the Line Input Adapter-KS-U57 (not supplied) or AUX Input Adapter-KS-U58 (not supplied). Assigned title (☞ page 46) Sound mode (☞ page 45) ☞ page 45 : Buttons on the touch panel. In the explanation, - JVC KW ADV790 | Instructions - Page 45
ENGLISH Sound equalization While playing back any source other than "Bluetooth PHONE," you can easily access menu by pressing [SHORT CUT] on the touch panel, then... ~ • You can also use AV MENU on the monitor - JVC KW ADV790 | Instructions - Page 46
ENGLISH Assigning titles to the sources In the explanation, buttons on the touch panel are indicated inside [ ]. You can assign titles as follows. FM/AM stations AV-IN EXT-IN Up to 16 characters-up to 30 stations. Up to 16 characters ~ Select the source. (☞ page 9) • For FM/AM stations: Select - JVC KW ADV790 | Instructions - Page 47
ENGLISH Menu operations The following steps are one of the fundamental ! procedures. Some of the settings do not open the sub-setting window, but just selecting an option will change the setting. • The display indications may change according to change of the specifications. Ex.: Changing - JVC KW ADV790 | Instructions - Page 48
the contrast. Color: Adjust the color of the picture-lighter or darker. Tint: Adjust the tint if the human skin color is unnatural. • Press [5] or [∞] to adjust. *1 The ILLUMINATION lead connection is required. (☞ Installation/Connection Manual) *2 Adjustable only when the source is "DISC" (the - JVC KW ADV790 | Instructions - Page 49
ratio of incoming signal 4:3 16:9 Regular: For 4:3 original pictures Full: For 16:9 original pictures Display Auto: • For "DISC": Aspect ratio is automatically selected to match to the incoming signals. • For the other video sources: Aspect ratio is fixed to . Language*4 Select - JVC KW ADV790 | Instructions - Page 50
Select playback file type when a disc contains different types of files. Audio: Plays back audio files. Still Picture: Plays back JPEG files. Video: Plays back DivX/MPEG1/MPEG2 files. Audio&Video: Plays back audio files and DivX/MPEG1/MPEG2 files. DivX Regist. (Registration)*3 This unit has its - JVC KW ADV790 | Instructions - Page 51
level while playing Dolby Digital software. Auto: Select to apply the effect to multi-channel encoded software. On: Select to always use this function. Auto: Increases the tuner selectivity to reduce interference noises between adjacent stations. (Stereo effect may be lost.) Wide: Subject to the - JVC KW ADV790 | Instructions - Page 52
Navigation : Select when connecting a Navigation System. For connecting an external component to the CD changer jack on the rear. Changer/iPod*4: CD changer or iPod. ☞ [34, 40] External: Any other than the above. ☞ [44] • For connecting the Bluetooth adapter . See Installation/Connection Manual. The - JVC KW ADV790 | Instructions - Page 53
volume level will automatically increase or decrease when you change the source. -12 to +12; Initial 00 • You can make the adjustments separately for DVD and other discs. Amplifier Gain You can change the maximum volume level of this unit. Off: Deactivates the built-in amplifier. Low: VOL 00 to - JVC KW ADV790 | Instructions - Page 54
operating the menu. *2 Only for the device connected for "Bluetooth PHONE." *3 Selectable only when the source is "Bluetooth PHONE" and the connected cellular phone is compatible with Text Message. When operating the Bluetooth device, refer also to the instructions supplied with the device. 54 - JVC KW ADV790 | Instructions - Page 55
by ringing and displaying "Receiving Message." To read the message, ☞ page 30. Manual: The unit does not inform you of the arrival of a message. MIC Setting *5 Adjust microphone volume connected to the Bluetooth adapter. 01/02/03 Version *6 The Bluetooth software and hardware versions are - JVC KW ADV790 | Instructions - Page 56
following cases: • After starting the heater in the car. • If it becomes very humid inside the car. Should this occur, the unit may malfunction. In case, gently insert the disc around the center holder (with the printed surface facing up). • Make sure to store discs into the cases after use. To - JVC KW ADV790 | Instructions - Page 57
details about DVD-VR format and Playlist, refer to the instructions supplied with the recording equipment. File playback Playing DivX files • This unit can play back DivX files with the extension code , , or (regardless of the letter case-upper/lower). • This unit supports the - JVC KW ADV790 | Instructions - Page 58
is an extension code used for the MPEG2 files recorded by JVC Everio camcorders. • The stream format should conform to MPEG system/ program stream to MPEG1 Audio Layer-2 or Dolby Digital. • The maximum bit rate for video signals (average) is 4 Mbps. Playing JPEG files • This unit can play - JVC KW ADV790 | Instructions - Page 59
Picture" (baseline JPEG), it will be displayed. Bluetooth car in a safe place. • Some Bluetooth devices may not be connected to this unit depending on the Bluetooth supports the function you have tried. • Device Unfound: No available Bluetooth the connection between the adapter and this unit. Icons - JVC KW ADV790 | Instructions - Page 60
the following types of iPods through the interface adapter. - iPod with dock connector (3rd Generation) - iPod with Click Wheel (4th Generation) - iPod mini - iPod photo - iPod nano *1 - iPod video (5th Generation) *2 *1 When you connect the iPod nano to the interface adapter, be sure to disconnect - JVC KW ADV790 | Instructions - Page 61
page 51) Playback disc Output signals DVD 48 kHz, 16/20/24 bits Linear PCM 48 kHz, 16 bits stereo Linear PCM* MPEG Audio MPEG bitstream 48 kHz, 16 bits stereo Linear PCM Audio CD, Video CD 44.1 kHz, 16 bits stereo Linear PCM / 48 kHz, 16 bits - JVC KW ADV790 | Instructions - Page 62
00 00 +01 +02 +02 +03 Classic +02 +03 +01 00 00 +02 00 User1/2/3 00 00 00 00 00 00 00 Language codes (for DVD/DivX language selection) Code Language Code Language AA Afar FA Persian AB Abkhazian FI Finnish AF Afrikaans FJ Fiji AM Ameharic FO Faroese AR Arabic - JVC KW ADV790 | Instructions - Page 63
word mark and logos are owned by the Bluetooth SIG, Inc. and any use of such marks by Victor Company of Japan, Limited (JVC) is under license. Other trademarks and trade names are those of their respective owners. • iPod and iTunes are trademarks of Apple Inc., registered in the U.S. and other - JVC KW ADV790 | Instructions - Page 64
ENGLISH Troubleshooting What appears to be trouble is not always serious. Check the following points before calling a service center. • For operations with the external components, refer also to the instructions supplied with the adapters used for the connections (as well as the instructions - JVC KW ADV790 | Instructions - Page 65
brake lead is not connected properly. Brake" appears on the screen, even when the (☞ Installation/Connection Manual) parking brake is engaged. • No picture appears on the external monitor. • Connect the video cord correctly. • Select the correct input on the external monitor. • "Eject Error" or - JVC KW ADV790 | Instructions - Page 66
player again. Bluetooth audio player is already connected. To select "New Device," disconnect it. (☞ page 28) Check whether the connected audio player supports AVRCP (Audio Video Remote Control Profile). Check the connection between the adapter receiving weak digital signals or receiving - JVC KW ADV790 | Instructions - Page 67
. The receiver is updating iPod. Disconnect the adapter from both this unit and iPod. Then, connect them again. Check the connection between the adapter and this unit. Reset the iPod. • Turn on the video component if it is not on. • Connect the video component correctly. Adjust items in - JVC KW ADV790 | Instructions - Page 68
NTSC 1 Vp-p/75 Ω Input: LINE IN, VIDEO IN, Antenna input Output: VIDEO OUT Others: CD changer, OE REMOTE, Reverse gear signal, DIGITAL OUT (optical) FM Sensitivity/Selectivity: 20 μV/35 dB Non-contact optical pickup (semiconductor laser) DVD, fs=48 kHz/96 kHz: 16 Hz to 22 000 Hz VCD - JVC KW ADV790 | Instructions - Page 69
Film Transistor) active matrix format Color System: NTSC/PAL Aspect Ratio: 16:9 (wide) Power Requirement: +40°C (32°F to 104°F) Dimensions (W × H × D) (with trim plate and sleeve attached): Installation Size (approx.): Panel Size (approx.): car, consult your telephone directory for the nearest - JVC KW ADV790 | Instructions - Page 70
JVC. Como primer paso, por favor lea detenidamente este manual para de Clase B, de conformidad con la Parte 15 de las reglas de la FCC JVC pueden anular la autoridad del usuario para operar el equipo. ADVERTENCIAS: Para evitar daños y accidentes • NO instale ningún receptor o tienda ningún cable - JVC KW ADV790 | Instructions - Page 71
que la calidad del sonido se deteriore. DISPOSITIVOS EXTERNOS Operaciones Bluetooth®- teléfono celular/reproductor de audio 27 Escuchando el cambiador 36 Para escuchar la transmisión HD Radio 39 Para escuchar el iPod 40 Uso de otros componentes externos .... 42 AJUSTES Ecualización de sonido - JVC KW ADV790 | Instructions - Page 72
de disco Formato de grabación, tipo de archivo, etc. Reproducible DVD DVD Vídeo (Códigos regionales: 1)*1 DVD Audio DVD-ROM DVD Grabable/reescribible DVD Vídeo (DVD-R/-RW*2, +R/+RW*3) DVD-VR • DVD Vídeo: Puente UDF DivX/MPEG1/MPEG2 • DVD-VR • DivX/MPEG1/MPEG2/JPEG/MP3/ JPEG WMA/WAV: ISO - JVC KW ADV790 | Instructions - Page 73
Operaciones básicas -Panel del monitor/panel táctil Visualiza la pantalla . ☞ página 47 Visualiza la pantalla . ☞ página 9 Visualice y borre las ventanas Short Cut (atajo). Las funciones disponibles varían según las fuentes. Para los detalles, consulte la sección de - JVC KW ADV790 | Instructions - Page 74
R03/LR03/AAA funciones ESPAÑOL Instale las pilas en el control remoto el volante de dirección. • Para la conexión, consulte el Manual de instalación/conexión (volumen separado). 2 3 4 5 entrantes. • DVD/DivX 6: Muestra el número de disco. • VCD: Reanuda la reproducción de PBC. • DVD-VR: - JVC KW ADV790 | Instructions - Page 75
Pulse y mantenga pulsado: Búsqueda manual Para las operaciones del sintonizador un canal al pulsarlo. Operaciones para Apple iPod: • ∞: Comienza la reproducción/pausa Bluetooth PHONE": Finaliza la llamada. "Bluetooth AUDIO": Comienza la reproducción/ pausa. t VCD: Vuelve al menú PBC. y • DVD - JVC KW ADV790 | Instructions - Page 76
puesta en hora del reloj. • Las opciones no disponibles aparecerán sombreadas en las pantallas AV Menu. Idioma para las indicaciones: En este manual, se utilizan indicaciones en inglés para las explicaciones. Puede seleccionar el idioma de indicación. (☞ página 49) @ Realice los ajustes del reloj - JVC KW ADV790 | Instructions - Page 77
para fuentes de vídeo) Pantalla de información de fuente Exit Lista de pistas TUNER o HD Radio = SAT = DISC (DVD/VCD/CD) = CD-CH, iPod, o EXT-IN = Bluetooth PHONE = Bluetooth AUDIO = AV-IN = (vuelta al comienzo) • Podrá seleccionar algunas fuentes si no están preparadas. Vuelta al comienzo Hora - JVC KW ADV790 | Instructions - Page 78
lselo repetidamente. Ÿ Pulse [BAND]. ! Pulse [4] o [¢] para efectuar la búsqueda de una emisora-Búsqueda automática • Búsqueda manual: Mantenga pulsado [4] o [¢] hasta que "Manual Search" aparezca en la pantalla y, a continuación, púlselo repetidamente. • El indicador ST se enciende al recibir una - JVC KW ADV790 | Instructions - Page 79
ESPAÑOL Para sintonizar emisoras con un señal suficientemente fuerte Esta función funciona sólo para las bandas FM. Una vez activada (se selecciona ), esta función siempre funcionará al efectuar la búsqueda de emisoras FM. 1 Pulse [AV MENU]. Preajuste automático de emisoras FM-SSM (Memoria - JVC KW ADV790 | Instructions - Page 80
ESPAÑOL Preajuste manual Ej.: Almacenando una emisora FM de 92,5 MHz en el número de preajuste 4 de la banda FM1. 1 Visualice la lista de preajustes. Seleccione una emisora - JVC KW ADV790 | Instructions - Page 81
ESPAÑOL Operaciones de los discos El tipo de disco se detecta automáticamente, y la reproducción se inicia automáticamente (para algunos discos: el inicio automático depende de su programa interno). Si el disco no dispone de ningún menú de disco, todas las pistas del mismo serán reproducidas - JVC KW ADV790 | Instructions - Page 82
ón Pare la reproducción Pulse: Seleccionar un capítulo Sostener: Búsqueda hacia atrás/adelante*2 Selecciona el título/programa/lista de reproducción *1 DVD-VR también indica reproducción PRG (programa) o PLAY (lista de reproducción). *2 Velocidad de búsqueda: x2 ] x10 : Botones en el panel táctil - JVC KW ADV790 | Instructions - Page 83
Mientras se reproducen los siguientes discos, pulse . • Cada vez que pulsa el botón, la pantalla cambia para mostrarle una información diferente (☞ página 9). Para DivX/MPEG1/MPEG2: Nº de carpeta/Nº de pista/tiempo de reproducción Para JPEG: Nº de carpeta/Nº de archivo ESPAÑOL Tipo de disco - JVC KW ADV790 | Instructions - Page 84
Nº de pista/tiempo de reproducción ESPAÑOL Modo de sonido (☞ página 45) Sólo para CD-Text *3 Número total de pistas incluidas en el disco ☞ página 19 Tiempo de reproducción total [3 / 8] [7] [4 ¢] Inicia y pone en pausa la reproducción Pare la reproducción Pulse: Seleccionar la pista Sostener - JVC KW ADV790 | Instructions - Page 85
botones de operación para los diversos discos ESPAÑOL Toque la pantalla (parte central). * Toque [KEY]. Toque [KEY]. Toque [KEY]. Para borrar tocándola sobre la pantalla. B Para la operación del menú de reproducción de DVD/VCD/DivX [2 3 5 ∞] Selecciona las opciones del menú [ENT] Confirme la - JVC KW ADV790 | Instructions - Page 86
Selección de los modos de reproducción Solamente puede uno de los siguientes modos de reproducción-Repetida o aleatoria. Ej.: Para seleccionar repetición de pista 1 3 ESPAÑOL • También puede usar AV MENU en el panel del monitor. 2 Al seleccionar uno de los modos de reproducción, el indicador - JVC KW ADV790 | Instructions - Page 87
Selección de pistas en la lista Si un disco incluye carpetas, podrá visualizar las listas de carpetas/pistas (archivo) y luego iniciar la reproducción. 1 Prohibición de la expulsión del disco Podrá bloquear un disco en la ranura de carga. ESPAÑOL • También puede usar AV MENU en el panel del - JVC KW ADV790 | Instructions - Page 88
ESPAÑOL Operaciones utilizando el control remoto-RM-RK252 Pare la reproducción. Inicia la reproducción/pausa (si lo pulsa durante la reproducción). Búsqueda hacia atrás/adelante*1 (El sonido no se escucha). Cámara lenta durante la pausa*2 (El sonido no se escucha.) Pulse: Seleccionar un capítulo ( - JVC KW ADV790 | Instructions - Page 89
ESPAÑOL Pare la reproducción. Inicia la reproducción/pausa (si lo pulsa durante la reproducción). Búsqueda hacia atrás/adelante*4 (El sonido no se escucha). Cámara lenta hacia adelante durante la pausa*5 (El sonido no se escucha.) • La cámara lenta hacia atrás no funciona. Pulse: Seleccionar un - JVC KW ADV790 | Instructions - Page 90
ESPAÑOL Pare la reproducción. Inicia la reproducción/pausa (si lo pulsa durante la reproducción). Búsqueda hacia atrás/adelante*1 (El sonido no se escucha). Pulse: Seleccionar la pista Sostener: Búsqueda hacia atrás/adelante*2 (El sonido no se escucha.) Seleccionar la carpeta. Selecciona una relaci - JVC KW ADV790 | Instructions - Page 91
ESPAÑOL Pare la reproducción. Inicia la reproducción/pausa. (Slide show: se muestra cada archivo durante unos segundos). Muestra el archivo actual hasta que lo cambie, si lo pulsa durante la presentación de diapositivas. Selecciona el archivo Seleccionar la carpeta. Selecciona una relación de - JVC KW ADV790 | Instructions - Page 92
ESPAÑOL Pare la reproducción. Inicia la reproducción/pausa (si lo pulsa durante la reproducción). Búsqueda hacia atrás/adelante*1 Pulse: Selecciona la pista. Sostener: Búsqueda hacia atrás/adelante*2 Selecciona la pista. *1 Velocidad de búsqueda: x2 ] x5 ] x10 ] x20 ] x60 *2 Velocidad de búsqueda: - JVC KW ADV790 | Instructions - Page 93
Lista de reproducción en cualquier momento mientras se reproduce un DVD-VR con sus datos grabados. 1 Visualiza la pantalla Programa en la pantalla utilizando el control remoto, mientras se reproducen los siguientes discos-DVD/VCD/DivX/MPEG1/MPEG2/ JPEG. ESPAÑOL 1 Visualiza la barra en pantalla - JVC KW ADV790 | Instructions - Page 94
actual Carpeta/pista actual Carpeta/archivo actual 5 Indicación de la hora Tiempo de reproducción transcurrido del disco Tiempo estante del título (para DVD) Tiempo restante del disco (para los otros) Tiempo de reproducción transcurrido del capítulo/pista actual *2 Tiempo restante del capítulo - JVC KW ADV790 | Instructions - Page 95
/reproductor de audio Para las operaciones Bluetooth, se deberá conectar el adaptador Bluetooth (KS-BTA200) al jack del cambiador de CD en la parte trasera. • Consulte también las instrucciones suministradas con el adaptador Bluetooth y el dispositivo Bluetooth. • Consulte la lista (incluida en la - JVC KW ADV790 | Instructions - Page 96
ESPAÑOL Sólo podrá introducir [0] - [9]. • [BS]: Borra el carácter que está antes del cursor. • [Del]: Borra el carácter sobre el que está el cursor. • [Enter]: Confirma la entrada. 5 Opere el dispositivo Bluetooth para conectar, mientras se visualiza "Open..." en la pantalla. Ingrese el mismo có - JVC KW ADV790 | Instructions - Page 97
con función de audio, aparecerá . *2 Este ajuste no afecta al nivel de volumen de las otras fuentes. ~ Pulse [SOURCE] y, a continuación, pulse [Bluetooth PHONE]. (☞ página 9) • También puede usar SOURCE en el panel del monitor. Púlselo repetidamente. Ÿ Pulse [AV MENU]. • También puede usar AV MENU - JVC KW ADV790 | Instructions - Page 98
, pulse [Yes]. La fuente será cambiada a "Bluetooth PHONE". Para leer el mensaje posteriormente, pulse [No página 54) Cuando se ajusta a ... Para leer un mensaje, acceda a la lista de mensajes. telefónicos a los que ha llamado. Received Calls Muestra la lista de las llamadas - JVC KW ADV790 | Instructions - Page 99
. Para volver a marcar los números marcados previamente 1 2 ESPAÑOL Sólo podrá introducir [0] - [9 hasta 32 números) • [BS]: Borra el carácter que está antes del cursor. • [Del]: Borra el carácter sobre el que está el 3 cursor. • [Preset]:Va a la lista de preajustes. Puede preajustar el número - JVC KW ADV790 | Instructions - Page 100
1 Pulse [AV MENU] en el panel táctil o AV MENU en el panel del monitor. 2 Pulse [Bluetooth]. 3 Pulse [Dial Menu], luego... Para llamar un número preajustado 1 2 Ej.: Seleccionando 2 Seleccione el número telefónico que desea guardar. [Sostener] 3 Seleccione un número de preajuste - JVC KW ADV790 | Instructions - Page 101
de audio de Bluetooth. : Inicia y pone en pausa la reproducción. : Salto hacia atrás/adelante : Ajuste el volumen. Información Bluetooth: Si desea obtener más información sobre Bluetooth, visite el siguiente sitio web de JVC: 33 DISPOSITIVOS EXTERNOS - JVC KW ADV790 | Instructions - Page 102
Selecciona las carpetas (sólo para MP3) Sostener: Visualiza la lista de discos Se recomienda usar un cambiador de CD compatible con MP3 JVC con este receptor. • Puede reproducir sólo discos CD (CD-DA) y MP3. Preparativos: Asegúrese de haber seleccionado para . (☞ página - JVC KW ADV790 | Instructions - Page 103
ESPAÑOL Selección de los modos de reproducción Solamente puede uno de los siguientes modos de reproducción-Repetida o aleatoria. Ej.: Para seleccionar repetición de pista para un disco MP3 1 Pulse [AV MENU] en el panel táctil o AV MENU en el panel del monitor. 2 Pulse [Mode]. 3 Al seleccionar uno - JVC KW ADV790 | Instructions - Page 104
Antes de la operación, conecte cualquiera de las dos unidades siguientes (adquiridas separadamente) al jack del cambiador de CD de la parte trasera de esta unidad. • Interfaz de radio satelital SIRIUS de JVC, KS-SRA 100, para escuchar la radio satelital SIRIUS. • Adaptador digital inteligente de - JVC KW ADV790 | Instructions - Page 105
ESPAÑOL Sintonice el canal que desee N° de preajuste Nº de canal Banda Modo de sonido (☞ página 45) Indicador de recepción de la señal ☞ página 9 Sólo para SIRIUS ☞ página 38 : Botones en el panel táctil: En las explicaciones, se indican dentro de [ ]. Para la radio SIRIUS ~ Pulse [SOURCE], - JVC KW ADV790 | Instructions - Page 106
ESPAÑOL Cómo almacenar canales en la memoria Se pueden preajustar seis canales para cada banda. Ej.: Almacenando un canal en el número de preajuste 4 1 Visualice la lista de preajustes. Selección de las listas Podrá seleccionar un canal utilizando las listas-Lista de categorías/Lista de canales. 1 - JVC KW ADV790 | Instructions - Page 107
ón HD Radio™ Antes de hacer funcionar, conecte el sintonizador HD Radio, KT-HD300 (de venta por separado) al jack del cambiador de CD en la parte posterior de la unidad. ¿Qué es la tecnología HD Radio? La tecnología HD Radio puede brindar sonido digital de alta calidad-las emisiones digital AM - JVC KW ADV790 | Instructions - Page 108
. Se deberá conectar el adaptador de interfaz para iPod (KS-PD100) al jack del cambiador de CD en la parte trasera. Preparativos: Asegúrese de haber seleccionado para . (☞ página 52) ~ Pulse [SOURCE], luego pulse [iPod] (☞ página 9) La reproducción se inicia automáticamente - JVC KW ADV790 | Instructions - Page 109
ESPAÑOL Selección de una pista en el menú del reproductor 1 Pulse [5] para acceder al menú del reproductor. "SEARCH" parpadea en la pantalla durante las operaciones de menú. • Este modo se cancelará si no se efectúa ninguna operación durante unos 5 segundos. 2 Pulse [4] o [¢] para seleccionar la - JVC KW ADV790 | Instructions - Page 110
externos AV-INPUT Puede conectar un componente externo a los terminales LINE IN/VIDEO IN. Título asignado (☞ página 46) Modo de sonido (☞ pá mientras observa la imagen de reproducción Toque la pantalla (parte central). Toque la pantalla (parte central). • Si no se efectúa ninguna operación - JVC KW ADV790 | Instructions - Page 111
de navegación al terminal VIDEO IN para poder ver la pantalla de navegación. Preparativos: Asegúrese de haber seleccionado para . según las fuentes de reproducción. Toque la pantalla (parte central). Toque la pantalla (parte central). • Si no se efectúa ninguna operación - JVC KW ADV790 | Instructions - Page 112
ESPAÑOL EXT-INPUT Puede conectar un componente externo al jack del cambiador de CD de la parte trasera mediante el adaptador de entrada de línea-KS-U57 (no suministrado) o el adaptador de entrada AUX-KS-U58 (no suministrado). Título asignado (☞ página 46) Modo de sonido (☞ página 45) ☞ página 45 : - JVC KW ADV790 | Instructions - Page 113
Ecualización de sonido Mientras se reproduce cualquier fuente que no sea "Bluetooth PHONE", podrá acceder fácilmente al menú pulsando [SHORT CUT] en el panel táctil, luego... ESPAÑOL ~ • También puede usar AV MENU en el panel - JVC KW ADV790 | Instructions - Page 114
(en cuanto a los caracteres disponibles, ☞ página 63). • [Store]: Confirme la entrada. • [2/3]: Mueve el cursor. • [BS]: Borra el carácter que está antes del cursor. • [Del]: Borra el carácter sobre el que está el cursor. • [Cap]: Cambia la caja (mayúsculas/ minúsculas). • [Change]: Cambia el juego - JVC KW ADV790 | Instructions - Page 115
ESPAÑOL Operaciones de los menús Los pasos siguientes constituyen uno de los ! procedimientos fundamentales. Algunos de los ajustes no abren la ventana de ajustes secundarios, pero con sólo seleccionar una opción se podrá cambiar el ajuste. • Las indicaciones en pantalla pueden cambiar de - JVC KW ADV790 | Instructions - Page 116
. -15 (más oscura) a +15 (más brillante); Inicial 00 Picture Adjust (Ajustar Imagen)*2 Puede realizar lo siguiente de manera que la o [∞] para ajustar. *1 Se requiere la conexión del conductor ILLUMINATION. (☞ Manual de Instalación/Conexión) *2 Puede ajustarse sólo cuando la fuente sea "DISC" - JVC KW ADV790 | Instructions - Page 117
ESPAÑOL Inicial: Subrayado Opciones del menú Configuraciones seleccionables, [página de referencia] Aspect (Aspecto)*3 Puede cambiar la relación de aspecto de la imagen. Relación de aspecto de la señal entrante 4:3 16:9 Regular: Para imágenes originales 4:3 Pantalla Full: Para imágenes - JVC KW ADV790 | Instructions - Page 118
cuando el disco contenga diferentes tipos de archivos. Audio : Reproduce archivos de audio. Still Picture: Reproduce archivos JPEG. Video : Reproduce archivos DivX/MPEG1/MPEG2. Audio&Video: Reproduce archivos de audio y archivos DivX/MPEG1/ MPEG2. DivX Regist. (Registration) (Cod. Reg. DivX - JVC KW ADV790 | Instructions - Page 119
ESPAÑOL Inicial: Subrayado Menú opciones D. Audio Output (Sal de Audio D)*3 Down Mix (Mezcla)*3 Configuraciones seleccionables, [página de referencia] Seleccione el formato de señal a emitirse a través del terminal DIGITAL OUT (óptico). (☞ también página 61) PCM : Selecciónelo al conectar un - JVC KW ADV790 | Instructions - Page 120
&Video: Navigation : Selecciónelo al conectar un Sistema de navegación. Para conectar un componente externo al jack del cambiador de CD en la parte trasera. Changer/iPod*4: Cambiador de CD o iPod. ☞ [34, 40] External: Con excepción de lo de arriba. ☞ [44] • Para conectar el adaptador Bluetooth Manual - JVC KW ADV790 | Instructions - Page 121
de FM. El nivel de volumen aumenta o disminuye automáticamente al cambiar la fuente. -12 a +12; Inicial 00 • Puede realizar ajustes separadamente para DVD y otros discos.. Podrá cambiar el nivel máximo de volumen de este receptor. Off: Desactiva el amplificador incorporado. Low: VOL 00 a 30 (Selecci - JVC KW ADV790 | Instructions - Page 122
(☞ página 38) • Para otras fuentes de reproducción, podrá visualizar una lista pulsando DISP en el panel del monitor. (☞ página 9) Bluetooth (Bluetooth)*1 Opciones del menú Configuraciones seleccionables, [página de referencia] Dial Menu (Menú de Marcado) *2 Seleccione el método para hacer la - JVC KW ADV790 | Instructions - Page 123
para "Bluetooth PHONE". *5 Sólo para el teléfono celular conectado para "Bluetooth PHONE". No se puede seleccionar cuando se ha seleccionado "New Device". *6 Si desea obtener más información sobre Bluetooth, visite el siguiente sitio web de JVC: 55 - JVC KW ADV790 | Instructions - Page 124
utilice los siguientes discos: CD simple-disco de 8 cm Disco alabeado (3-3/16 pulgada) Pegatinas y restos de pegatina Rótulo autoadhesivo Forma irregular C-thru Disc (disco semitransparente) Partes transparente o semitransparentes en el área de grabación. 56 - JVC KW ADV790 | Instructions - Page 125
no se puedan reproducir debido a sus propias características o condiciones de grabación. Reproduciendo DVD-VR • Para los detalles sobe el formato DVD-VR y la lista de reproducción, consulte el manual entregado con el equipo de grabación. Reproducción de archivo Reproducción de archivos DivX • Esta - JVC KW ADV790 | Instructions - Page 126
MPEG1/MPEG2 con el código de extensión , o *. * es un código de extensión utilizado para archivos MPEG2 grabados mediante videocámaras JVC Everio. • El formato de flujo debe cumplir con el flujo de sistema/programa MPEG. El formato de archivo debe ser MP@ML (Main Profile - JVC KW ADV790 | Instructions - Page 127
MP3/WMA/ WAV) 9 Lista de pistas p Pista actual (resaltado) * Si los datos de etiqueta incluyen "Jacket Picture" (línea de base JPEG), aparecerá visualizada. Operaciones Bluetooth General • Absténgase de realizar actividades complicadas mientras conduce, como por ejemplo, marcar números, utilizar la - JVC KW ADV790 | Instructions - Page 128
no funcionar correctamente o como se desea. En tal KS-U100K de JVC (no suministrado) a la toma caso, visite el siguiente sitio web de JVC: del cambiador de CD, situada en la parte trasera. Al - JVC KW ADV790 | Instructions - Page 129
con estas fuentes multicanal a este terminal, y ajuste correctamente . (☞ página 51) Disco de reproducción Señales de salida DVD 48 kHz, 16/20/24 bit PCM Lineal 48 kHz, 16 bit estéreo PCM Lineal* 96 kHz, PCM Lineal 48 kHz, 16 bit - JVC KW ADV790 | Instructions - Page 130
+02 +03 +01 00 00 +02 00 User1/2/3 00 00 00 00 00 00 00 ESPAÑOL Códigos de idiomas (para selección del idioma de DVD/DivX) Código Idioma Código Idioma Código Idioma Código Idioma Código Idioma AA Afar FA Persa KK Kazak NO Noruego ST Sesotho AB Abkasiano FI Finland - JVC KW ADV790 | Instructions - Page 131
de DTS, Inc. • "DVD Logo" es una marca comercial de DVD Format/Logo Licensing Corporation registrado Bluetooth SIG, Inc., y cualquier uso de los mismos por Victor Company of Japan, Limited (JVC) se realiza bajo licencia. Otras marcas y nombres comerciales son de sus respectivos propietarios. • iPod - JVC KW ADV790 | Instructions - Page 132
componentes externos). ESPAÑOL General Síntomas Soluciones/Causas • No sale sonido de los altavoces. • La pantalla no está clara fuente. • Inicie la reproducción en el componente externo conectado al terminal VIDEO IN. • Inspeccione los cables y las conexiones. • La señal de entrada es muy débil - JVC KW ADV790 | Instructions - Page 133
cuando se inserta un DVD Vídeo. • No se Bluetooth. • Hay eco o ruidos. Ajuste opciones en el menú . (☞ página 48) • Detenga la reproducción mientras conduce por caminos accidentados. • Cambie el disco. El cable del freno de estacionamiento no está correctamente conectado. (☞ Manual - JVC KW ADV790 | Instructions - Page 134
"Reset 01" - "Reset 07" en la pantalla. • El cambiador de CD no funciona en absoluto. • Reduzca la distancia entre la unidad y el teléfono celular Bluetooth. • Mueva el coche a un lugar donde pueda mejorar la recepción de la señal. • Reduzca la distancia entre el receptor y el reproductor de audio - JVC KW ADV790 | Instructions - Page 135
Aparece "Reset 08" en la pantalla. • Los controles del iPod no funcionarán después de desconectarlo de esta unidad. • No aparece iPod. • Encienda el componente de vídeo, si no está encendido. • Conecte correctamente el componente de vídeo. Ajuste las opciones en . (☞ página 48) iPod - JVC KW ADV790 | Instructions - Page 136
kΩ de carga (plena escala) 1 kΩ NTSC 1 Vp-p/75 Ω LINE IN, VIDEO IN, Entrada de antena VIDEO OUT Cambiador de CD, OE REMOTE, señal del engranaje de marcha atrás, DIGITAL OUT (óptico) 87,5 MHz de frecuencias: DVD, fs=48 kHz/96 kHz: 16 Hz a 22 000 Hz VCD/CD: 16 Hz a 20 000 Hz Gama dinámica: 93 dB - JVC KW ADV790 | Instructions - Page 137
todo de mando: Formato de matriz activa TFT (Transistor de película delgada) Sistema de Color: NTSC/PAL Relación de aspecto: 16:9 (ancha) Requisitos de potencia: Voltaje de funcionamiento: 14,4 V CC (tolerancia nico para buscar la tienda especializada en car audio más cercana. 69 REFERENCIAS - JVC KW ADV790 | Instructions - Page 138
Merci pour avoir acheté un produit JVC. Veuillez lire attentivement toutes les instructions avant d'utiliser l'appareil afin de bien comprendre son fonctionnement et d' informez-vous auprès de votre administration locale ou, aux États-Unis, de l'Electronic Industries Alliance: http://www.eiae.org. 2 - JVC KW ADV790 | Instructions - Page 139
Bluetooth®-Télé iPod 40 Utilisation d'autres appareils extérieurs 42 RÉGLAGES Égalisation du son 45 Affectation de titres aux sources....... 46 Utilisation des menus 47 RÉFÉRENCES Pour sécurité... • N'augmentez pas trop le volume car Guide de dépannage 64 Spécifications 68 3 INTRODUCTION - JVC KW ADV790 | Instructions - Page 140
pas être reproduits. Précautions pour la lecture de disques à double face La face non DVD d'un disque à "DualDisc" n'est pas compatible avec le standard "Compact Disc Digital Audio". Par conséquent, l'utilisation de la face non DVD d'un disque à double face sur cet appareil n'est pas recommandée. 4 - JVC KW ADV790 | Instructions - Page 141
Opérations de base - Panneau du moniteur/panneau tactile Affichez l'écran . ☞ page 47 Affichez l'écran . ☞ page 9 Affichez et masquez les fenêtres de raccourcis. Les fonctions disponibles varient en fonction des sources. Pour les détails, référez-vous à la section concernant - JVC KW ADV790 | Instructions - Page 142
fonction de télécommande de volant. • Référez-vous au Manuel d'installation/ raccordement (volume séparé) pour les connexion. l'appareil hors tension • Permet de répondre aux appels entrants. 5 • DVD/DivX 6: Affiche le menu de disque. • VCD: Reprend la lecture PBC. • DVD-VR: Affiche l'écran du - JVC KW ADV790 | Instructions - Page 143
utilisation des disques: • 5 / ∞: DVD: Permet de choisir le titre. DVD-VR: Choisit le programme/liste de lecture ces touches pour choisir un canal. Pour utiliser un iPod Apple: • ∞: Lance la lecture / pause • pause. Pour les opérations Bluetooth: • Permet de répondre aux appels entrants. • Lance la - JVC KW ADV790 | Instructions - Page 144
FRANÇAIS Avant d'utiliser l'appareil Vous pouvez annuler la démonstration sur l'écran et régler l'horloge. • Les articles non disponibles apparaissent en gris sur les écrans de menu AV. Langue des indications: Dans ce manuel, les indications en anglais sont utilisées à titre d'exemple. Vous pouvez - JVC KW ADV790 | Instructions - Page 145
disponibles dépendent des appareils extérieurs que vous avez connectés, des supports que vous avez attachés et des réglages que vous Liste des plages TUNER ou HD Radio = SAT = DISC (DVD/VCD/CD) =CD-CH, iPod, ou EXT-IN = Bluetooth PHONE = Bluetooth AUDIO = AV-IN = (retour au début) • Vous - JVC KW ADV790 | Instructions - Page 146
[BAND]. ! Appuyez sur [4] ou [¢] pour rechercher une station-Recherche automatique. • Recherche manuelle: Maintenez pressée [4] ou [¢] jusqu'à ce que "Manual Search" apparaisse sur l'écran, puis appuyez répétitivement sur la touche. • L'indicateur ST s'allume lors de la réception d'une émission FM - JVC KW ADV790 | Instructions - Page 147
de stations avec un signal suffisamment fort Fonctionne uniquement pour les bandes FM. Une fois que vous avez mis en service cette fonction (choisissez ), elle reste toujours en service lors de la recherche des stations FM. 1 Appuyez sur [AV MENU]. Préréglage automatique des stations FM-SSM - JVC KW ADV790 | Instructions - Page 148
FRANÇAIS Préréglage manuel Ex.: Mémorisation de la station FM de fréquence 92,5 MHz sur le numéro de préréglage 4 de la bande FM1. 1 Affichez la liste des préréglages. Sélection d'une station préréglée Sur la télécommande: 1 2 ou Maintenez pressée Sur l'appareil: • Pour choisir directement sur le - JVC KW ADV790 | Instructions - Page 149
" apparaisse. ~ Ouvrez le panneau du moniteur. ! Insérez un disque. Face portant l'étiquette Le menu est affiché. • En maintenant la touche du volume: Les disques produisent très peut de bruit par rapport aux autres sources. Réduisez le volume avant de reproduire un disque afin - JVC KW ADV790 | Instructions - Page 150
la lecture Appuyez: Sélection d'un chapitre Maintenez pressée: Recherche vers l'arrière/vers l'avant*2 Choisissez le titre/programme/liste de lecture *1 Pour les DVD-VR, la lecture PRG (programme) ou PLAY (liste de lecture) est aussi indisquée. *2 Vitesse de recherche: x2 ] x10 : Touches sur le - JVC KW ADV790 | Instructions - Page 151
un dossier Maintenez pressée: Affiche la liste des dossiers. No de plage/Durée de lecture L'indicateur PBC s'allume quand la fonction PBC est en service. Mode sonore (☞ page 45) Nb total de plages comprises dans le disque Durée totale de lecture [3 / 8] [7] [4 ¢] ☞ page 19 Démarrez et mettez la - JVC KW ADV790 | Instructions - Page 152
No de plage/Durée de lecture FRANÇAIS Mode sonore (☞ page 45) Uniquement pour les CD Text *3 Nb total de plages comprises dans le disque ☞ page 19 Durée totale de lecture [3 / 8] [7] [4 ¢] Démarrez et mettez la lecture en pause Arrêtez la lecture Appuyez: Sélection d'une plage Maintenez press - JVC KW ADV790 | Instructions - Page 153
de lecture). * Pendant qu'un menu de disque est affiché pour un DVD, [KEY] est affiché automatiquement. Sur le menu de disque, vous pouvez en le touchant sur l'écran. B Pour les opérations de lecture du menu DVD/VCD/DivX [2 3 5 ∞] Choisissez les articles de menu [ENT] Validez le choix - JVC KW ADV790 | Instructions - Page 154
): Reproduit aléatoirement toutes les plages - Track: Répète la plage actuelle (PBC hors Disc (All): Reproduit aléatoirement toutes les service) plages (PBC hors service) Track: Track: Folder: Répète la plage actuelle*1 Répète la plage actuelle*1 Répète toutes les plages du dossier actuel Disc - JVC KW ADV790 | Instructions - Page 155
de la plage choisie démarre. (* Appuyez sur cette touche pour passer aux pages précédentes/suivantes de la liste) 1 Numéro du dossier supports vidéo: Format d'image (☞ page 49) Mode sonore (☞ page 45) • Pour les supports audio: La lecture de la plage choisie démarre. Mettez en ou hors service - JVC KW ADV790 | Instructions - Page 156
FRANÇAIS Opérations en utilisant de la télécommande-RM-RK252 Arrêtez la lecture. Démarre la lecture/met la lecture en pause (si la touche est pressée pendant la lecture). Recherche vers l'arrière/vers l'avant*1 (Aucun son n'est entendu.) Lecture au ralenti si la touche est pressée pendant une pause - JVC KW ADV790 | Instructions - Page 157
FRANÇAIS Arrêtez la lecture. Démarre la lecture/met la lecture en pause (si la touche est pressée pendant la lecture). Recherche vers l'arrière/vers l'avant*4 (Aucun son n'est entendu.) Lecture au ralenti vers l'avant si la touche est pressée pendant une pause*5 (Aucun son n'est entendu.) • La - JVC KW ADV790 | Instructions - Page 158
FRANÇAIS Arrêtez la lecture. Démarre la lecture/met la lecture en pause (si la touche est pressée pendant la lecture). Recherche vers l'arrière/vers l'avant*1 (Aucun son n'est entendu.) Appuyez sur la touche: Sélection d'une plage Maintenez pressée: Recherche vers l'arrière/vers l'avant*2 (Aucun - JVC KW ADV790 | Instructions - Page 159
Arrêtez la lecture. Démarrez la lecture/met la lecture en pause. (Diaporama: chaque fichier est affiché pendant quelques secondes.) Affiche le fichier actuel jusqu'à ce que vous le changiez, si vous appuyez sur cette touche pendant le diaporama. Choisissez un fichier. Sélection d'un dossier. Sé - JVC KW ADV790 | Instructions - Page 160
FRANÇAIS Arrêtez la lecture. Démarre la lecture/met la lecture en pause (si la touche est pressée pendant la lecture). Recherche vers l'arrière/vers l'avant*1 Appuyez sur la touche: Sélection d'une plage. Maintenez pressée: Recherche vers l'arrière/vers l'avant*2 Sélection d'une plage. *1 Vitesse - JVC KW ADV790 | Instructions - Page 161
de la liste de lecture à n'importe quel moment pendant la lecture d'un DVD-VR avec ses données enregistrées. 1 Affichez l'écran de programme sur l'écran en utilisant la télécommande, lors de la lecture des disques suivants-DVD/VCD/DivX/MPEG1/MPEG2/JPEG. FRANÇAIS 1 Affiche la barre sur écran. - JVC KW ADV790 | Instructions - Page 162
Dossier/plage actuelle Dossier/fichier actuel 5 Indications de la durée Durée de lecture écoulée du disque Durée de lecture restante du titre (pour les DVD) Durée de lecture restante du disque (pour les autres) Durée de lecture écoulée du chapitre ou de la plage actuelle *2 Durée de lecture - JVC KW ADV790 | Instructions - Page 163
Bluetooth, il faut connecter l'adaptateur Bluetooth (KS-BTA200) à la prise de changeur de CD à l'arrière • Référez-vous aussi aux instructions fournies avec l'adaptateur Bluetooth et l'appareil Bluetooth Bluetooth pour mettre en service la fonction Bluetooth. Suite à la page suivante 27 - JVC KW ADV790 | Instructions - Page 164
même après que vous le déconnectez. Utilisez (ou mettez en service ) pour connecter le même périphérique la prochaine fois (☞ • Référez-vous aux instructions fournies avec le périphérique pour vérifier le code PIN. 6 Utilisez le périphérique Bluetooth pour faire la connexion - JVC KW ADV790 | Instructions - Page 165
appareil, puis faites un appel (ou faites un réglage en utilisant le menu ). ☞ page 55 Quand un appel arrive... La source change automatiquement sur "Bluetooth PHONE". Quand est hors service... Pour répondre à un appel entrant • Appuyez sur n'importe quelle touche sur le - JVC KW ADV790 | Instructions - Page 166
le message, appuyez sur [Yes]. La source change sur "Bluetooth PHONE". Pour lire le message plus tard, appuyez sur page 54) Quand est réglé sur ... Affichez la liste des messages pour lire les messages. (☞ phone que vous avez composés. Received Calls Affiche la liste des - JVC KW ADV790 | Instructions - Page 167
> à n'importe quel moment. Vous pouvez aussi accéder au menu en maintenant pressée SOURCE sur le panneau du moniteur. • Vous pouvez mettre en service facilement en appuyant sur [SHORT CUT] sur le panneau tactile, puis... [Maintenez pressée] Vous pouvez aussi mettre en - JVC KW ADV790 | Instructions - Page 168
] sur le panneau tactile ou AV MENU sur le panneau du moniteur. 2 Appuyez sur [Bluetooth]. 3 Appuyez sur [Dial Menu], puis... Pour appeler un numéro préréglé 1 2 FRANÇAIS Ex.: Sélection de 2 Choisissez un numéro de téléphone à mémoriser. [Maintenez pressée] 3 Choisissez un numéro - JVC KW ADV790 | Instructions - Page 169
lecture en pause. : Saut vers l'arrière/saut vers l'avant : Ajuste le volume. Informations sur le système Bluetooth: Si vous souhaitez recevoir plus d'informations sur le système Bluetooth, consultez le site web de JVC suivant: 33 APPAREILS EXTÉRIEURS - JVC KW ADV790 | Instructions - Page 170
[5 ∞] Appuyez: Dossiers choisis (uniquement pour MP3) Maintenez pressée: Affichage de la liste des disques Il est recommandé d'utiliser un changeur de CD JVC compatible MP3 avec votre autoradio. • Vous pouvez uniquement reproduire des CD (CD-DA) et des disques MP3. Préparation: Assurez-vous que - JVC KW ADV790 | Instructions - Page 171
toutes les pages du disque actuel All: Reproduit aléatoirement toutes les plages des disques en place Vous pouvez accéder mettre en ou hors service facilement la répétition de plage en appuyant sur [SHORT CUT] sur le panneau tactile, puis... ☞ page 45 Vous pouvez utiliser les touches suivantes sur - JVC KW ADV790 | Instructions - Page 172
vendu séparément) à la prise du changeur de CD à l'arrière de l'appareil. • Interface de radio satellite SIRIUS JVC, KS-SRA 100, pour écouter la radio satellite SIRIUS. • Adaptateur JVC Smart Digital, XMDJVC 100, pour écouter la radio satellite XM. Pour la radio SIRIUS Activez votre suscription apr - JVC KW ADV790 | Instructions - Page 173
FRANÇAIS Accord d'un canal souhaité No de préréglage No de canal Bande Mode sonore (☞ page 45) Indicateur de réception de signal ☞ page 9 Pour la radio SIRIUS ~ Appuyez sur [SOURCE], puis appuyez sur [SAT]. (☞ page 9) • Vous pouvez aussi utiliser SOURCE sur le panneau du moniteur. Appuyez répé - JVC KW ADV790 | Instructions - Page 174
2 est maintenant mémorisée sur le numéro de préréglage 4. Sélection d'un canal préréglé Sur la télécommande uniquement: 1 * Appuyez sur cette touche pour passer aux pages précédentes/suivantes de la liste 1 Numéro de la liste actuelle de catégories/ nombre total de listes de catégories 2 Numéro - JVC KW ADV790 | Instructions - Page 175
bande FM (en stéréo) et la bande FM numérique a une qualité équivalente aux CD-sans bruits statiques et avec une réception claire. De plus, les stations peuvent de stations HD Radio offrent aussi plus d'un canal de programmes. Ce service est appelé muliplex. • Pour en savoir plus sur les stations HD - JVC KW ADV790 | Instructions - Page 176
PD100) à la prise de changeur de CD à l'arrière. Préparation: Assurez-vous que est choisi pour . (☞ page 52) ~ Appuyez sur [SOURCE], puis appuyez sur [iPod] (☞ page 9) La lecture démarre automatiquement. • Vous pouvez aussi utiliser SOURCE sur le panneau du moniteur. Appuyez - JVC KW ADV790 | Instructions - Page 177
s'allument alternativement sur l'écran. Pour annuler, choisissez . Sélection des modes de lecture 1 Vous pouvez accéder mettre en ou hors service facilement la répétition de plage en appuyant sur [SHORT CUT] sur le panneau tactile, puis... ☞ page 45 • Vous pouvez aussi utiliser - JVC KW ADV790 | Instructions - Page 178
FRANÇAIS Utilisation d'autres appareils extérieurs AV-INPUT Vous pouvez connecter un appareil extérieur aux prises LINE IN/VIDEO IN. Titre affecté (☞ page 46) Mode sonore (☞ page 45) Vous pouvez accéder facilement au réglage en appuyant sur [SHORT CUT] sur le panneau - JVC KW ADV790 | Instructions - Page 179
navigation à la prise VIDEO IN de façon à pouvoir voir l'écran de navigation. Préparation: Assurez-vous que est choisi pour . (☞ page 52) Pour afficher l'écran de navigation (et écouter la guidage de navigation cran de navigation • Les navigation est affiché). Quand - JVC KW ADV790 | Instructions - Page 180
FRANÇAIS EXT-INPUT Vous pouvez connecter un appareil extérieur aux prises du changeur de CD à l'arrière de l'appareil en utilisant l'adaptateur d'entrée de ligne-KS-U57 (non fourni) ou l'adaptateur d'entrée auxiliaire-KS-U58 ( - JVC KW ADV790 | Instructions - Page 181
du son Pendant la lecture d'une source autre que "Bluetooth PHONE", vous pouvez accéder facilement au menu < et Ÿ, puis à l'étape !... ! Choisissez un mode sonore. 2 Ajustez (1), puis mémorisez (2). Passez aux 6 autres modes sonores • Pour les valeurs préréglées de chaque mode sonore, ☞ page 62. - JVC KW ADV790 | Instructions - Page 182
FRANÇAIS Affectation de titres aux sources Dans les explications, les boutons sur le panneau tactile sont indiqués à l'intérieur de crochets [ ]. Vous pouvez affecter des titres comme suit. Stations FM/ - JVC KW ADV790 | Instructions - Page 183
FRANÇAIS Utilisation des menus Les étapes suivantes décrivent une des procédures de ! base. Certains des réglages n'ouvrent pas de sous- fenêtre de réglage, mais permettent seulement de choisir une option pour changer le réglage. • Les indications de l'affichage peuvent changer en fonction - JVC KW ADV790 | Instructions - Page 184
Off: Annulation. On: Met en service le gradateur. Auto: Assombrit le +15 (la plus claire); Réglage initial 00 Picture Adjust (Réglage Image)*2 Vous pouvez ajuster les ré connexion du fil ILLUMINATION est requise. (☞ Manuel d'installation/Raccordement) *2 Ajustable uniquement quand la source est - JVC KW ADV790 | Instructions - Page 185
FRANÇAIS Réglage initial: Souligné Articles du menu Réglages pouvant être choisis, [page de référence] Aspect (Format Image)*3 Il est possible de changer le format de l'image. Format d'image du signal d'entrée 4:3 16:9 Affichage Language (Langue)*4 Time Set (Réglage Heure) Time Format ( - JVC KW ADV790 | Instructions - Page 186
service l'heure (DST) d'été si votre zone d'habitation y est soumise. Off: Annulation. On: Met en service extérieur est 4:3. • Référez-vous aux illustrations ci-à gauche pour savoir comment les images Picture: Reproduit les fichiers JPEG. Video: Reproduit les fichiers DivX/MPEG1/MPEG2. Audio&Video - JVC KW ADV790 | Instructions - Page 187
. Vous pouvez profiter d'un son puissant à un faible niveau de volume lors de la lecture d'un support Dolby Digital. Auto: Choisissez ce réglage pour appliquer les effets aux supports codés multicanaux. On: Choisissez ce réglage pour toujours utiliser cette fonction. Auto: Augmente la sélectivité du - JVC KW ADV790 | Instructions - Page 188
&Video: navigation est connecté. Pour connecter un appareil extérieur à la prise du changeur de CD à l'arrière. Changer/iPod*4: Changeur de CD ou iPod. ☞ [34, 40] External: N'importe quel autre appareils que ceux donnés ci-dessus. ☞ [44] • Pour la connexion de l'adaptateur Bluetooth d'installation/ - JVC KW ADV790 | Instructions - Page 189
la source. -12 à +12; réglage initial 00 • Vous pouvez faire les ajustements séparément pour DVD et les autres disques. Vous pouvez changer le niveau de volume maximum de cet autoradio. Off: Met hors service l'amplificateur intégré. Low: VOL 00 à 30 (Choisissez ce réglage si la puissance maximum des - JVC KW ADV790 | Instructions - Page 190
appareil connecté pour "Bluetooth PHONE". *3 Peut être choisi uniquement quand la source est "Bluetooth PHONE" et que le téléphone portable connecté est compatible avec les Messages textuels. Lors de l'utilisation d'un appareil Bluetooth, référez-vous aussi aux instructions fournies avec l'appareil - JVC KW ADV790 | Instructions - Page 191
un message par une sonnerie et en affichant "Receiving Message". Pour lire le message, ☞ page 30. Manual: L'appareil ne vous informe pas de l'arrivée d'un message. MIC Setting (Réglage Micro.) *5 Ajustez le volume du microphone connecté à l'adaptateur Bluetooth. 01/02/03 Version (Version) *6 Les - JVC KW ADV790 | Instructions - Page 192
garder les disques propres Si le disque est sale, sa lecture risque d'être déformée. Si un disque est sale, essuyez-le avec un chiffon doux, disques. Comment manipuler les disques Pour retirer un disque de sa boîte, Support central faites pression vers le centre du boîtier et soulevez légèrement le - JVC KW ADV790 | Instructions - Page 193
être reproduits à cause de leurs caractéristiques ou des conditions d'enregistrement. Lecture de DVD-VR • Pour les détails sur le format DVD-VR et la liste de lecture, référez-vous aux instructions fournies avec l'appareil d'enregistrement. Lecture de fichier Lecture de fichiers DivX • Cet appareil - JVC KW ADV790 | Instructions - Page 194
fichier MPEG1/ MPEG2 portant l'extension , ou *. * est le code d'extension pour les fichiers MPEG2 enregistrés par les caméscopes JVC Everio. • Le format de transmission en continu doit être conforme au programme/système MPEG. Le format de fichier doit être MP@ML (profil - JVC KW ADV790 | Instructions - Page 195
ît de nouveau, vérifiez si l'appareil extérieur prend en charge la fonction que vous avez essayée. • Device Unfound: Aucun périphérique Bluetooth disponible n'est détecté avec . • Loading: L'appareil met à jour le répertoire téléphonique et/ou les messages. • Please Wait...: L'appareil se pr - JVC KW ADV790 | Instructions - Page 196
un maximum de 40 caractères. Avis: Lors de l'utilisation de iPod, certaines opérations peuvent ne pas être réalisées correctement ou comme prévues. Dans ce cas, consultez le site Web JVC suivant: Réglages du menu • Si vous changez le - JVC KW ADV790 | Instructions - Page 197
décodeur compatible avec ces sources multicanaux, et réglez correctement. (☞ page 51) Disque reproduit Signaux de sortie DVD 48 kHz, 16/20/24 bits Linear PCM 48 kHz, 16 bits stéréo Linear PCM* 96 kHz, Linear PCM 48 kHz, 16 bits st - JVC KW ADV790 | Instructions - Page 198
+01 00 00 +02 00 User1/2/3 00 00 00 00 00 00 00 FRANÇAIS Codes de langue (pour la sélection de la langue des DVD/DivX) Code Langue AA Afar AB Abkhazien AF Afrikaans AM Amharique AR Arabe AS Assamais AY Aymara AZ Azerbaïdjanais BA Bashkir BE Biélorusse - JVC KW ADV790 | Instructions - Page 199
sigle double Bluetooth SIG, Inc. et toute utilisation de ces marques par Victor Company of Japan, Limited (JVC) est faite sous licence. Les autres marques et noms de commerce sont la propriété de leur propriétaire respectif. • iPod et iTunes sont des marques de commerce d'Apple Inc., enregistrée aux - JVC KW ADV790 | Instructions - Page 200
service. • Pour les opérations des appareils extérieurs, référez-vous aussi aux modes d'emploi fournis avec les adaptateurs utilisés pour les connexion (de même qu'aux instructions la lecture sur l'appareil extérieure connecté à la prise VIDEO IN. • Vérifiez les cordons et les connexions. • Les - JVC KW ADV790 | Instructions - Page 201
du menu . (☞ page d'installation/ quand vous insérez un DVD Vidéo. Le code de ré Support" apparaît sur l'écran et la plage La plage ne peut pas être reproduite. est sautée. • Le périphérique Bluetooth rique n'est pas indiqué sur ses instructions, essayez "0000" ou "1234". • - JVC KW ADV790 | Instructions - Page 202
est déjà connecté. Pour choisir "Bluetooth AUDIO". "New Device" déconnectez-le. (☞ page 28) • Le lecteur audio connecté ne peut pas être Vérifiez si le lecteur audio connecté prend en charge AVRCP commandé. (Audio Video Remote Control Profile). • "Reset 08" apparaît sur l'écran. Vérifiez - JVC KW ADV790 | Instructions - Page 203
de la batterie. Mettez hors service l'égaliseur sur cet appareil ou sur iPod. Vérifiez la connexion. Le casque iPod. • Mettez l'appareil vidéo sous tension s'il ne l'est pas déjà. • Connectez le périphérique vidéo correctement. Ajustez les réglages dans le menu . (☞ page 48) iPod - JVC KW ADV790 | Instructions - Page 204
(pleine échelle) 1 kΩ NTSC 1 Vp-p/75 Ω Entrée LINE IN, VIDEO IN, AEntrée d'antenne VIDEO OUT Changeur de CD, OE REMOTE, Signal de marche arrière, DIGITAL OUT (optique) 87,5 MHz à 107,9 optique sans contact (laser semi-conducteur) Réponse en fréquence: DVD, fs=48 kHz/96 kHz: 16 Hz à 22 000 Hz - JVC KW ADV790 | Instructions - Page 205
Matrice active TFT (transistor à couches minces) Standard de couleur: NTSC/PAL Format d'image 16:9 (large) Alimentation: Tension de fonctionnement: CC 14,4 admissibles: 0°C à +40°C (32°F à 104°F) Dimensions (L × H × P) Taille d'installation (approx.): (avec la plaque de garniture et le - JVC KW ADV790 | Instructions - Page 206
Having TROUBLE with operation? Please reset your unit Refer to page of How to reset your unit Still having trouble?? USA ONLY Call 1-800-252-5722 http://www.jvc.com We can help you! EN, SP, FR © 2008 Victor Company of Japan, Limited 1207MNMMDWJEIN - JVC KW ADV790 | Instructions - Page 207
Instructions DVD RECEIVER WITH MONITOR KW-ADV790/KW-AVX710
-
 1
1 -
 2
2 -
 3
3 -
 4
4 -
 5
5 -
 6
6 -
 7
7 -
8
-
9
-
10
-
11
-
12
-
13
-
14
-
15
-
16
-
17
-
18
-
19
-
20
-
21
-
22
-
23
-
24
-
25
-
26
-
27
-
28
-
29
-
30
-
31
-
32
-
33
-
34
-
35
-
36
-
37
-
38
-
39
-
40
-
41
-
42
-
43
-
44
-
45
-
46
-
47
-
48
-
49
-
50
-
51
-
52
-
53
-
54
-
55
-
56
-
57
-
58
-
59
-
60
-
61
-
62
-
63
-
64
-
65
-
66
-
67
-
68
-
69
-
70
-
71
-
72
-
73
-
74
-
75
-
76
-
77
-
78
-
79
-
80
-
81
-
82
-
83
-
84
-
85
-
86
-
87
-
88
-
89
-
90
-
91
-
92
-
93
-
94
-
95
-
96
-
97
-
98
-
99
-
100
-
101
-
102
-
103
-
104
-
105
-
106
-
107
-
108
-
109
-
110
-
111
-
112
-
113
-
114
-
115
-
116
-
117
-
118
-
119
-
120
-
121
-
122
-
123
-
124
-
125
-
126
-
127
-
128
-
129
-
130
-
131
-
132
-
133
-
134
-
135
-
136
-
137
-
138
-
139
-
140
-
141
-
142
-
143
-
144
-
145
-
146
-
147
-
148
-
149
-
150
-
151
-
152
-
153
-
154
-
155
-
156
-
157
-
158
-
159
-
160
-
161
-
162
-
163
-
164
-
165
-
166
-
167
-
168
-
169
-
170
-
171
-
172
-
173
-
174
-
175
-
176
-
177
-
178
-
179
-
180
-
181
-
182
-
183
-
184
-
185
-
186
-
187
-
188
-
189
-
190
-
191
-
192
-
193
-
194
-
195
-
196
-
197
-
198
-
199
-
200
-
201
-
202
-
203
-
204
-
205
-
206
-
207
 |
 |
ENGLISH
ESPAÑOL
FRANÇAIS
For installation and connections, refer to the separate manual.
Para la instalación y las conexiones, refiérase al manual separado.
Pour l’installation et les raccordements, se référer au manuel séparé.
INSTRUCTIONS
MANUAL DE INSTRUCCIONES
MANUEL D’INSTRUCTIONS
For canceling the display demonstration, see page 8.
Para cancelar la demonstración en pantalla, consulte la página 8.
Pour annuler la démonstration des affichages, référez-vous à la page 8.
KW-ADV790
DVD RECEIVER WITH MONITOR
KW-AVX710
For customer Use:
Enter below the Model No.
and Serial No. which are
located on the top or bottom
of the cabinet. Retain this
information for future
reference.
Model No.
Serial No.
KW-ADV790
RECEPTOR DVD CON MONITOR
KW-AVX710
KW-ADV790
RÉCEPTEUR DVD ET MONITEUR
KW-AVX710
LVT1778-001A
[J]