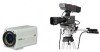
JVC KY-F560U KA-F5602U, KA-F5603U Studio kit for KY-F560U camera (47 page inst - Page 15
Mounting KY-F560 Camera on this Unit continued, Notes
 |
UPC - 046838326004
View all JVC KY-F560U manuals
Add to My Manuals
Save this manual to your list of manuals |
Page 15 highlights
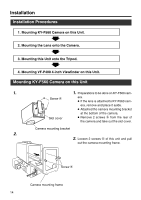
English Mounting KY-F560 Camera on this Unit (continued) 3. Mounting bracket Screw Ç 4. 5. Slot 3. Place the camera on top of the camera mounting frame and use the screw Ç provided to secure the camera to the base of the frame. Use the camera mounting bracket screw hole to secure the camera. 4. After the camera mounting frame is in- serted into this unit, secure it by screwing back the 2 screws ı which were taken out earlier in above-mentioned step 2.. Camera mounting frame Screw ı Relay board Notes ● Please remove the camera lens mount cap before hand. ● Before inserting the camera mounting frame into this unit, turn the lens secure lever located in front of the camera clockwise to move it to a lower position. If the lever remains at the upper position, it may hit this unit when the Lever frame is being inserted. Screw Ç 5. Insert this unit's relay board into the slot at the rear of the camera and secure it by screwing back the 2 screws Å which were taken out earlier in above-mentioned step 1.. Note Ensure that the relay board is inserted all the way in. 15
-
 1
1 -
2
-
3
-
4
-
5
-
6
-
7
-
8
-
9
-
 10
10 -
 11
11 -
 12
12 -
 13
13 -
 14
14 -
 15
15 -
 16
16 -
 17
17 -
 18
18 -
 19
19 -
 20
20 -
21
-
22
-
23
-
24
-
25
-
26
-
27
-
28
-
29
-
30
-
31
-
32
-
33
-
34
-
35
-
36
-
37
-
38
-
39
-
40
-
41
-
42
-
43
-
44
-
45
-
46
-
47
 |
 |
