Kenwood CMOS-220 Operation Manual
Kenwood CMOS-220 Manual
 |
View all Kenwood CMOS-220 manuals
Add to My Manuals
Save this manual to your list of manuals |
Kenwood CMOS-220 manual content summary:
- Kenwood CMOS-220 | Operation Manual - Page 1
CMOS-320 CMOS-220 UNIVERSAL MULTI-VIEW CAMERA/ UNIVERSAL REAR VIEW CAMERA INSTRUCTION MANUAL CAMÉRA MULTI-VUES you call upon your Kenwood dealer for information or service on the product. Model CMOS-320/CMOS-220 Serial number US Residence Only Register Online Register your Kenwood product at www. - Kenwood CMOS-220 | Operation Manual - Page 2
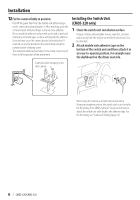
you could damage the unit. NOTE • A rear view camera is a camera that provides symmetrical images in the same way as rear and side view mirrors. • Connection to a TV with an order: ground, ignition and camera unit. 4 Install the unit in your car. 5 Reconnect the - battery. 2 | CMOS-320/CMOS-220 - Kenwood CMOS-220 | Operation Manual - Page 3
. • May result in the rear view camera falling off. - Do not apply water to the unit. - Do not expose the unit to rain. - Do not subject the camera to unnecessary force. - Thoroughly clean where tape is used for sticking on the unit. • Refer to the Instruction's manual for details on connecting the - Kenwood CMOS-220 | Operation Manual - Page 4
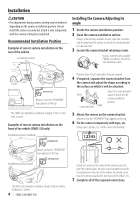
piece of tape, etc., fix the camera temporarily. 12345 Mount so that the "KENWOOD" logo appears at the top. Installation position (lower) The CMOS-320 should be installed at a height of 30cm to 80cm (0.98feet to 2.62feet). 4 | CMOS-320/CMOS-220 Install the camera at the center of the vehicle and - Kenwood CMOS-220 | Operation Manual - Page 5
read the instruction manual for your video monitor. When the camera is installed as a rearview camera: Change the shift lever to the R (Reverse) range to view the image of the rear of the vehicle. When the camera is installed as a front camera (CMOS-320 only): Refer to the instruction manual of the - Kenwood CMOS-220 | Operation Manual - Page 6
using the camera as a front camera and with a Kenwood navigation system, this switch unit is used only for the ID setting of the CMOS-320 unit. So you do not have to attach the switch unit with double-side adhesive tape. For the ID setting, see "Camera ID Setting"(page 13) 6 | CMOS-320/CMOS-220 - Kenwood CMOS-220 | Operation Manual - Page 7
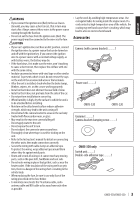
monitor (separately available) Camera Connect the camera to the camera connection cord. Camera's cord length: 1.5 m (4.92 feet), Power cord: 7.5 m (24.6 feet) Power cord Switch unit (CMOS-320 only): 1 m (3. terminal of the battery to prevent the short-circuiting incident. CMOS-320/CMOS-220 | 7 - Kenwood CMOS-220 | Operation Manual - Page 8
) Connect to the camera control terminals of the control unit. CAM+ (Green/red) CAM- (Green/white) Camera 2 (Used as front view camera) Power cord Connect to the external video input. Select the external video input to check the camera image. Video cord To power supply 8 | CMOS-320/CMOS-220 - Kenwood CMOS-220 | Operation Manual - Page 9
brake pedal so that the vehicle is completely stationary. Perform the setting in a place that will not cause nuisance to other people. 3 Set the camera. Adjust the "Overhead View Image Adjustment" (page 10, 11) so that the parking line is displayed vertically in the center. CMOS-320/CMOS-220 | 9 - Kenwood CMOS-220 | Operation Manual - Page 10
Camera Setting (CMOS-320 only) Camera Setting Procedure 1 Complete all of the required connections in advance. 2 Display the camera video. For displaying the camera video, read the instruction manual for your video monitor. 3 Press and hold the view and + buttons of the switch unit simultaneously - Kenwood CMOS-220 | Operation Manual - Page 11
is possible by one step up and down. If the adjustment is not possible in the currently available range, change the camera position before retrying. 3 After completing the adjustment, press the view button. 4 Select [Next]. Advances to "GUIDELINE ADJUSTMENT (Size)". CMOS-320/CMOS-220 | 11 - Kenwood CMOS-220 | Operation Manual - Page 12
size of guidelines displayed in the wide view. 1 Select "GUIDELINE ADJUSTMENT (Size)". 2 Press the + or - button of the switch unit to adjust the size. 3 After completing the adjustment, press the view button. Advances to "GUIDELINE ADJUSTMENT (Red Line Position Setting)". 12 | CMOS-320/CMOS-220 - Kenwood CMOS-220 | Operation Manual - Page 13
switch unit to select [Finish] and press the view button. 6 Turn off the ACC. 7 Disconnect the switch unit. 8 Connect CAM+/CAM- to the Kenwood car navigation system. 9 Turn on the ACC. 1 Press the + or - button of the switch unit to select [Finish] and press the view button. CMOS-320/CMOS-220 | 13 - Kenwood CMOS-220 | Operation Manual - Page 14
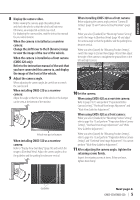
screen (page 8). Overhead View Image seen from the viewpoint straight up above the vehicle. Depending on the camera installation position, the Overhead View image may not be displayed correctly. • Overhead View may appear twice, depending on the connected navigation system. 14 | CMOS-320/CMOS-220 - Kenwood CMOS-220 | Operation Manual - Page 15
Camera Unit (CMOS-220) Output video : Wide-angle mirror image (for rearview) Sensor: 1/3.6-inch color CMOS sensor Number of pixels: Approx. 330,000 pixels Lens : Wide angle, Focal length f=1.12 mm, F value 2.2 Angles of view consumption (CMOS-320): 100 mA Max. current consumption (CMOS-220): 50 mA - Kenwood CMOS-220 | Operation Manual - Page 16
ra ou bien celle-ci risquerait de tomber. • Vérifiez le support de montage de la caméra avant de conduire. Les vis sont-elles desserrées ? - Le support de la caméra est-il bien fixé ? - Si la et caméra. 4 Installez l'appareil dans votre voiture. 5 Reconnectez la batterie -. 16 | CMOS-320/CMOS-220 - Kenwood CMOS-220 | Operation Manual - Page 17
électrique. Accessoires Caméra (avec support de montage) ..........1 Cordon d'alimentation ..........1 CMOS-320 CMOS-220 Rondelle ..........1 Vis de serrage du support de la caméra..........1 CMOS-320 uniquement Commutateur..........1 Ruban adhésif double-face..........1 CMOS-320/CMOS-220 | 17 - Kenwood CMOS-220 | Operation Manual - Page 18
l'avant du véhicule (CMOS-320 uniquement) Position d'installation (standard) Le montage doit être effectué avec le logo "KENWOOD" vers le haut. Position d'installation (abaissée) Le cas échéant, suivez les instructions des étapes 4 et 5. 4 Si cela est nécessaire, détachez le support de la caméra et - Kenwood CMOS-220 | Operation Manual - Page 19
de la caméra, veillez à ne pas tirer sur le câble de la caméra. En cas d'installation du CMOS-220 en tant que caméra de vue arrière : Réglez l'angle de sorte que l'arrière du véhicule ou l'image vue de dessus» et «Réglage des lignes de guidage grand angle». Page suivante 3 CMOS-320/CMOS-220 | 19 - Kenwood CMOS-220 | Operation Manual - Page 20
système de navigation Kenwood, ce commutateur sert uniquement au réglage d'ID de l'appareil CMOS-320. Ainsi, il est inutile de fixer le commutateur avec de l'adhésif double face. Pour le réglage d'ID, reportez-vous à la section «Réglage de l'ID de la caméra» (page 27). ɹɹɹ 20 | CMOS-320/CMOS-220 - Kenwood CMOS-220 | Operation Manual - Page 21
éra : 1,5 m (4,92 pieds), Cordon d'alimentation: 7,5 m (24,6 pieds) Cordon d'alimentation Commutateur (CMOS-320 uniquement) 1 m (3,28 pieds) CAM+ (vert/rouge) CAM- (vert/blanc) Clé de contact Fusible débranchez la borne (-) de la batterie pour éviter tout court-circuit. CMOS-320/CMOS-220 | 21 - Kenwood CMOS-220 | Operation Manual - Page 22
Raccordement du système (CMOS-320 uniquement) • Lorsque vous connectez la caméra à un système de navigation Kenwood, par exemple, (unité de contrôle) équipé de la fonction de externe pour vérifier l'image transmise par la caméra. Cordon vidéo À la source d'alimentation 22 | CMOS-320/CMOS-220 - Kenwood CMOS-220 | Operation Manual - Page 23
FRANÇAIS Réglage de la caméra (CMOS-320 uniquement) Fonctionnement du commutateur Le commutateur peut être utilisé pour modifier le mode d'affichage des images, afficher/ vue de dessus» (page 24, 25), afin que la ligne de place de parking s'affiche verticalement au centre. CMOS-320/CMOS-220 | 23 - Kenwood CMOS-220 | Operation Manual - Page 24
de la caméra. 1 Sélectionnez "OVERHEAD VIEW IMAGE ADJUSTMENT (CENTERING)". 2 Appuyez sur le bouton + ou - du commutateur pour que les deux lignes blanches s'affichent à l'emplacement correspondant à la ligne centrale du véhicule. 24 | CMOS-320/CMOS-220 Pour faire le réglage, décalez les lignes - Kenwood CMOS-220 | Operation Manual - Page 25
ès avoir effectué tous les réglages nécessaires, appuyez sur le bouton Vue. Passe au "OVERHEAD VIEW IMAGE ADJUSTMENT (Right-and-Left ANGLE)". Réglage de l'image vue de dessus (angle haut et bas sur le bouton Vue. Passe au "OVERHEAD VIEW IMAGE ADJUSTMENT (Up-and-Down ANGLE)". CMOS-320/CMOS-220 | 25 - Kenwood CMOS-220 | Operation Manual - Page 26
Réglage de la caméra (CMOS-320 uniquement) Réglages des lignes de guidage • Les réglages suivants permettent de configurer la que ligne de repère pour la position de stationnement du véhicule. 1 Sélectionnez "WIDE VIEW GUIDELINE ADJUSTMENT (Red Line Position Setting)". 26 | CMOS-320/CMOS-220 - Kenwood CMOS-220 | Operation Manual - Page 27
d'un CMOS-320 en tant que caméra avant à un système de navigation Kenwood équipé de la fonction de commande de caméra, il est nécessaire d'affecter l'ID à [Front Camera] (Avant Branchez CAM+/CAM- au système de navigation Kenwood. 9 Remettez le contact sur la position ACC. CMOS-320/CMOS-220 | 27 - Kenwood CMOS-220 | Operation Manual - Page 28
angle Image couvrant un angle horizontal d'environ 135°. Lorsque vous connectez la caméra à un système de navigation Kenwood, par exemple, (unité de contrôle) équipé de la fonction de contrôle par caméra, utilisez le ître deux fois, selon le système de navigation connecté. 28 | CMOS-320/CMOS-220 - Kenwood CMOS-220 | Operation Manual - Page 29
x 32,8 x 12 mm Poids :Approx. 10 g (sans le câble) Généralités Tension de fonctionnement : 14,4 V (9.0 V - 16.0 V) Consommation électrique max. (CMOS-320) : 100 mA Consommation électrique max. (CMOS-220) : 50 mA • Une image inverse est une image vidéo dans laquelle la gauche et la droite sont invers - Kenwood CMOS-220 | Operation Manual - Page 30
in der folgenden Reihenfolge an: Masse, Zündung und Kamera. 4 Bauen Sie das Gerät in Ihr Fahrzeug ein. 5 Schließen Sie die --Batterie wieder an. 30 | CMOS-320/CMOS-220 - Kenwood CMOS-220 | Operation Manual - Page 31
Schlägen kommen. Zubehör Kamera (mit Kamerahalterung) ..........1 Stromversorgungskabel ..........1 CMOS-320 CMOS-220 Tülle ..........1 Klemmschraube für die Kamerahalterung ..........1 nur CMOS-320 Schalteinheit ..........1 Doppelseitiges Klebeband ..........1 CMOS-320/CMOS-220 | 31 DEUTSCH - Kenwood CMOS-220 | Operation Manual - Page 32
"KENWOOD" sich oben befindet. 6 Befestigen Sie die Kamera provisorisch mit Klebeband o.Ä. Befestigen Sie die Kamera provisorisch mit einem Stück Klebeband usw. 12345 Einbauposition (untere) Die CMOS-320 sollte in einer Höhe von 30 bis 80 cm eingebaut werden. 32 | CMOS-320/CMOS-220 Installieren - Kenwood CMOS-220 | Operation Manual - Page 33
Kamerawinkels darauf, dass das Kamerakabel nicht gespannt wird. Beim Installieren einer CMOS-220 als Rückfahrkamera: Stellen Sie den Winkel so ein, dass unten rechts gerade werden. 10 Stellen Sie die Kamera ein. Bei Benutzung einer CMOS-320 als Rückfahrkamera: Führen Sie wie auf den Seiten 37 bis 41 - Kenwood CMOS-220 | Operation Manual - Page 34
der CMOS-320-Einheit verwendet. Es ist daher nicht erforderlich, die Schalteinheit mit beidseitigem Klebeband zu befestigen.Näheres zur ID-Einstellung siehe „Camera ID Setting" (Einstellung der Kamera-ID) (Seite 41). ɹɹɹ Klemmschraube für die Kamerahalterung (M3 x 8 mm) 34 | CMOS-320/CMOS-220 - Kenwood CMOS-220 | Operation Manual - Page 35
Kameraanschlusskabel anschließen. Länge Kamerakabel: 1,5 m, Stromversorgungskabel: 7,5 m Stromversorgungskabel Schalteinheit (nur CMOS-320): 1 m CAM+ (grün/rot) CAM- (grün/weiß) DEUTSCH Sicherung (2 A) den Minuspol (-) von der Batterie ab, um Kurzschlüsse zu vermeiden. CMOS-320/CMOS-220 | 35 - Kenwood CMOS-220 | Operation Manual - Page 36
Systemverbindung (nur CMOS-320) • Verwenden Sie beim Anschließen der Kamera an ein Kenwood-Navigationssystem (Steuerungseinheit), das über die Kamerasteuerungsfunktion verfügt, das Sie den externen Video-Eingang zum Prüfen des Kamerabilds. Videokabel An Stromversorgung 36 | CMOS-320/CMOS-220 - Kenwood CMOS-220 | Operation Manual - Page 37
DEUTSCH Einstellung der Kamera (nur CMOS-320) Betrieb der Schalteinheit Die Schalteinheit dient zum Umschalten des Bildanzeigemodus, zum Anzeigen/Ausblenden der -Kopf-Ansicht" (Seite 38, 39) so ein, dass die Parkmarkierung vertikal in der Mitte angezeigt wird. CMOS-320/CMOS-220 | 37 - Kenwood CMOS-220 | Operation Manual - Page 38
Einstellung der Mitte der Kamera-Einbauposition. 1 Wählen Sie „OVERHEAD VIEW IMAGE ADJUSTMENT (CENTERING)" aus. 2 Drücken Sie die Plus- (+) oder Minustaste (-) der Schalteinheit, so dass die beiden weißen Linien an der Position erscheinen, die der Fahrzeugachse entspricht. 38 | CMOS-320/CMOS-220 - Kenwood CMOS-220 | Operation Manual - Page 39
3 Drücken Sie nach Beendigung der Einstellung die Ansichtstaste. Zum Wechseln zu „OVERHEAD VIEW IMAGE ADJUSTMENT (Right-and-Left ANGLE)". Bildeinstellung Über-Kopf-Ansicht (Horizontalwinkel) Diese möglich ist, ändern Sie die Kameraposition und wiederholen Sie den Vorgang. CMOS-320/CMOS-220 | 39 - Kenwood CMOS-220 | Operation Manual - Page 40
(Horizontal direction)" aus. 2 Drücken Sie die Plus- (+) oder Minustaste (-) der Schalteinheit zum Einstellen der horizontalen Positionierung. 40 | CMOS-320/CMOS-220 3 Drücken Sie nach Beendigung der Einstellung die Ansichtstaste. Zum Wechseln zu „GUIDELINE ADJUSTMENT (Red Line Position Setting)". - Kenwood CMOS-220 | Operation Manual - Page 41
Kamera-ID Bei Anschluss einer CMOS-320 als Frontkamera an ein Kenwood Navigationssystem mit Kamerasteuerfunktion muss die ID [Front Camera] zugewiesen werden. 1 Installieren ab. 8 Schließen Sie CAM+/CAM- an das Kenwood Auto-Navigationssystem an. 9 Schalten Sie ACC ein. CMOS-320/CMOS-220 | 41 - Kenwood CMOS-220 | Operation Manual - Page 42
135° erfasst. Verwenden Sie beim Anschließen der Kamera an ein Kenwood-Navigationssystem (Steuerungseinheit), das über die Kamerasteuerungsfunktion verfügt, das mitgelieferte angeschlossenem Navigationssystem kann die Über-Kopf-Ansicht eventuell zweimal erscheinen. 42 | CMOS-320/CMOS-220 - Kenwood CMOS-220 | Operation Manual - Page 43
27,5 x 32,8 x 12 mm Gewicht: Ca. 10 g (ohne Kabel) Allgemeine technische Daten Betriebsspannung: 14,4 V (9,0 V-16,0 V) Max. Stromverbrauch (CMOS-320): 100 mA Max. Stromverbrauch (CMOS-220): 50 mA • "Spiegelbild" bedeutet, dass auf dem Videobild genau wie im Rück- oder Seitenspiegel Links und Rechts - Kenwood CMOS-220 | Operation Manual - Page 44
tijdelijk de draden aan om te controleren of alles goed is bevestigd en of de camera en het systeem werken. 44 | CMOS-320/CMOS-220 • Bij het monteren van deze camera moet u ervoor zorgen dat er geen kabels tussen de camera en het omringende metaal of de aansluitingen bekneld raken. • Monteer de - Kenwood CMOS-220 | Operation Manual - Page 45
of gevaar van elektrische schokken. Accessoires Camera (met camerabeugel) ..........1 Voedingskabel..........1 CMOS-320 CMOS-220 Doorvoerrubber..........1 Klemschroef camerabeugel..........1 CMOS-320 uitsluitend Schakeleenheid..........1 Dubbelzijdig plakband ..........1 CMOS-320/CMOS-220 | 45 - Kenwood CMOS-220 | Operation Manual - Page 46
vast met plakband o.i.d. Inbouwpositie (onder) Monteer de camera dusdanig, dat het "KENWOOD"-logo aan de bovenkant zichtbaar is. 12345 De CMOS-320 moet worden geïnstalleerd op een hoogte van 30 tot 80 cm of meer. 46 | CMOS-320/CMOS-220 Installeer de camera in het midden van het voertuig en - Kenwood CMOS-220 | Operation Manual - Page 47
Als u [Standard] (Standaard) selecteert voor "Montagepositie instelling", raadpleeg dan pagina 51 tot 55 voor het uitvoeren van "Voorbereiding voor het instellen van de camera", "Beeldafstelling bovenaanzicht" en "Afstelling begeleidingslijn groothoekbeeld". Volgende pagina 3 CMOS-320/CMOS-220 | 47 - Kenwood CMOS-220 | Operation Manual - Page 48
deze schakeleenheid alleen gebruikt voor het instellen van de identificatie van de CMOS-320 unit. U hoeft de schakeleenheid dus niet met dubbelzijdig plakband vast te maken. Voor het instellen van de identificatie raadpleegt u "Camera-identificatie instellen" (pagina 55) 48 | CMOS-320/CMOS-220 - Kenwood CMOS-220 | Operation Manual - Page 49
afzonderlijk leverbaar) Camera Sluit de camera aan op het camera-aansluitsnoer. Lengte camerakabel: 1,5 m, voedingskabel: 7,5 m Voedingskabel Schakeleenheid (uitsluitend CMOS-320): 1 m gestoken en koppelt u de massakabel (-) los bij de accu om kortsluitingen te vermijden. CMOS-320/CMOS-220 | 49 - Kenwood CMOS-220 | Operation Manual - Page 50
uitsluitend CMOS-320) • Tijdens het aansluiten van de camera op een Kenwood- Camera 2 (gebruikt als vooruitcamera) Voedingskabel Aansluiten op de externe video-ingang. Selecteer de externe video-ingang om het camerabeeld te controleren. Videosnoer Naar de voeding 50 | CMOS-320/CMOS-220 - Kenwood CMOS-220 | Operation Manual - Page 51
rempedaal in zodat de auto volledig stilstaat. Voer de instelling uit op een plek waar dit geen overlast voor andere mensen vormt. 3 Stel de camera in. Stel de "Beeldafstelling bovenaanzicht"(pagina 52,53) zo in dat de parkeerlijn verticaal in het midden wordt weergegeven. CMOS-320/CMOS-220 | 51 - Kenwood CMOS-220 | Operation Manual - Page 52
van de inbouwpositie van de camera af. 1 Selecteer "OVERHEAD VIEW IMAGE ADJUSTMENT (CENTERING)". 2 Druk op de + of - toets van de schakeleenheid, tot de twee witte lijnen op de positie verschijnen die overeenkomt met de middenlijn van de auto. 52 | CMOS-320/CMOS-220 Afstelling is met twee stappen - Kenwood CMOS-220 | Operation Manual - Page 53
dit item stelt u de verticale hoek (nijging) van de inbouwpositie van de camera af. 1 Selecteer "OVERHEAD VIEW IMAGE ADJUSTMENT (Up-and-Down ANGLE)". 2 Druk op de + of - u op de weergavetoets. Hiermee gaat u verder naar "OVERHEAD VIEW IMAGE ADJUSTMENT (Up-and-Down ANGLE)". CMOS-320/CMOS-220 | 53 - Kenwood CMOS-220 | Operation Manual - Page 54
drie hieronder getoonde begeleidingslijnen weergegeven, ervan uitgaande dat de camera-installatiehoogte 80 cm is en dat de afstand tussen de in het groothoekbeeld worden weergegeven. 1 Selecteer "WIDE VIEW GUIDELINE ADJUSTMENT (Horizontal direction)". 2 Druk op de Setting)". 54 | CMOS-320/CMOS-220 - Kenwood CMOS-220 | Operation Manual - Page 55
van de camera voltooien 5 Na het instellen drukt u op de + of - toets van de schakeleenheid om [Finish] te selecteren en drukt u op de weergavetoets. 6 Zet ACC uit. 7 Maak de schakeleenheid los. 8 Sluit de CAM+/CAM- aan op het Kenwood autonavigatiesysteem. 9 Zet ACC aan. CMOS-320/CMOS-220 | 55 - Kenwood CMOS-220 | Operation Manual - Page 56
Beeld gezien vanuit een standpunt recht boven de auto. Afhankelijk van de inbouwpositie van de camera, is het mogelijk dat het overzichtsbeeld niet correct wordt weergegeven. • Bovenkant beeld kan twee keer verschijnen, afhankelijk van het aangesloten navigatiesysteem. 56 | CMOS-320/CMOS-220 - Kenwood CMOS-220 | Operation Manual - Page 57
zonder kabel) Camera-eenheidCMOS-220) Uitvoervideo : Gespiegeld groothoekbeeld (voor achteruitbeeld) Sensor:1/3,6"-kleuren-CMOS-sensor Aantal pixels 14,4 V (9,0 V - 16,0 V) Max. stroomverbruik (CMOS-320): 100 mA Max. stroomverbruik (CMOS-220): 20 mA • Gespiegeld beeld houdt in dat het videobeeld - Kenwood CMOS-220 | Operation Manual - Page 58
é se rapportant à la directive EMC 2004/108/EC Déclaration de conformité se rapportant à la directive RoHS 2011/65/EU Fabricant : JVC KENWOOD Corporation 3-12 Moriya-cho, Kanagawa-ku, Yokohama-shi, Kanagawa, 221-0022, Japan Représentants dans l'UE : JVCKENWOOD NEDERLAND B.V. Amsterdamseweg 37, 1422 - Kenwood CMOS-220 | Operation Manual - Page 59
radio frequency energy. Changes or modifications to this equipment may cause harmful interference unless the modifications are expressly approved in the instruction manual. The user could lose the authority to operate this equipment if an unauthorized change or modification is made. FCC NOTE This - Kenwood CMOS-220 | Operation Manual - Page 60
-
 1
1 -
 2
2 -
 3
3 -
 4
4 -
 5
5 -
 6
6 -
 7
7 -
8
-
9
-
10
-
11
-
12
-
13
-
14
-
15
-
16
-
17
-
18
-
19
-
20
-
21
-
22
-
23
-
24
-
25
-
26
-
27
-
28
-
29
-
30
-
31
-
32
-
33
-
34
-
35
-
36
-
37
-
38
-
39
-
40
-
41
-
42
-
43
-
44
-
45
-
46
-
47
-
48
-
49
-
50
-
51
-
52
-
53
-
54
-
55
-
56
-
57
-
58
-
59
-
60
 |
 |

CMOS-320
CMOS-220
UNIVERSAL MULTI-VIEW CAMERA/ UNIVERSAL REAR VIEW CAMERA
INSTRUCTION MANUAL
CAMÉRA MULTI-VUES UNIVERSELLE/ CAMÉRA DE RECUL UNIVERSELLE
MODE D’EMPLOI
UNIVERSAL MULTIVIEW-KAMERA/ UNIVERSAL RÜCKFAHRKAMERA
BEDIENUNGSANLEITUNG
UNIVERSELE MULTIVIEWCAMERA/ UNIVERSELE ACHTERUITRIJCAMERA
GEBRUIKSAANWIJZING
LYT2720-001A (W)
© 2014 JVC KENWOOD Corporation
Take the time to read through this instruction manual.
Familiarity with installation and operation procedures will help you obtain the best performance
from your new Universal Camera.
For your records
Record the serial number, found on the back of the unit, in the spaces designated on the warranty card,
and in the space provided
below. Refer to the model and serial numbers whenever you call upon your
Kenwood dealer for information or service on the product.
Model CMOS-320/CMOS-220 Serial number
US Residence Only
Register Online
Register your Kenwood product at
www.Kenwoodusa.com