Kenwood CMOS-220 Operation Manual - Page 6
Installing the Switch Unit, CMOS-320 only
 |
View all Kenwood CMOS-220 manuals
Add to My Manuals
Save this manual to your list of manuals |
Page 6 highlights
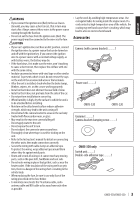
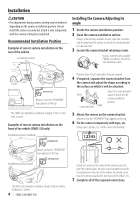
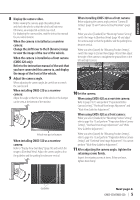
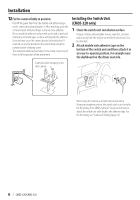
Installation 12 Fix the camera firmly in position. Peel off the paper liner from the double-side adhesive tape on the camera bracket and attach it. After attaching, push the camera bracket with your finger to ensure close adhesion. Do not touch the adhesive surface with your hand or peel and reattach an attached tape, as these will degrade the adhesive force and may cause the camera bracket to be detached. If required, secure the bracket on the vehicle body using the camera bracket clamping screw. The camera bracket has two holes for the screw. Select one of them to fit the position of the attachment. Camera bracket clamping screw (M3 x 8mm) Installing the Switch Unit (CMOS-320 only) 1 Clean the switch unit installation surface. Using a commercially available cleaner, wipe dirt, moisture and oil away from the surface on which the switch unit is to be attached. 2 Attach double-side adhesive tape on the bottom of the switch unit and then attach it in an easy-to-operate position, for example near the dashboard on the driver seat side. ɹɹɹ When using the camera as a front camera and with a Kenwood navigation system, this switch unit is used only for the ID setting of the CMOS-320 unit. So you do not have to attach the switch unit with double-side adhesive tape. For the ID setting, see "Camera ID Setting"(page 13) 6 | CMOS-320/CMOS-220
-
 1
1 -
 2
2 -
 3
3 -
 4
4 -
 5
5 -
 6
6 -
 7
7 -
 8
8 -
 9
9 -
 10
10 -
 11
11 -
 12
12 -
13
-
14
-
15
-
16
-
17
-
18
-
19
-
20
-
21
-
22
-
23
-
24
-
25
-
26
-
27
-
28
-
29
-
30
-
31
-
32
-
33
-
34
-
35
-
36
-
37
-
38
-
39
-
40
-
41
-
42
-
43
-
44
-
45
-
46
-
47
-
48
-
49
-
50
-
51
-
52
-
53
-
54
-
55
-
56
-
57
-
58
-
59
-
60
 |
 |
